At Amazon AWS ReInvent 2016 one of the cool new features that was released was Polly, an amazingly slick synthetic voice engine. At time of writing, Polly supports a total of 47 male & female voices spread across 24 languages.


From the moment I saw the demo I knew I could use this to generate on the fly audio for use on Twilio.

Using AWS Polly with Twilio will allow you to make use of multiple languages, dialects and pronunciation of words. For example the word “live” in the phrases “I live in Seattle” and “Live from New York.” Polly knows that this pair of homographs are spelled the same but are pronounced quite differently. (sic) .

In this example I’m going to be using AWS Polly, Twilio TwiML (the Twilio XML based markup language) and NodeJS to produce an app that will allow you to generate on demand MP3 files which can then be nested in TwiML <Play> verbs.

Phase One: Get started by setting up the credentials needed by Polly

  1. Login to your AWS account
  2. Navigate to “Identity and Access Management”
  3. Create a new use that has programatic access (this will generate keys and a key secret).
  4. Attach the user to “AmazonPollyFullAccess” policy and finish the account creation steps.

Phase Two: Create a new NodeJS project

  1. In terminal navigate to where you keep your projects and create a new directory
    mkdir nodeJSPollyTwiML && cd nodeJSPollyTwiML
  2. Inside the directory initialise node using
    npm init
  3. The initialise script will ask you some basic questions about the application; name, keywords etc. I will leave this up to you.

Once the initialise script has finished we can install the required modules needed by NodeJS to run our application.

npm install --save aws-config aws-sdk body-parser express forms

This will install the required modules needed to build and run this app.
Now we can begin to build out this application.
Call up your favourite text editor – mine currently is Atom, which is made by the GitHub team.

Atom Screenshot

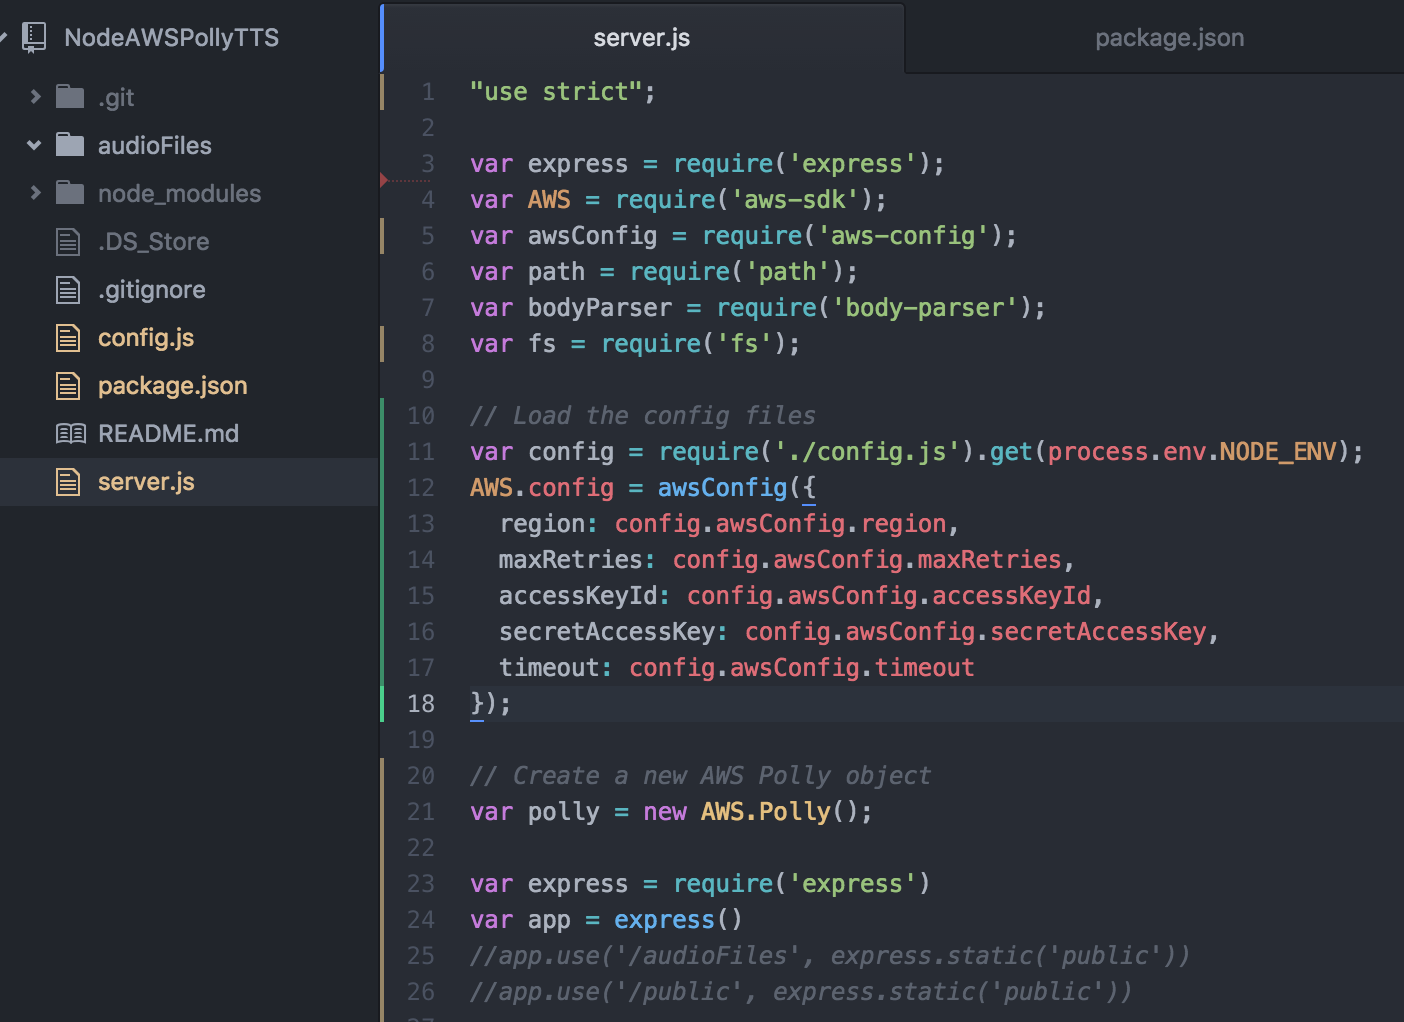
Atom allows you to keep a project directory on the left for easy navigation as well as colour coding all the files based on their git state.

The structure of the app is going to be:

├── server.js
|   ├── config.js
├── audioFiles
  • server.js will be responsible for all the application processing
  • config.js will be where the system configuration files will be stored
  • audioFiles will house the saved audio records.

Before we can write any server code we need somewhere to store our AWS credentials. Create a new file called config.js, add to this file:

var config = {
production: {
serverAddress: "https://production.domain.com",
port: 3005,
awsConfig: {
region: 'us-east-1',
maxRetries: 3,
accessKeyId: 'this is top secret',
secretAccessKey: 'this is bottom secret',
timeout: 15000
}
},
default: {
serverAddress: "https://test.domain.com",
port: 3000,
awsConfig: {
region: 'us-east-1',
maxRetries: 3,
accessKeyId: 'this is top secret test',
secretAccessKey: 'this is bottom secret test',
timeout: 15000
}
}
}

exports.get = function get(env) {
return config[env] || config.default;
}

In the configuration page we have broken out the settings into two parts; one for production systems and one for test systems (default in this case). As we are still building this app I will be working from the test environment.

Using Module exports we can now call the config file into server.js and load the credentials when we need them!

Open server.js file and load the modules needed, this should be the same as what was in package.json after npm install had completed.

To server.js we are going to add:

"use strict";

var express = require('express');
var AWS = require('aws-sdk');
var awsConfig = require('aws-config');
var path = require('path');
var bodyParser = require('body-parser');
var fs = require('fs');

// Load the config files
var config = require('./config.js').get(process.env.NODE_ENV);
AWS.config = awsConfig({
region: config.awsConfig.region,
maxRetries: config.awsConfig.maxRetries,
accessKeyId: config.awsConfig.accessKeyId,
secretAccessKey: config.awsConfig.secretAccessKey,
timeout: config.awsConfig.timeout
});

// Create a new AWS Polly object
var polly = new AWS.Polly();

var express = require('express')
var app = express()

Here we have defined that the app is to use ‘strict mode‘ when processing.

Then the script loaded all the modules and imported the configuration file.

To make use of AWS Polly a polly object is created you will see this referenced later.

Lastly an express object is created, this object will be used to handle the HTTP requests to the app.


Application Logic

While this application doesn’t have a lot of moving parts its important to understand whats going on.

When a HTTP Request comes in, express will route the task to a function that will engage with Polly, transmit the text and desired voice.

When Polly completes the task it will return the audio file as a data stream which is saved to disk.

Once the file has been saved to disk it can then be sent as part of the HTTP Response.

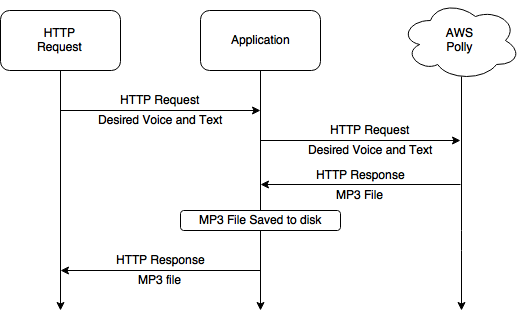
The diagram illustrates the lifecycle.

For the inbound HTTP request URL, Im going to define the structure as

/play/Carla/Hi%20Mathew.%20this%20is%20Carla%20from%20Amazon%20Web%20services.

Breaking this down, the path is comprised of ‘play‘ this refers to the Twilio Verb Play, if the application were to be built out further you could use other verbs or commands to define other paths, e.g. /host/ could generate the audio file but return the URL path of the audio file, letting the application host the file.

Next ‘Carla‘ refers to the Polly voice we want to use, as mentioned before AWS polly has a total of 47 male & female voices. Each of these voices has a name so its easy to reference which voice you want to use by calling that name.

The last part: ‘Hi%20Mathew.%20this%20is%20Carla%20from%20Amazon%20Web%20services.‘ Is the message that needs to be converted into speech. To ensure that the message is transmitted correctly you will need to URL encode the string, this converts spaces into %20, you can find more details on URL encoding here.

Add the following to server.js

// Generate an Audiofile and serve stright back to the user for use as a file stright away
app.get('/play/:voiceId/:textToConvert', function (req, res) {
var pollyCallback = function (err, data) {
if (err) console.log(err, err.stack); // an error occurred
else console.log(data); // successful response

// Generate a unique name for this audio file, the file name is: PollyVoiceTimeStamp.mp3
var filename = req.params.voiceId + (new Date).getTime() + ".mp3";
fs.writeFile('./audioFiles/'+filename, data.AudioStream, function (err) {
if (err) {
console.log('An error occurred while writing the file.');
console.log(err);
}
console.log('Finished writing the file to the filesystem ' + '/audioFiles/'+filename)

// Send the audio file
res.setHeader('content-type', 'audio/mpeg');
res.download('audioFiles/'+filename);
});
};

var pollyParameters = {
OutputFormat: 'mp3',
Text: unescape(req.params.textToConvert),
VoiceId: req.params.voiceId
};

// Make a request to AWS Polly with the text and voice needed, when the request is completed push callback to pollyCallback
polly.synthesizeSpeech(pollyParameters, pollyCallback);
})

Lets break down what this function does.

First

app.get('/play/:voiceId/:textToConvert', function (req, res) {

When a HTTP GET requests comes in that starts /play/ this function will be called. Next voiceID is the variable for the the Polly voice requested, and textToConvert the URL encoded text that needs to be converted.

To make the request to AWS Polly, the pollyParameters object needs to be populated, this consists of the chosen voice and the text to convert. MP3 has been fixed in this example.

Now the application is ready to call Polly,

polly.synthesizeSpeech(pollyParameters, pollyCallback);

here the app passes the parameters as well as a callback that will be invoked when the job is finished.

Once Polly has finished generating the audio file it will run the callback and (if successful) pass back the audio file.

The callback pollyCallback is now responsible for a two things; saving the file to disk and passing the file back to the users request.

var filename = req.params.voiceId + (new Date).getTime() + ".mp3";
fs.writeFile('./audioFiles/'+filename, data.AudioStream, function (err) {

To make sure we dont overwrite another audio file I’m using epoc timestamps to define a unique file name combined with the Polly voice used.

At the end of the callback, it will pass back to the user the audio file and a MP3 header

res.setHeader('content-type', 'audio/mpeg');
res.download('audioFiles/'+filename);

Awesome! Now we have an API that can generate synthesised speech using AWS Polly from text provided inbound.
If you build and run the application, putting in

/play/Carla/Hello%20reader.%20Thank%20you%20for%20taking%20the%20time%20to%20read%20this%20blog%20post%20and%20build%20the%20tutorial.%20I%20Hope%20it%20has%20been%20helpful%20for%20you.

You will get a MP3 file passed back in your browser!


Phase Three: Twilio Play

Now we have a HTTP addressable endpoint we can integrate our audio files into Twilio’s TwiML,  when Twilio makes a request to your Twilio application for TwiML you can now integrate this application into <Play> verbs. An example is:

<Response><Play>http://your.app.domain/play/Joanna/Wow.%20I%20have%20integrated%20Amazon%20Polly%20into%20my%20Twilio%20application.%20Now%20I%20can%20generate%20natural%20voices%20with%20custom%20text%20exactly%20when%20needed.%20This%20is%20amazing.</Play></Response>

When you compile your TwiML you will need to make sure that the text to speak has been url-encoded, otherwise Twilio will fail the TwiML for not being compliant.
GitHubhttps://github.com/dotmat/nodeJSPollyTwiML

Conclusion:

Integrating AWS Polly into your Twilio apps is now fast and easy. With a HTTP request you can request a desired voice convert text into an audio file which can be used with Twilio to play back to a caller / customer.

Betterments:

  1. At present time, the application is unsecured, anyone with access to your app / domain could quickly start using polly to increase your AWS spend. While Polly is very cheap ($0.000004 per character, or about $0.004 per minute of generated audio) its still something that should be addressed. I would recommend implementing some kind of auth that can check against known users database (Basic Auth for example)
  2. For common messages that you might use over and over its pointless to keep generating this for one time use, if you had a prebuilt database of common messages that your application uses, you could reference these from the API. In the GitHub repo I expanded the code to allow you to pull audio files by calling the MP3 file name.
  3. The app currently does no house keeping of audio files, each time you make a request to Polly it will generate an audio file. A good tool next would be something that deletes audio files over than a X days or weeks.

I hope this tutorial has been helpful, please reach out if you have any issues or questions!

Over the last few months I’ve been speaking to a lot of customers (of Twilio), who need to be able to break down the spend of minutes spread over the countries that they call.

An example here would be:

ISO Country Code Minutes Used Total Price Number Of Calls
US 34 55.23 29


Thinking about how to solve this issue, I thought the best way to do it was to put the power into a script that you can download and run yourself.

You can find the script at: https://github.com/dotmat/TwilioCountryMonthlyReport

You will need to install Twilio helper library by running:

pip install Twilio

Once you have the helper library installed you need to edit the ‘CountryReportGenerator.py’ file to include your AccountSID and AuthKey as well as the dates you want to examine.

  • Keep in mind that the larger date range you select the longer the script will take to run.

From your terminal you can now run:

python3 ./CountryReportGenerator.py

The script will generate three reports for you.

  1. A CSV file showing containing the log of calls made in the date period. The CSV headers are: CallSID, CountryCode, NumberCalled, CallPrice, CallDuration
  2. A CSV file, this CSV file is the outcome of   and outputs: Country, MinutesUsed, TotalPrice, NumberOfCalls
  3. A JSON feed of the data so that you can use this in any server scripts you have running

Please let me know if you have any questions or issues.

TL:DR: Python3 Script that examines a date range to work out what countries have been called and in what frequency.

Unused number hunter is Pyton based script to help you release (and save some $$$’s) on unused numbers that may be sitting in your Twilio account.
If you are in the habbit of buying Twlio numbers, using them for a project and then not relasing them this script will be the tool for you.

How to use:

  • Download the python script to a directory
  • Ensure you have the Twilio Python helper library installed, you can find this at: https://github.com/twilio/twilio-python
  • Edit the Accountsid, Authkey and number of call records you want to examine, saving the script.
  • Run: python /directory/NumberHunter.py

What will happen:

  • NumberHunter will grab all the phone numbers from your Twilio account, storing the numbers in a txt file called: TwilioNumbersInAccount.txt
  • NumberHunter will grab a copy of the call records up to the number (default is 100) you want to examine. (Saved in TwilioCallLog.txt)
  • NumberHunter will compare numbers in your call log against your Twilio numbers
  • NumberHunter will save a copy of your unused numbers in a file called unusedTwilioNumbers.txt
  • NumberHunter will ask you if you want to release these numbers – If you select Y it WILL REMOVE these numbers from your account immediately.

GitHub link: https://github.com/dotmat/TwilioPythonUnusedNumberHunter
Happy Hunting!

TL:DR : Python based script to search your account for unused numbers and release them.

In my last post: http://www.mathewjenkinson.co.uk/twilio-sms-conversations-using-cookies/ I used HTTP Cookies to ask multiple questions to a handset. This got me thinking, what if I could use that conversation to generate a lead in Salesforce.

For example, your at an event, ‘CloudForce’ for example 😉 and you want to ask your guests about the experience they are having as well as capture the guests phone number in a lead campaign in Salesforce ready to pick up with the lead after the event. This gives you instant feedback on how people are enjoying the event, an incoming lead stream and verified phone numbers from potential customers.

In this post, Im going to build on using Twilio cookies to populate a lead campaign in Salesforce. To initiate this setup, I want to get the interested lead to message a keyword “CloudForceEU” for example. Once the initial message comes in, I want to ask 4 questions to the lead and then pass the captured data to our Salesforce instance.

To replicate this setup you will need:

  • An account with Twilio (https://www.twilio.com/try-twilio)
  • A SMS capable number within your Account Portal.
  • A Salesforce instance where you can add custom lead fields and use Web2Lead Form generator
  • A PHP based server to host the script found on my Github.  – If your savy you can make your own in another language such as Ruby or Python 🙂

Setting up Salesforce

To begin we need to add 4 custom fields to our salesforce lead’s panel. As I am choosing to ask 4 questions to our potential lead I want to capture this information so I can get an overall feel for the event as well as capturing info about our potential lead.

To add a custom field in Salesforce go to : salesforce.com/p/setup/layout/LayoutFieldList?type=Lead&setupid=LeadFields

or:  Setup > Leads > Fields and scroll to the bottom for ‘Custom Fields’ It should look something like:

Leads Generation SalesForce

Leads Generation SalesForce

Here we want the button marked ‘New’. Following the steps, we want a new text box of no more than 150 (This is WAY more than we need as we are only gathering simple responses). Fill in the details for the new field and then continue along. I tend to add the details of the question in the description so that I know what Question1 relates to. Continue this until you have all your question fields added.

Now we are going to build our Web2Lead form and capture the ID’s needed for our SMS Script.

Navigate to: Customize > Leads > Web-To-Lead

Remove all the initial fields from the box marked ‘Selected Fields’ and then import:

  • PhoneNumber
  • Campaign
  • Question1
  • Question2
  • Question3
  • Question4

You could add first name to this setup but you would need add a name collection to the SMS conversation, while its easy to do. Its not something I will be doing in this setup.

In the end your setup should look something like:

SF Web2Lead

SF Web2Lead

Then click generate. Salesforce will spit you out some code that you could use in a webform but we are going to grab the details of this code and use it in our SMS lead tracker. The code will look something like:


<!– ———————————————————————- –>
<!– NOTE: Please add the following <META> element to your page <HEAD>. –>
<!– If necessary, please modify the charset parameter to specify the –>
<!– character set of your HTML page. –>
<!– ———————————————————————- –>

<META HTTP-EQUIV=”Content-type” CONTENT=”text/html; charset=UTF-8″>

<!– ———————————————————————- –>
<!– NOTE: Please add the following <FORM> element to your page. –>
<!– ———————————————————————- –>

<form action=”https://www.salesforce.com/servlet/servlet.WebToLead?encoding=UTF-8″ method=”POST”>

<input type=hidden name=”oid” value=”ABC123″>
<input type=hidden name=”retURL” value=”http://”>

<!– ———————————————————————- –>
<!– NOTE: These fields are optional debugging elements. Please uncomment –>
<!– these lines if you wish to test in debug mode. –>
<!– <input type=”hidden” name=”debug” value=1> –>
<!– <input type=”hidden” name=”debugEmail” –>
<!– value=”[email protected]”> –>
<!– ———————————————————————- –>

<label for=”phone”>Phone</label><input id=”phone” maxlength=”40″ name=”phone” size=”20″ type=”text” /><br>

<label for=”Campaign_ID”>Campaign</label><select id=”Campaign_ID” name=”Campaign_ID”><option value=””>–None–</option></select><br>

Question1:<input id=”Question1″ maxlength=”174″ name=”Question1″ size=”20″ type=”text” /><br>

Question2:<input id=”Question2″ maxlength=”174″ name=”Question2″ size=”20″ type=”text” /><br>

Question3:<input id=”Question3″ maxlength=”174″ name=”Question3″ size=”20″ type=”text” /><br>

Question4:<input id=”Question4″ maxlength=”174″ name=”Question4″ size=”20″ type=”text” /><br>

<input type=”submit” name=”submit”>

</form>


As you can see its quite comprehensive, what we need from this code snippet; is the form URL, formID and then the ID’s for our phone number, campaign and questions. From the script above we get

  • URL Endpoint: ‘https://www.salesforce.com/servlet/servlet.WebToLead?encoding=UTF-8’
  • FormID: ‘ABC123’
  • Phone Number: ‘phone’
  • Campaign ID : ‘Campaign_ID’
  • Question 1 : ‘Question1’
  • Question 2 : ‘Question2’
  • Question 3 : ‘Question3’
  • Question 4 : ‘Question4’

This is the data we need to plug into our SMS cookie script.

At the end of the Twilio SMS conversation, the script will bundle up the details of the conversation and HTTPS POST to the salesforce URL.

Using Twilio cookies to mange the SMS Conversation

In the last post: http://www.mathewjenkinson.co.uk/twilio-sms-conversations-using-cookies/ I used HTTP Cookies to ask multiple questions to a handset. Now we are going to do the same thing, except at the end of this conversation we are going to post the data to Salesforce. You can find a copy of the script on my Github Twilio 2 SalesforceLeads.

The full script Im going to use is:

<?php
// Load the questions we want:
$question1 = ‘Hello. Welcome to the event! We would like to ask you some questions about your experience.</Message><Message>What did you think of the venue & refreshments? 5 (Exceptional) 0 (Poor)’; // by adding the </Message><Message> you can break up the initial response into a welcome message and then question1.
$question2 = ‘And the content of the Presentations? 5 (Exceptional) 0 (Poor)’;
$question3 = ‘How likely are you to attend future Twilio events from 5 (Definitely would) to 0 (definitely would not)’;
$question4 = ‘Is there anything specific you would like to discuss with Twilio? 5 (Yes, please asks someone to call) 0 (I’ll contact you if I need anything)’;
// After we have all 4 questions we can upload to the DB and thank the user for their input
$endStatement = ‘Thanks for your time. Hope you have a fun day!’;

// If we have no cookies we need to set all the cookies to nil and ask the opening question.
if(!isset($_COOKIE[‘question1’])) {
$TwiMLResponse = $question1;
//setcookie(‘question1’, ‘nil’);
setcookie(‘event’, $_POST[‘Body’]);
setcookie(‘question1’, ‘nil’);
setcookie(‘question2’, ‘nil’);
setcookie(‘question3’, ‘nil’);
setcookie(‘question4’, ‘nil’);
}
// If Question 1 is blank we can pair the answer to question 1
elseif ($_COOKIE[‘question1’] == ‘nil’) {
setcookie(‘question1’, $_POST[‘Body’]);
$TwiMLResponse = $question2;
}
// If Question 1 is not blank we find out if question 2 is blank and move up the ladder
elseif (($_COOKIE[‘question2’] == ‘nil’)) {
setcookie(‘question2’, $_POST[‘Body’]);
$TwiMLResponse = $question3;
}
elseif (($_COOKIE[‘question3’] == ‘nil’)) {
setcookie(‘question3’, $_POST[‘Body’]);
$TwiMLResponse = $question4;
}
// After we get the response for question 4, we can assign it to the question.
// Now we have all 4 questions answered and can pass the thank you note and also make a HTTP POST to our end point
elseif (($_COOKIE[‘question4’] == ‘nil’)) {
// With the last question answered, we can reply with our end statement and POST all the data from the conversation.
$TwiMLResponse = $endStatement;
// So now we have the cookies for the event and questions 1 to 3 and the BODY tag for answer 4. Now we can make a POST request to our form with that data.

// Get cURL resource
$curl = curl_init();
// Set some options – we are passing in a useragent too here
curl_setopt_array($curl, array(
CURLOPT_RETURNTRANSFER => 1,
CURLOPT_URL => ‘https://www.salesforce.com/servlet/servlet.WebToLead?encoding=UTF-8’,
CURLOPT_USERAGENT => ‘TwilioSMS’,
CURLOPT_POST => 1,
// POST fields for salesforce input:
CURLOPT_POSTFIELDS => array(‘oid’ => ‘ABC123’, ‘phone’ => $_POST[‘From’], ‘Campaign_ID’ => $_COOKIE[‘event’], ‘Question1’ => $_COOKIE[‘question1’], ‘Question2’ => $_COOKIE[‘question2’], ‘Question3’ => $_COOKIE[‘question3’], ‘Question4’ => $_POST[‘Body’])

));
// Send the request & save response to $resp
$resp = curl_exec($curl);
// Close request to clear up some resources
curl_close($curl);
}
header(‘content-type: text/xml’);
?>
<Response><Message><?php echo $TwiMLResponse; ?></Message></Response>

As you can see Im only use one script to manage the conversation, updating the cookies and working out where the data needs to be updated to and eventually POSTed too. As we are capturing questions about our SalesForceEU event Im going to need 4 questions:

$question1 = ‘Hello. Welcome to the event! We would like to ask you some questions about your experience.</Message><Message>What did you think of the venue & refreshments? 5 (Exceptional) 0 (Poor)’; // by adding the </Message><Message> you can break up the initial response into a welcome message and then question1.
$question2 = ‘And the content of the Presentations? 5 (Exceptional) 0 (Poor)’;
$question3 = ‘How likely are you to attend future Twilio events from 5 (Definitely would) to 0 (definitely would not)’;
$question4 = ‘Is there anything specific you would like to discuss with Twilio? 5 (Yes, please asks someone to call) 0 (I’ll contact you if I need anything)’;

As the script gets more replies from Twilio it populates the questions cookies until they are all full of data. Then we thank the user for their time, assemble the POST request and send it off to SalesForce.

CURLOPT_RETURNTRANSFER => 1,
CURLOPT_URL => ‘https://www.salesforce.com/servlet/servlet.WebToLead?encoding=UTF-8’,
CURLOPT_USERAGENT => ‘TwilioSMS’,
CURLOPT_POST => 1,
// POST fields for salesforce input:
CURLOPT_POSTFIELDS => array(‘oid’ => ‘ABC123’, ‘phone’ => $_POST[‘From’], ‘Campaign_ID’ => $_COOKIE[‘event’], ‘Question1’ => $_COOKIE[‘question1’], ‘Question2’ => $_COOKIE[‘question2’], ‘Question3’ => $_COOKIE[‘question3’], ‘Question4’ => $_POST[‘Body’])

If we run a test between my phone and Salesforce we get:

Twilio2SalesForceSMS

Twilio2SalesForceSMS


and in SalesForce:

SalesForce Leed Capture from SMS

SalesForce Leed Capture from SMS


As you can see this opens up lots of possibilities of lead capture and accurate number sourcing from events. You can even have a campaign manager back at HQ reaching back out to leads while they are still at the event.


When I talk to people about using Twilio (Twilio.com) SMS to engage with their customers I get a lot of push back on the technical side of how to manage a two way conversation.

If you think back to the old days before iPhones and threaded messages. We had whats now called ‘Nokia’ style messages. This is just a continuous list of messages that arrive into your mailbox, messages between two handsets were not threaded or connected in anyway. Twilio operates in the same fashion, a message out to a handset is not connected to a message in from a handset, there is no ID that links them and no function to make parent child relationships.

Step in Twilio Cookies. In the internet world you can use cookies to track a clients events and navigation throughout your website, you can use it to log if a customer viewed a product or read an article and then clicked on a related one. A visual example :

Cookies Example

Cookies Example (Taken from Twilio.com)

Using Cookies with Twilio we can imitate a conversation with the handset / end user, collecting data along the way and at the end of the conversation we can do something meaningful with the information – such as POST the data to a database or store in a file somewhere.

Why would conversations / cookies be handy to use with Twilio? Well, imagine your hosting an event and you want to get feedback from your guests, you can pass your guests a Twilio powered phone number which when they message will initiate a conversation with them.  At the end of the conversation we will have meaningful answers about the event, not to mention the guests phone number so we can follow up with that all important sales call!


The example Im using here is a single page PHP powered script that when your guests message will ask them favourite colour, meal, drink and if they want to go to the movies next week. We will then take this data and make a HTTP POST request to any server with the data. You can use Google Forms here to capture all your responses by amending the URL and POST ID’s. See: https://www.twilio.com/blog/2012/11/connecting-twilio-sms-to-a-google-spreadsheet.html as an example here.

If you just want the code its hosted at: TwilioSMSConversationCookies/TwilioSMSConversation.php

Below is a break down of the script:

These are the questions we want to ask when the user sends us a message:

// Load the questions we want:
$question1 = ‘Hello. What is your favourite colour’;
$question2 = ‘Thanks! Whats your favourite meal’;
$question3 = ‘Tasty! What about to Drink?’;
$question4 = ‘Delish! Do you want to go to the movies next week?’;

At the end of our conversation we want to thank the user so they know that no more questions are coming, and its polite!

// After we have all 4 questions we can upload to the DB and thank the user for their input
$endStatement = ‘Thanks for your time. Hope you have a fun day!’;

We are going to use cookies to track the conversation, I find that its better to pass all the cookies info we want with nil values and add data to these values as the conversation goes rather than adding them as we go. This way we can logically track the conversation.

if(!isset($_COOKIE[‘question1’])) {
$TwiMLResponse = $question1;
//setcookie(‘question1’, ‘nil’);
setcookie(‘event’, $_POST[‘Body’]);
setcookie(‘question1’, ‘nil’);
setcookie(‘question2’, ‘nil’);
setcookie(‘question3’, ‘nil’);
setcookie(‘question4’, ‘nil’);
}

As this conversation is kicked off by the user and not by us, we set all the question cookies to nil, load the first question into $TwiMLResponse and set the event cookie to be the current data in the original message. So for example if our event was called ‘Mats BBQ’ and I asked all my users to send the opening message as ‘Mats BBQ’ the event cookie would be ‘Mats BBQ’.

Because no question has been asked yet, all our cookie values are blank and we can ask our questions:

// If Question 1 is blank we can pair the answer to question 1
elseif ($_COOKIE[‘question1’] == ‘nil’) {
setcookie(‘question1’, $_POST[‘Body’]);
$TwiMLResponse = $question2;
}
// If Question 1 is not blank we find out if question 2 is blank and move up the ladder
elseif (($_COOKIE[‘question2’] == ‘nil’)) {
setcookie(‘question2’, $_POST[‘Body’]);
$TwiMLResponse = $question3;
}
elseif (($_COOKIE[‘question3’] == ‘nil’)) {
setcookie(‘question3’, $_POST[‘Body’]);
$TwiMLResponse = $question4;
}

Questions 1 to 3 are the same, its a case of moving through the questions, assigning the ‘Body’ value to the last question asked. When we get to the answer for Question 4 we have all our answers, so no need to set any more cookies.

Now we can take all our data, wrap it up into an array and make a HTTP POST request with this data:

// After we get the response for question 4, we can assign it to the question.
// Now we have all 4 questions answered and can pass the thank you note and also make a HTTP POST to our end point
elseif (($_COOKIE[‘question4’] == ‘nil’)) {
// With the last question answered, we can reply with our end statement and POST all the data from the conversation.
$TwiMLResponse = $endStatement;
// So now we have the cookies for the event and questions 1 to 3 and the BODY tag for answer 4. Now we can make a POST request to our form with that data.

// Get cURL resource
$curl = curl_init();
// Set some options – we are passing in a useragent too here
curl_setopt_array($curl, array(
CURLOPT_RETURNTRANSFER => 1,
CURLOPT_URL => ‘HTTP://YOUR.Domain.TLD/POST’,
CURLOPT_USERAGENT => ‘TwilioSMS’,
CURLOPT_POST => 1,
CURLOPT_POSTFIELDS => array(‘From’ => $_POST[‘From’], ‘Event’ => $_COOKIE[‘event’], ‘Question1’ => $_COOKIE[‘question1’], ‘Question2’ => $_COOKIE[‘question2’], ‘Question3’ => $_COOKIE[‘question3’], ‘Question4’ => $_POST[‘Body’])
));
// Send the request & save response to $resp
$resp = curl_exec($curl);
// Close request to clear up some resources
curl_close($curl);
}

I’ve removed my POST URL and ID’s to forms so you can see what question tally’s to what data and it should be easy enough to input your own details.

At then end of the php processing loop we need to pass all the information needed by Twilio:

header(‘content-type: text/xml’);
?>
<Response><Sms><?php echo $TwiMLResponse; ?></Sms></Response>

TwiML needs to pass strict XML  to operate so we set the header as XML file and then use the variable $TwiMLResponse to manage what we actually say back to our users.

I hope this helps your events get more data and keep your customers more engaged with your brand.

So for months of my development I’ve wanted to host and use a GitLab Droplet on Digital Ocean (https://www.digitalocean.com/?refcode=8dc34df963c1). Using the server works great for all my projects bar, ANYTHING xCode! The hours spent screaming at a bit of software “… But the Password is correct you stupid f*$ker, AHHH!!!!”

Up to this point, I had taken to using Xcode to locally manage the git repo for a particular project, which worked well but didn’t allow me to swap machines, pass code to friends or do anything close to what GitLab can to in term of backup and team management.

Eventually I came up with the idea of initialising the Git settings for a project and was going to push all the updated code / changes to GitLab using terminal. Ie, write all the code / project in Xcode, then close Xcode, launch terminal and then push from terminal to GitLab. But then, after I had setup a project directory, added the information needed to connect it to my git: “git init” and then “git remote add origin [email protected]:MyUserName/GitRepo.git” and had done the initial commit and push.

I went into Xcode, created a new project, navigated to the same directory and Xcode proudly told me that a git repo was already in use! See screenshot:

Git Repo Already Exists

Git Repo Already Exists

Clicking ok, and moving on with the rest of the project settings I can now push, commit and update all information FROM Xcode to my GitLab projects.

I hope this helps lots of people who struggle with GitLab / Xcode interrogations, from looking at forums and how-to guides. It seems a lot of people current struggle.

One of the coolest things about having your own phone number with Twilio (Twilio.com). Is that you can do some very nifty things with it.

For example, if you need a conference room setup with a text message you can forward to your friends, you can configure this in a PHP script quite easily, we can even get the script to respond to your request with details about the number to ring and the pin code.

If you haven’t already done so, head over to Twilio (Twilio.com) an sign up at: Try-Twilio This will provision you a Twilio number that you can call into and interact with.

Once we have a number lets build a script that can respond to our SMS message, generate the conference room pin and then respond back with the details of our conference room.

<?php

// Incoming Voice number thats paired with this setup – used for voice Conferences etc.
$voiceNumber = “+1…”;

// Get the Variables from the HTTP POST, We want to know the BODY and the FROM so we can authorise and action the request.

$fromPhoneNumber = $_POST[“From”];
$messageBody = $_POST[“Body”];

// Check the phone number is on our authorised list if so action the SMS request.

// As this grows I want to put the numbers into an authorised DB and make a DB request regarding this.
// As this minute we are just going to look up against authorised number just in the IF field.

if ($fromPhoneNumber == “+1…” or “+44…”) // This is the list of authorised numbers that can make conf rooms.

{

// If the number is authorised then we are going to look at the body for what we need to make / do.

if ($messageBody == “Conference” or “Conf”)
{
// If the body is Conference we want to generate a 4 digit pin number and then generate a SMS message that can be
// forwarded out to the participants.

// The idea is that this script will reply with
// “A Conference has been setup, please call XYZ Number press option X and enter pin abcd”

$confPin = rand(1000, 9999); // Generate a random pin number
$TwiMLResponse = “<Message>Conference Room Details:\r\nPhone Number: ” . $voiceNumber . “\r\nConference Pin: ” . $confPin. “</Message>”;
}
else // Catch all for whats left.
{
$TwiMLResponse = “<Message>Sorry, Me No understand. Try Again.</Message>”;
}
}
else
{
$TwiMLResponse = “<Message>Sorry, Your not authorised for this.</Message>”;
}

header(“content-type: text/xml”);
?>

<Response><?php echo $TwiMLResponse; ?></Response>

This script will check that the inbound number is able make conference room pin numbers and if so will generate a 4 digit pin that will then be distributed back to the user.

Now when we text our number the body “Conference” or “Conf” from an authorised phone it will generate a pin number and respond back with details of the conference room in a SMS message:


Conf Details

Conference Room Details


You can then copy and paste this SMS message into a group SMS or Whatsapp and allow people to call into the conference room.

Now we have the SMS part setup we need to build a script that can welcome the caller, get the pin number and then route them to the correct conference based on that response.

<?php

// Check to see if a Conf Pin has been inputted. If so, make a Conf room with that pin.
$confPin = $_GET[“Digits”];

// If no conf Pin ask the caller to enter a Conf pin or else hangup.
if (isset($confPin)){
$TwiMLResponse = “<Say voice=\”alice\”>Placing You into Conference Now.</Say><Dial><Conference>”. $confPin .”</Conference></Dial>”;
}
else
{
$TwiMLResponse = “<Gather method=\”GET\” timeout=\”25\” numDigits=\”4\”><Say voice=\”alice\”>Hello and welcome to the conference line. Please enter the Conference Pin.</Say></Gather><Say>I’m Sorry I didnt catch that</Say>”;

}

header(“content-type: text/xml”);
?>

<Response><?php echo $TwiMLResponse; ?></Response>


Here in this script we are checking to see if the GET method has been passed with any digits, indicating that the caller has already been greeted and input a conference pin. If we have a conference pin then we can use the digits to put his caller into that conference room.


This is a very simple conference line setup tool, and it will need some further modifying to make it secure. For example right now any 4 digit numbers will create a conference room. You may wish to modify the code so that only generated pin numbers can be used and those numbers cannot be reused – entirely up to you.


Working in support, I field a lot of queries from small business managers and startups about how to setup and build a phone menu system (IVR).

Interactive Voice Response (IVR) adds a level of class to your small business setup, they can make your organisation look bigger than it is and allows you to directly manage the routing of calls made to your company.

One of the best features of a Twilio based IVR is that you can give your customers one phone number and then route the calls to your sales / technicians / whoever as you need to.

–       No more ring this number for sales, ring this number for support etc.…

Lets propose we need to make an IVR for ‘John Smith Widget Company’, this IVR needs to have two menu options; one for sales and one for support and greet the caller with the office hours: 8am to 6pm


– When the caller selects an option (Sales or Support) we want to be able to route this call to an appropriate phone number (the companies sales manger for example), when this person (sales manager) answers the phone we want to be able to whisper that this is a sales call and offer them a chance to accept or reject the call.


– Should no one answer the phone or the call be rejected, as a fall back we need to explain to the caller no one is around and to leave a message on our voicemail system.

For this we will need:

A Twilio Account

A Twilio phone number

A webserver that supports a scripting language, I’m using PHP here but the code and logic will translate across most other languages.

If you haven’t done so already, sign up at https://www.twilio.com/try-twilio

You will need to verify your phone number and once in, copy your phone number, Accountsid and Authkey from your account portal page.

Download the Twilio PHP Libaray from github, the URL is:

URL

Make a new directory, something called smbivr and copy the ‘Services’ into this directory.

Now we need a landing page for when someone calls your Twilio number.

Make a new file called twilioIncomingCallHandler.php and save it in your directory smbivr

In this file we are going to add:

<?php

// Phone Number for your Sales Line:

$salesNumber = “”;

// Phone Number for your Support line:

$supportNumber = “”;

// To set the Caller ID to be the actual caller, uncomment this:

//$callerID = $_GET[“From”];

// To set the CallerID to the number dialed IE your Sales Line uncomment this:

$callerID = $_GET[“To”];

// Check if the HTTP request is loop by checking for any pressed digits

$menuInput = $_GET[“Digits”];

// If the menu is 1 we know they want sales team so we are going to say

// ‘Transfering you to sales now, Please note call calls are recoreded for training purposes’

// Then we are going to call the sales line and whisper the details of the call as well as giving the agent to divert to VM.

// If the menu is 2 the call is for support, so are going to transfer the call to out support line and whisper that the call is about customer support.

// If the menu is blank its a 1st time caller so we great the caller and then present the landing menu.

if ($menuInput == “1”) {

$TwiMLResponse = “<Dial callerId=\””. $callerID . “\” timeout=\”18\” action=\”./handleDialCallStatus.php\”><Number url=\”./whisper.php?type=sales\”>$salesNumber</Number></Dial>”;

}

elseif ($menuInput == “2”) {

$TwiMLResponse = “<Dial callerId=\””. $callerID . “\” timeout=\”18\” action=\”./handleDialCallStatus.php\”><Number url=\”./whisper.php?type=support\”>$supportNumber</Number></Dial>”;

}

else {

$TwiMLResponse = “<Gather method=\”GET\” timeout=\”25\” numDigits=\”1\”><Say voice=\”alice\”>Hello and welcome to Chicken and Bee. Your partner for web, voice and messaging services. Our opening hours are 8 am to 6 PM London Time. For Sales please press 1. For support or other enquiries please press 2.</Say></Gather>”;

}

header(“content-type: text/xml”);

?>

<Response><?php echo $TwiMLResponse; ?></Response>

As you can see from the code this file is going to do two things, the first time its called it will greet the caller with our welcome message, opening hours and then ask the caller who they would like to be directed too, when the user inputs a digit Twilio will make a HTTP POST to the same file but this time including the digit the caller pressed.

Now when the code runs, it will look for any digits pressed and provide a different set of TwiML instructions – in this case call either the sales or support line.

This is the normal for a IVR system, but we are going to branch off now and do some advanced bits.

For example what if the caller is a known customer or a high value customer, it might be a good idea for us to gather this callerID and check our CRM to see if they are in fact a customer.

When we made the <Dial> verb we also included some attributes, these included:

Action=”./handleDialCallStatus.php

and

url=”./whisper.php

You can find more information on these verbs at:

https://www.twilio.com/docs/api/twiml/dial#attributes-action

and

https://www.twilio.com/docs/api/twiml/number#attributes-url

The action URL (handleDialCallStatus.php) will handle the call when the dialed party has provided a response – hangup, voicemail etc.

The URL (whisper.php) will speak to the dialed party and give them an option to accept or decline the call based on some TwiML and scripting.

To make the ‘Number URL’ speak to the dialed party we direct the URL to a new script called ‘whisper.php’

In this file we are going to place:

<?php

// Find out what kind of whisper we are going to do is this a sales or support call?

$callType = $_GET[“type”];

// If the Type is a sales call say to the agent that this is a sales call and give them an option to divert to voicemail or accept the call.

if ($callType == “sales”) {

$TwiMLResponse = “<Gather action=\”./agentResponse.php\” numDigits=\”1\”><Say>You have an incoming sales call.</Say><Say>To accept the call, press 1.</Say><Say>To reject the call, press 2.</Say></Gather><Say>Sorry, I didn’t get your response.</Say><Redirect>screen-caller.xml</Redirect>”;

}

// If this is a support call say to the agent that this is a support call and give them an option to divert to VM or accept the call

if ($callType == “support”) {

$TwiMLResponse = “<Gather action=\”./agentResponse.php\” numDigits=\”1\”><Say>You have an incoming support call.</Say><Say>To accept the call, press 1.</Say><Say>To reject the call, press 2.</Say></Gather><Say>Sorry, I didn’t get your response.</Say><Redirect>screen-caller.xml</Redirect>”;

}

header(“content-type: text/xml”);

?>

<Response><?php echo $TwiMLResponse; ?></Response>

As you can see from the code, we are passing the type of call: Sales or Support as a variable to this TwiML.

You could if you had a CRM such as Salesforce or vTiger make an API call to the database, querying if the callerID is a known customer and if so pass back details to be relayed to the dialed party – How fantastic would it be to have your CRM provide your agent with the call details before they even connect with the customer.

However, in this example we are going to pass just the message that someone has called the sales or support line and would they like to accept or decline the call.

If the user presses 1, then the call connects both parties together, if the user presses 2 the call is hung up and the original caller is presented with a ‘I’m sorry, no one is available’ – This is where the Dial Action URL comes in to play.

Create a new PHP file called handleDialCallStatus.php

In this file place:

<?php

// If the call is due to be hung up be cause the whisper hung up, then we want to redirect the call to Voicemail and capture the Voicemail

$whisperStatus = $_POST[“DialCallStatus”];

if ($whisperStatus == “busy” or “no-answer” or “failed”) {

$TwiMLResponse = “<Say voice=\”alice\”>I am sorry. No one is around at the moment to take your call. Please leave your name and number and someone will get back to you shortly. Thank you!</Say><Record action=\”./handleRecording.php\” maxLength=\”60\” finishOnKey=\”*\” /><Say>I did not receive a recording</Say>”;

}

else

{

$TwiMLResponse = “<Hangup/>”;

}

header(“content-type: text/xml”);

?>

<Response><?php echo $TwiMLResponse; ?></Response>

This file will work out what happened with our called party. Did they hang up, was the line busy or did the call fail for some reason.

In the event that the any of these three events happen (Reject call, no answer or line busy) we can apologize to the caller and ask them to leave a voicemail.

In this file you can see that we are calling the Record verb, for more information on this please see:

INFO ABOUT RECORD VERB

Inside the record verb we are going to reference handleRecording.php  which is going to be the file responsible for generating the email we are going to send once the recording has been completed.

Our final file:  handleRecording.php is the file responsible for picking up the URL of the voicemail file and then do something with it. In this case its going to email me a copy of the recording. However you could put this URL (or file) in to a database or some kind of messaging alert.

The code is:

<?php

// Define Email Address and Name

$eMailAddress = “[email protected]”;

$emailName = “YourName”;

$phoneLineName = “Sales HotLine”; // The Name of the phone line called EG is this your Sales Hotline

// Get the details of the call and recording

$recordingURL = $_POST[“RecordingUrl”];

$fromCallerID = $_POST[“From”];

// Get the Time

$humanTime = date(‘H:i d/F’, time());

// Assemble the headers

$headers = “From: Voicemail<[email protected]>\r\n”; //Your Voicemail email address

$headers .= “MIME-Version: 1.0\r\n”;

$headers .= “Content-Type: text/html; charset=ISO-8859-1\r\n”;

// Assemble the MessageBody.

$eMailBody = “Hi $emailName,<br /><br />”;

$eMailBody .= “The $phoneLineName was Called today at: $humanTime<br />”;

$eMailBody .= “The Caller ID was: $fromCallerID<br />”;

$eMailBody .= “The Voicemail is: <br /><br /><audio controls><source src=\”” . $recordingURL. “\”></audio><br /><br />”;

$eMailBody .= “<a href=\”$recordingURL\”>Click here To listen</a><br />”;

$eMailBody .= “Thanks!<br /><br />Voicemail!”;

// Assemble the Mail message

// mail(to,subject,message,headers,parameters);

mail($eMailAddress, “New Voicemail for $phoneLineName”, $eMailBody, $headers);

header(“content-type: text/xml”);

?>

<Response></Response>

You will need to amend all the bits of this file to fit your network / mail server, including FROM email address, TO email address, your name.

Once you have this setup your good to go!

Now when someone calls your Twilio number:

twilioIncomingCallHander.php will pick up the file, greet the caller and ask them where to direct the call.

When the user selects an option the caller will be played ‘ringing’ sound while Twilio rings the provided number, informs them that a caller is on the line and gives them an option to accept or reject the call.

If the person answering the call accepts the call, we connect both parties together.

If the person answering rejects the call or the call cant be connected, we divert the caller to an answer machine, take a message and then email the message to  an email address.

With this IVR you can add routes and direct calls between your departments quickly and easily.

So finally after many months of development, design, build, rebuild and writing of code. I have some data and information on my beehive! Its remarkable how much data you can get and learn about an environment by monitoring a few points over time. At the moment the BeeBetaBox is currently loading up, sending a HTTP  POST to an end point with lots of data about the beehive every 10 mins. This data is rolled into a database and then assembled together to generate graphs showing temperature over time Because I capture the GPS co-ordinates of the hive as well we can then use this to make a lookup against a weather service and provide the weather predictions for the next 3 days. Handy if your hive is remote and you want to see about a visit soon!

BeeSafe Graph

So after spending a considerable amount of time using Sakis – the 3G dongle software. I feel I need to write a better post on how to connect your Debian based system / Raspberry Pi to the internet using a 3G connection.

– Be warned, Data on the 3G network is RARELY all you can eat, ensure you have an appropriate data plan before you let your Pi loose.

– 2nd Warning.. 3G dongles consume huge quantities of power, if your running the project off a battery setup, write some code to disconnect the 3G stick when not in use to prevent it from eating all the power just staying connected.

With that being said, to download and install the 3G software:

sudo apt-get -y update

then

sudo apt-get -y upgrade

then

sudo apt-get -y install ppp

Once the updates have taken route and ppp has been installed you will need to download sakis;

wget “http://www.sakis3g.org/versions/latest/armv4t/sakis3g.gz”

then

gunzip sakis3g.gz

then

chmod +x sakis3g

finally

sudo ./sakis3g –interactive

This will take you to the interactive window used by Sakis, you can configure the 3G dongle here and then issue the connect command. The software has been set out to be easy to interact with.

Depending on the Simcard you have in the dongle, it may attempt to download the latest settings automatically and then offer them to you as a connection method.

If you don’t get that luxury you can manually enter your APN, username and password manually in the prompts.

One feature that I LOVE about Sakis is that you can call the connect command from within another program, lets say my Pi gathers some data up and then needs to send it somewhere on the net, you can tell the program to connect to Sakis like this:

./sakis3g connect APN=”CUSTOM_APN” CUSTOM_APN=”giffgaff.com” APN_USER=”giffgaff” APN_PASS=”password”

This string tells Sakis to connect to the Giffgaff network and can be followed by:

sudo ./sakis3g disconnect

How to add a custom APN to the sakis config file:
Using Nano create a file called sakis3g.conf stored in /etc/

sudo nano /etc/sakis3g.conf

Here you can add the APN details like this:

APN=CUSTOM_APN
CUSTOM_APN=”giffgaff.com”
APN_USER=”giffgaff”
APN_PASS=”password”

and then connect the 3G dongle by doing this:

sudo ./sakis3g connect

Super handy if you need to bring some 3G connectivity to your project! 🙂