At Amazon AWS ReInvent 2016 one of the cool new features that was released was Polly, an amazingly slick synthetic voice engine. At time of writing, Polly supports a total of 47 male & female voices spread across 24 languages.
From the moment I saw the demo I knew I could use this to generate on the fly audio for use on Twilio.
Using AWS Polly with Twilio will allow you to make use of multiple languages, dialects and pronunciation of words. For example the word “live” in the phrases “I live in Seattle” and “Live from New York.” Polly knows that this pair of homographs are spelled the same but are pronounced quite differently. (sic) .
In this example I’m going to be using AWS Polly, Twilio TwiML (the Twilio XML based markup language) and NodeJS to produce an app that will allow you to generate on demand MP3 files which can then be nested in TwiML <Play> verbs.
Phase One: Get started by setting up the credentials needed by Polly
- Login to your AWS account
- Navigate to “Identity and Access Management”
- Create a new use that has programatic access (this will generate keys and a key secret).
- Attach the user to “AmazonPollyFullAccess” policy and finish the account creation steps.
Phase Two: Create a new NodeJS project
- In terminal navigate to where you keep your projects and create a new directory
mkdir nodeJSPollyTwiML && cd nodeJSPollyTwiML
- Inside the directory initialise node using
npm init
- The initialise script will ask you some basic questions about the application; name, keywords etc. I will leave this up to you.
Once the initialise script has finished we can install the required modules needed by NodeJS to run our application.
npm install --save aws-config aws-sdk body-parser express forms
This will install the required modules needed to build and run this app.
Now we can begin to build out this application.
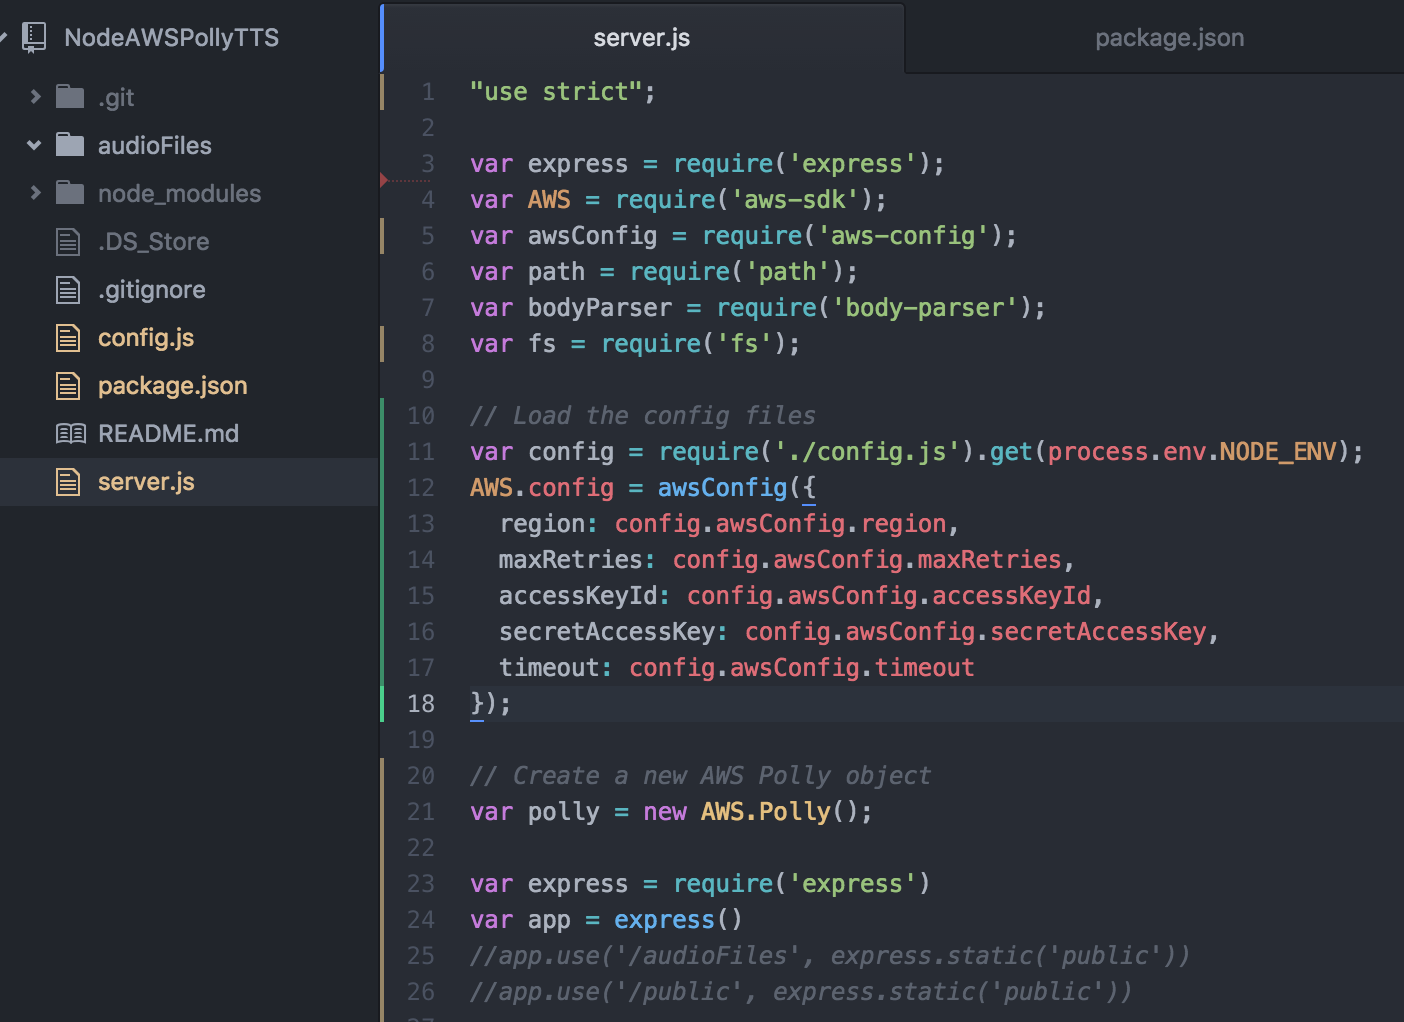
Call up your favourite text editor – mine currently is Atom, which is made by the GitHub team.

Atom allows you to keep a project directory on the left for easy navigation as well as colour coding all the files based on their git state.
The structure of the app is going to be:
├── server.js
|   ├── config.js
├── audioFiles- server.js will be responsible for all the application processing
- config.js will be where the system configuration files will be stored
- audioFiles will house the saved audio records.
Before we can write any server code we need somewhere to store our AWS credentials. Create a new file called config.js, add to this file:
var config = {
production: {
serverAddress: "https://production.domain.com",
port: 3005,
awsConfig: {
region: 'us-east-1',
maxRetries: 3,
accessKeyId: 'this is top secret',
secretAccessKey: 'this is bottom secret',
timeout: 15000
}
},
default: {
serverAddress: "https://test.domain.com",
port: 3000,
awsConfig: {
region: 'us-east-1',
maxRetries: 3,
accessKeyId: 'this is top secret test',
secretAccessKey: 'this is bottom secret test',
timeout: 15000
}
}
}

exports.get = function get(env) {
return config[env] || config.default;
}
In the configuration page we have broken out the settings into two parts; one for production systems and one for test systems (default in this case). As we are still building this app I will be working from the test environment.
Using Module exports we can now call the config file into server.js and load the credentials when we need them!
Open server.js file and load the modules needed, this should be the same as what was in package.json after npm install had completed.
To server.js we are going to add:
"use strict";

var express = require('express');
var AWS = require('aws-sdk');
var awsConfig = require('aws-config');
var path = require('path');
var bodyParser = require('body-parser');
var fs = require('fs');

// Load the config files
var config = require('./config.js').get(process.env.NODE_ENV);
AWS.config = awsConfig({
region: config.awsConfig.region,
maxRetries: config.awsConfig.maxRetries,
accessKeyId: config.awsConfig.accessKeyId,
secretAccessKey: config.awsConfig.secretAccessKey,
timeout: config.awsConfig.timeout
});

// Create a new AWS Polly object
var polly = new AWS.Polly();

var express = require('express')
var app = express()
Here we have defined that the app is to use ‘strict mode‘ when processing.
Then the script loaded all the modules and imported the configuration file.
To make use of AWS Polly a polly object is created you will see this referenced later.
Lastly an express object is created, this object will be used to handle the HTTP requests to the app.
Application Logic
While this application doesn’t have a lot of moving parts its important to understand whats going on.
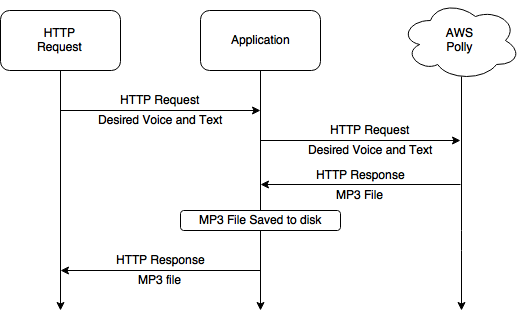
When a HTTP Request comes in, express will route the task to a function that will engage with Polly, transmit the text and desired voice.
When Polly completes the task it will return the audio file as a data stream which is saved to disk.
Once the file has been saved to disk it can then be sent as part of the HTTP Response.

The diagram illustrates the lifecycle.
For the inbound HTTP request URL, Im going to define the structure as
/play/Carla/Hi%20Mathew.%20this%20is%20Carla%20from%20Amazon%20Web%20services.
Breaking this down, the path is comprised of ‘play‘ this refers to the Twilio Verb Play, if the application were to be built out further you could use other verbs or commands to define other paths, e.g. /host/ could generate the audio file but return the URL path of the audio file, letting the application host the file.
Next ‘Carla‘ refers to the Polly voice we want to use, as mentioned before AWS polly has a total of 47 male & female voices. Each of these voices has a name so its easy to reference which voice you want to use by calling that name.
The last part: ‘Hi%20Mathew.%20this%20is%20Carla%20from%20Amazon%20Web%20services.‘ Is the message that needs to be converted into speech. To ensure that the message is transmitted correctly you will need to URL encode the string, this converts spaces into %20, you can find more details on URL encoding here.
Add the following to server.js
// Generate an Audiofile and serve stright back to the user for use as a file stright away
app.get('/play/:voiceId/:textToConvert', function (req, res) {
var pollyCallback = function (err, data) {
if (err) console.log(err, err.stack); // an error occurred
else console.log(data); // successful response

// Generate a unique name for this audio file, the file name is: PollyVoiceTimeStamp.mp3
var filename = req.params.voiceId + (new Date).getTime() + ".mp3";
fs.writeFile('./audioFiles/'+filename, data.AudioStream, function (err) {
if (err) {
console.log('An error occurred while writing the file.');
console.log(err);
}
console.log('Finished writing the file to the filesystem ' + '/audioFiles/'+filename)

// Send the audio file
res.setHeader('content-type', 'audio/mpeg');
res.download('audioFiles/'+filename);
});
};

var pollyParameters = {
OutputFormat: 'mp3',
Text: unescape(req.params.textToConvert),
VoiceId: req.params.voiceId
};

// Make a request to AWS Polly with the text and voice needed, when the request is completed push callback to pollyCallback
polly.synthesizeSpeech(pollyParameters, pollyCallback);
})
Lets break down what this function does.
First
app.get('/play/:voiceId/:textToConvert', function (req, res) {
When a HTTP GET requests comes in that starts /play/ this function will be called. Next voiceID is the variable for the the Polly voice requested, and textToConvert the URL encoded text that needs to be converted.
To make the request to AWS Polly, the pollyParameters object needs to be populated, this consists of the chosen voice and the text to convert. MP3 has been fixed in this example.
Now the application is ready to call Polly,
polly.synthesizeSpeech(pollyParameters, pollyCallback);
here the app passes the parameters as well as a callback that will be invoked when the job is finished.
Once Polly has finished generating the audio file it will run the callback and (if successful) pass back the audio file.
The callback pollyCallback is now responsible for a two things; saving the file to disk and passing the file back to the users request.
var filename = req.params.voiceId + (new Date).getTime() + ".mp3";
fs.writeFile('./audioFiles/'+filename, data.AudioStream, function (err) {
To make sure we dont overwrite another audio file I’m using epoc timestamps to define a unique file name combined with the Polly voice used.
At the end of the callback, it will pass back to the user the audio file and a MP3 header
res.setHeader('content-type', 'audio/mpeg');
res.download('audioFiles/'+filename);
Awesome! Now we have an API that can generate synthesised speech using AWS Polly from text provided inbound.
If you build and run the application, putting in
/play/Carla/Hello%20reader.%20Thank%20you%20for%20taking%20the%20time%20to%20read%20this%20blog%20post%20and%20build%20the%20tutorial.%20I%20Hope%20it%20has%20been%20helpful%20for%20you.
You will get a MP3 file passed back in your browser!
Phase Three: Twilio Play
Now we have a HTTP addressable endpoint we can integrate our audio files into Twilio’s TwiML, when Twilio makes a request to your Twilio application for TwiML you can now integrate this application into <Play> verbs. An example is:
<Response><Play>http://your.app.domain/play/Joanna/Wow.%20I%20have%20integrated%20Amazon%20Polly%20into%20my%20Twilio%20application.%20Now%20I%20can%20generate%20natural%20voices%20with%20custom%20text%20exactly%20when%20needed.%20This%20is%20amazing.</Play></Response>
When you compile your TwiML you will need to make sure that the text to speak has been url-encoded, otherwise Twilio will fail the TwiML for not being compliant.
GitHub: https://github.com/dotmat/nodeJSPollyTwiML
Conclusion:
Integrating AWS Polly into your Twilio apps is now fast and easy. With a HTTP request you can request a desired voice convert text into an audio file which can be used with Twilio to play back to a caller / customer.
Betterments:
- At present time, the application is unsecured, anyone with access to your app / domain could quickly start using polly to increase your AWS spend. While Polly is very cheap ($0.000004 per character, or about $0.004 per minute of generated audio) its still something that should be addressed. I would recommend implementing some kind of auth that can check against known users database (Basic Auth for example)
- For common messages that you might use over and over its pointless to keep generating this for one time use, if you had a prebuilt database of common messages that your application uses, you could reference these from the API. In the GitHub repo I expanded the code to allow you to pull audio files by calling the MP3 file name.
- The app currently does no house keeping of audio files, each time you make a request to Polly it will generate an audio file. A good tool next would be something that deletes audio files over than a X days or weeks.
I hope this tutorial has been helpful, please reach out if you have any issues or questions!