For Christmas this year I received a few nerdy toys; One of them being a digital power meter (Amazon Link) that allows you to see your energy consumption.

I mainly asked for it so that I could start tracking energy usage around the house. Mostly for fun and only partially for the data.

After watching a number of videos on YouTube all about Tesla PowerWalls and the app that comes with it, I got inspired to build a similar kind of app / utility monitor to allow me to see how much power the house consumes and when are my peak energy consumption times.

This post primarily focuses on getting the data from the Modbus power meter into a RaspberryPi. Separate posts will include building services to publish this data.

There are two options to buy the power meter; A lcd display unit that gives you a quick read out and a unit that converts its signals into Modbus RS485 which can then be plugged into a bigger system – in my case a RaspberryPi. (Clicking on the images takes you to Amazon, it’s not an affiliate link. I’m just being helpful if you want to copy my setup).

Power Meter with LCD Screen

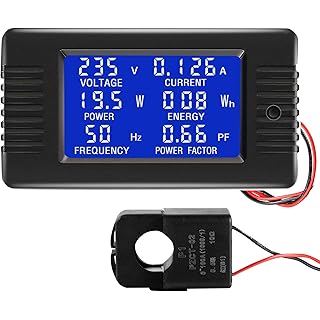
This power meter gives you an instant read out of energy consumed.

This power meter outputs its energy readings using the Modbus RS485 Protocol

This power meter outputs its energy readings using the Modbus RS485 Protocol

The reason that I chose to use the Modbus power meter rather than the LCD was that I wanted to measure power coming into the house from my circuit breaker and while its great to quickly wire the LCD unit into the setup, running around the house and then back to the circuit breaker would have just been too boring.. plus code!

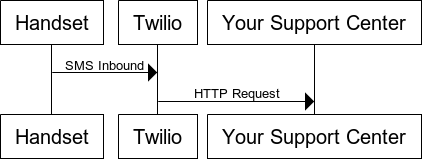
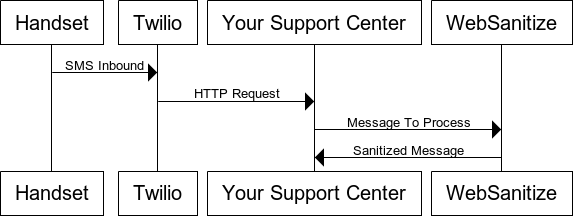
Here’s a simple setup digram for how I wired the power meter into my house electrical system.

Electrical Wiring Diagram

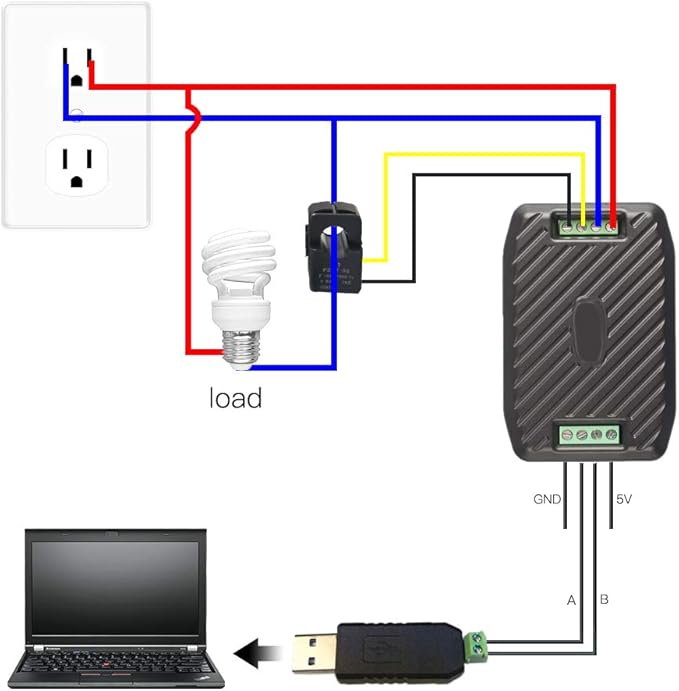
Both the live and neutral are wired into the power meter and then the inductor is placed to encapsulate the live wire.

!* ⚠️ Warning! ⚠️ *!
Electricity is VERY dangerous, please take every precaution you can to be safe. If in doubt consult a qualified electrician who can do the work for you.

Depending on the setup and country your going to get a few outputs of power.
In the US, power is 110/220AC at 60Hz, in the UK its 240AC at 50Hz, in Europe its 230AC at 50Hz. Again, please consult a qualified electrician for your region, the last thing anyone needs is to short a wire and burn your house down.


Once you have the power meter wired up you can begin to take some measurements. The unit maker PeaceFair have released a windows version to read the values quickly. You can find a link here; however it requires an AliExpress login. If you’re using windows and don’t need anything more a viewer this is probably going to be perfect for you.


In my setup I’ve plugged the USB connector into a RaspberryPi, the Pi using the latest version of Raspbian Buster Lite. Buster Lite is a variant of Ubuntu and so you can run ubuntu commands.

First thing to do is to update the Pi’s software.

sudo apt-get update -y && sudo apt-get upgrade -y


This updates all the installed software on the Pi and allows us to start with a fresh up-to-date image.

In the user Pi home directory create a new folder called powerMeter.

cd ~ && mkdir powerMeter && cd powerMeter

This command will create the folder and navigate to it.

 
Once here, we need to setup a Python script to communicate with the power meter.

The power meter uses a protocol called ‘Modbus‘ which was invented in the late 1970’s and uses two wires to communicate between a master and multiple slave devices on the same 2 wire network. Its protocol is very similar to RS232 only with less device handshaking.

Due to the open nature of Modbus, a number of tools and scripts exist to communicate with a Modbus device.

For Python, I’m going to be using the ‘MinimalModbus library which will do a lot of the heavy lifting for us.


To get started create a script called ‘powerMeter.py‘ using your preferred text editor. Im using nano, but feel free to use vim or anything else.

nano powerMeter.py


Once in the text editor add the python3 shebang (The shebang line in any script determines the script’s ability to be executed like a standalone executable)

#!/usr/bin/env python3

Then import the needed libraries.

import minimalmodbus
import serial

in this script the needed libraries are minimalmodbus and serial.


Once we have setup the script we can start to define our powerMeter, adding in the needed credentials to make a connection via RS485/Modbus.


powerMeter = minimalmodbus.Instrument('/dev/ttyUSB0', 1)
powerMeter.serial.baudrate = 9600
powerMeter.serial.bytesize = 8
powerMeter.serial.parity = serial.PARITY_NONE
powerMeter.serial.stopbits = 1
powerMeter.mode = minimalmodbus.MODE_RTU
print('Details of the power meter are:')
print(powerMeter)


Let’s unpack what’s going on here; powerMeter is the object that’s been created to act as the connection via the USB socket (‘ttyUSB0’), the 9600 refers to the speed of communication. At the end the RTU mode sets up the specific protocol that the service will use. Modbus actually has a few different ones, so we need to implicitly define one.

At the end, the powerMeter is printed to show what values have been assigned.

 
Now that the powerMeter has been created, a function can be created to read the data values from it.


def readPowerMeter():
print("Attempting to read power meter")
try:
voltageReading = powerMeter.read_register(0, 0, 4)
ampsReading = powerMeter.read_register(1, 0, 4)
wattsReading = powerMeter.read_register(3, 0, 4)
frequencyReading = powerMeter.read_register(7, 0, 4)
print("Voltage", voltageReading/10)
print("Amps", ampsReading/10)
print("Watts", wattsReading/10)
print("Frequency", frequencyReading/10)
except IOError:
print("Failed to read from instrument")

Finally call the function to read the values from the powerMeter function

# Run the function to read the power meter.
readPowerMeter()


You can run the script by typing

python3 powerMeter.py

On success the script will print out all the values it could read from the meter.

Here’s a copy of mine:

 
Attempting to read power meter
Voltage 245.7
Amps 165.8
Watts 329.3
Frequency 60.0

As you can see from the readouts, my house operates at 250AC (ish) Volts, I’m currently drawing 165 AMPS of power and consuming 329 watts of electricity.

Success!

Success!

Success!

With the basic script setup we can now make requests to the Modbus power meter and read back basic values about power being consumed in the house.
Later posts will show how you can turn this data into information I can store on a server and then recall to a UI.
Thank you!

Attributes: 

I placed a full copy of the script on GitHub. Please clone and use as you please!

Community post which contained code I used in my setup – Thanks to Bill Thomson for sharing!.


Ngrok – pronouce ‘en-grok’ is a fantastic bit of software produced by inconshreveable. The software lets you build temporary tunnels for your apps and development servers to the internet.

It generates an internet addressable endpoint that then forwards onto your app/service behind a firewall.

Over the last few years Ive relied on ngrok for everything from demo events used on stage to development work when I’ve needed to debug my project against real world internet services.

Due to the cheapness and ease of setup, I now use a (lot of) RaspberryPi for most of my app development inside my home network.

This post will help you setup ngrok on a RaspberryPi.

First load up your terminal, on a mac you can find this in the applications folder or simple ask Siri to open a new terminal window.

Once a new window is open you can then connect to the Pi. An example SSH command is

ssh [email protected]

Where pi is the user I want to connect as, and 192.168.1.10 is the IP address of the RaspberryPi itself.

For more details on ssh’ing into a PI, please read the official documentation provided by the RaspberryPi team.

Once you are connected to the Pi its always a good idea to update the Pi software, you can do this by:

sudo apt-get update -y && sudo apt-get upgrade -y

This will get you up to date with the latest software and ready to install anything new.

Change directories into the root temp directory by:

cd /tmp/

The tmp directory is used by the system to store files that will be cleaned up at a later point, its a perfect spot for us to download our file to.

We need to grab the latest URL for ngrok ARM from the downloads page on ngrok.com. Jump to the downloads page and copy the URL relevant to your hardware.

If your using a newer RaspberryPi you can use the 64Bit edition

Ngrok 64Bit


Otherwise the regular ARM download will be what you will need.

Ngrok Download


The download link will look something like:

 https://bin.equinox.io/c/4VmDzA7iaHb/ngrok-stable-linux-arm.zip

We can now download the latest stable NGROK from the server by issuing the wget command.

wget https://bin.equinox.io/c/4VmDzA7iaHb/ngrok-stable-linux-arm.zip

This will download the zipped file and store it in our tmp directory.

Next we need to unzip the file. You can do this by issuing the unzip command.

unzip ngro*

You will notice here that I didn’t fill in the whole file name, Im using a wildcard to unpack everything that starts with ngro… This is because I placed the zipped file in the tmp directory there should only be one.

With the application unzipped now, we can move it into the user ‘pi’ home directory by

mv /tmp/ngrok ~/ngrok

Once moved we can now jump into the pi directory

cd ~

The ~ symbol references the current user we are logged in as, in this case, its user pi.

You can now test your ngrok app by issuing it a command, for example

./ngrok http 3000

will create a HTTP and HTTPS tunnel that forwards traffic to port 3000 running on your RaspberryPi.

I hope this (short) guide is helpful for when you need to test your app in the real world!

Recently Twilio released a new product called Studio, which is a graphical drag and drop editor you can use to build workflows, IVR’s and bots – both via voice and SMS channels. Over the last little while, I’ve been using Studio to build some awesome bots.

An awesome studio flow

One of the bots that I have built is a blacklisting tool that prevents my apps from spamming and messaging unwanted users, this tool uses another product of Twilio called ‘functions’ which is essentially AWS Lambda but executed within the Twilio ecosystem.

To do this project I found a great service called BanishBot, which dub’s itself as ‘An API designed to help you manage opt-in/out communications and access lists.’ In short, its an API you can use in distributed systems to manage your opt-in and out lists.

In this post, I’m going to use Studio, Functions, and BanishBot to create an auto-updating opt-in/out application. At the end of the build, I’ll have a system where customers/people can automatically opt-in or out of my messages. I’ll then be able to use BanishBot in my application development as the last mile checker to make sure I’m not actually sending out unwanted messages.

You’ll need the following to do this project:
Twilio account (upgraded and with a phone number) – Sign up here
BanishBot account – Sign up here

Once your setup with your accounts, go into Twilio functions and create a new function using the blank template.
Name the function something like ‘BanishNewNumber’, then copy and paste this code into the code field – update the username and APIKey fields with your own credentials.

var banishbot = require(‘banishbot’);
var username = ”; // Put your BanishBot username here
var apiKey = ”; // Put your BanishBot API key here
// This script is responsible for banishing a number to the banishbot platform
// This script is usually initiated from a Studio function
// and is passed the number that no longer wishes to be contacted.
exports.handler = function(context, event, callback) {
var numberToBanish = event.NumberToBanish;
console.log(‘Stand back! Im going to Banish the number ‘+numberToBanish);

banishPayload = {“banished”: true, “type”: “PhoneNumber”, “notes”: “STOP request from Studio Flow SMS StudioBot”}
banishbot.banishNewItem(username, apiKey, numberToBanish, banishPayload).then(function(result) {
// Success Result
console.log(result);
callback(null, ‘OK’);
})
.fail(function (error) {
// Error Something died, here is the response
console.log(error);
callback(null, ‘OK’);
});
//callback(null, ‘OK’);
};

Once you have set this function up click save.
Make the second function, called ‘UnbanishNumber’ then copy and paste this code into the code field – update the username and APIKey fields with your own credentials.

var banishbot = require(‘banishbot’);
var username = ”; // Put your BanishBot username here
var apiKey = ”; // Put your BanishBot API key here
// This script is responsible for unbanishing a number.
// This is usually a request from a Studio flow to return SMS to a user.
// This script updates the BanishBot Table to set the banished state to be false for a number.
exports.handler = function(context, event, callback) {
var numberToUnBanish = event.numberToUnBanish;
console.log(‘Stand back! Im going unbanish ‘+numberToUnBanish);

banishPayload = {
banished: false,
notes: ‘This number was un-banished using The BanishBot Studio Flow’
};
banishbot.updateBanishedItem(username, apiKey, numberToUnBanish, banishPayload).then(function(result) {
// Success Result
console.log(result);
callback(null, ‘OK’);
})
.fail(function (error) {
// Error Something died, here is the response
console.log(error);
callback(null, ‘OK’);
});
//callback(null, ‘OK’);
};

Great! A quick recap of the two functions we just created, one is responsible for banishing a number, and the other is responsible for un-banishing a number.

Now let’s go ahead and create our Studio bot that will handle our inbound stop/start requests.

But why build an opt-out bot?
When engaging with consumers, customers or people via SMS you have to comply with carrier compliance requirements, industry standards, and applicable law.
These often include the keywords HELP and STOP. In the case of shortcodes (five/six-digit numbers), you are also required to manage your own blacklist – something BanishBot is designed to do.

This project is going to conform to the highest of standards, that is we are going to manage the following keywords:
STOP, END, CANCEL, UNSUBSCRIBE, QUIT, HELP, INFO, START, and SUBSCRIBE

I’m choosing to adhere to the highest of standards because it means I can use this project/code in a shortcode application without changing any code – handy!

The keywords are broken down into three areas; Stop, Start and Help.
When a user sends a message containing one of the STOP words (STOP, END, CANCEL, UNSUBSCRIBE, QUIT), we are going to banish this number.
When a user sends a message containing one of the START words (START, and SUBSCRIBE), we are going un-banish the number.
When a user sends a message containing one of the HELP words ( HELP, INFO) we are going to reply to the user with details on how they can get in touch – an email address or website for example.

You can find more details on TCPA compliance and industry regulations here: https://support.twilio.com/hc/en-us/articles/223182208-Industry-standards-for-U-S-short-code-HELP-and-STOP

From your Twilio console navigate to Studio and create a new flow, I’ve called mine ‘MatBot’ but feel I recommend you stick with a naming convention relevant to your project.

Your new empty flow will contain just a red trigger box with three connectors attached, one for inbound messages, one for inbound calls and one for REST API requests.

If you aren’t familiar with Studio have a look at the getting started pages.

Today we will be focusing on the SMS opt-out mechanism.
The first ‘widget’ we are going to drag onto the page is the ‘Spit’ Widget. A split is used to help guide how an application will react given different input parameters – in our case the SMS message body.
Drag a split widget onto the flow and link it up to the inbound SMS trigger. It should look something like this:

Message Split

Now when someone sends our number a message, we are going to parse that text and perform different responses based on the message body.

Before we can add any connects let’s drag the rest of the components onto the flow and configure them.
Drag a function widget onto the flow and name it ‘BanishThisNumber’, then from the function drop down select the function ‘BanishNewNumber’ and in the parameters section create a new parameter called ‘NumberToBanish’ with a value of ‘{{trigger.message.From}}’. The {{ brackets }} tells studio that this parameter is dynamic and to use the SenderID we received the message from.

Once you have this widget setup save and then repeat the function setup, this time for the unbanish number function. I called mine ‘UnBanishThisNumber’ linking to function ‘UnbanishNumber’ passing a parameter called ‘numberToUnBanish’ with value ‘{{trigger.message.From}}’.

Great! Now let’s add our first split, click the ‘New’ button, select ‘Regex’ from the drop down and in the value box type STOP. Once you have typed STOP a new drop-down will appear. From the drop-down select the function ‘BanishThisNumber’.

Banish This Number

Now when someone sends the message STOP to your number, the studio flow will route the message to the ‘BanishThisNumber’ function which will update the BanishBot service with this number which will now be banished. Now that you have one link setup lets connect the other opt-out keywords; END, CANCEL, UNSUBSCRIBE and QUIT.

Now, this is great but what if a user wants to opt back into your service. To opt a user back in they need to send one of the following words; START or SUBSCRIBE. You can add these words the same way you added the STOP keywords but link the keywords to the function ‘UnBanishThisNumber’.

Finally, we need to add support for the help/information keywords; HELP, INFO.
For help and information, we can reply to the message with a response that directs the user to our helpdesk or email address.
Drag a ‘Send Message’ Widget onto the flow and insert your response message.

Your Studio flow should look something like this:

BanishBot Studio Flow

Fantastic! Congratulations on building your opt-out bot!
Now when anyone wants opt-out of your services they will be handled automatically by the studio flow.

For the sending side, you now need to build BanishBot into your sending mechanism, so that each time you want to send someone an SMS message, the sending mechanism first checks the number against BanishBot and rejects the request if the number is indeed banished. – You can find the BanishBot Docs here, https://www.banishbot.com/docs.html
Hope you have fun banishing things 😉

An ever increasing problem in the digital age is the continual use and unwanted exposure of rude words and profanity. Thinking about this from a business perspective its never great when your customer service agents are exposed to an angry customer who does nothing but swear in a real time live chat.

Lets take for example a (Twilio) SMS powered customer support channel.

The standard work flow would be

Raw Inbound Request

Here the message comes into your support application, the raw content is added to a ticket or messaging system and is presented to your customer agent.

If this inbound contains profanity or other rude words your agents are immediately exposed to this.


Fortunately I’ve found a service that scans text bodies for rude words and replaces them – WebSanitize.

Using WebSanitize you can implement a profanity filter at the server or application layer.

This lets you build a workflow into your inbound messages process.

In layman’s terms we can add a method to scan inbound messages for profanity and replace the words.

This gives you the option of adding a layer between the rude inbound messages and our / your customer service agents.


Getting started with WebSanitize

The core of WebSanitize is fast API, to get started you need to sign up for an account with them. Once you have an API Key the request is fairly straight forward:

To make a request you need to pass the following details:


URL https://api.websanitize.com/message
API Key Your API Key
Content-type application/json
filter ‘word’ or ‘character’
message The message you want inspected


An example API request would be:

curl -XPOST -H ‘x-api-key: This1sN0tS3cure’ \
-H “Content-type: application/json” \
-d ‘{“filter”:”word”, “message”:”What the fuck man!”}’ \
‘https://api.websanitize.com/message’

Here the message that needs to be inspected is: “What the fuck man!” and the API is going to perform a word swap if it finds any profanity.

The response to the above request is:

{
“JobID”:”u4C9JTNPB3a8ykplhAi8YJyzXodGoF”,
“MessageAlert”:true,
“OriginalMessage”:”What the fuck man!”,
“CleanerMessage”:”what the duck man!”
}

The return response contains

JobID A unique ID for this request
MessageAlert true/false if a banned word was found
OriginalMessage The original unfiltered message
CleanerMessage The cleaned message


The first thing to notice is that ‘MessageAlert‘ flag has been set to true. You can use this as a first step to see if you need to replace the original text is to check this status. e.g.:

if(MessageAlert == true){
// Replace the original text using the returned variable CleanerMessage
} else {
// The original message did not contain any profanity
}


With this ‘Sanitized’ message replacing the original one we can present this to our customer support agent.

Why use WebSanitize or any kind of screening service?
It’s often said that a companies best asset is the people.
If you think about the abuse and language thats occasionally used by irate people when they speak to customer service agents, any barrier or in this case a ‘Sanitizer’ that can shield an employee from those harsh words is always a good thing.
Using a service like WebSanitize gives your customer service agents confidence that you or your organisation  are proactively taking steps to keep them safe and shielded from those undesirable words.

Over the last few months I’ve been speaking to a lot of customers (of Twilio), who need to be able to break down the spend of minutes spread over the countries that they call.

An example here would be:

ISO Country Code Minutes Used Total Price Number Of Calls
US 34 55.23 29


Thinking about how to solve this issue, I thought the best way to do it was to put the power into a script that you can download and run yourself.

You can find the script at: https://github.com/dotmat/TwilioCountryMonthlyReport

You will need to install Twilio helper library by running:

pip install Twilio

Once you have the helper library installed you need to edit the ‘CountryReportGenerator.py’ file to include your AccountSID and AuthKey as well as the dates you want to examine.

  • Keep in mind that the larger date range you select the longer the script will take to run.

From your terminal you can now run:

python3 ./CountryReportGenerator.py

The script will generate three reports for you.

  1. A CSV file showing containing the log of calls made in the date period. The CSV headers are: CallSID, CountryCode, NumberCalled, CallPrice, CallDuration
  2. A CSV file, this CSV file is the outcome of   and outputs: Country, MinutesUsed, TotalPrice, NumberOfCalls
  3. A JSON feed of the data so that you can use this in any server scripts you have running

Please let me know if you have any questions or issues.

TL:DR: Python3 Script that examines a date range to work out what countries have been called and in what frequency.

In my last post: http://www.mathewjenkinson.co.uk/twilio-sms-conversations-using-cookies/ I used HTTP Cookies to ask multiple questions to a handset. This got me thinking, what if I could use that conversation to generate a lead in Salesforce.

For example, your at an event, ‘CloudForce’ for example 😉 and you want to ask your guests about the experience they are having as well as capture the guests phone number in a lead campaign in Salesforce ready to pick up with the lead after the event. This gives you instant feedback on how people are enjoying the event, an incoming lead stream and verified phone numbers from potential customers.

In this post, Im going to build on using Twilio cookies to populate a lead campaign in Salesforce. To initiate this setup, I want to get the interested lead to message a keyword “CloudForceEU” for example. Once the initial message comes in, I want to ask 4 questions to the lead and then pass the captured data to our Salesforce instance.

To replicate this setup you will need:

  • An account with Twilio (https://www.twilio.com/try-twilio)
  • A SMS capable number within your Account Portal.
  • A Salesforce instance where you can add custom lead fields and use Web2Lead Form generator
  • A PHP based server to host the script found on my Github.  – If your savy you can make your own in another language such as Ruby or Python 🙂

Setting up Salesforce

To begin we need to add 4 custom fields to our salesforce lead’s panel. As I am choosing to ask 4 questions to our potential lead I want to capture this information so I can get an overall feel for the event as well as capturing info about our potential lead.

To add a custom field in Salesforce go to : salesforce.com/p/setup/layout/LayoutFieldList?type=Lead&setupid=LeadFields

or:  Setup > Leads > Fields and scroll to the bottom for ‘Custom Fields’ It should look something like:

Leads Generation SalesForce

Leads Generation SalesForce

Here we want the button marked ‘New’. Following the steps, we want a new text box of no more than 150 (This is WAY more than we need as we are only gathering simple responses). Fill in the details for the new field and then continue along. I tend to add the details of the question in the description so that I know what Question1 relates to. Continue this until you have all your question fields added.

Now we are going to build our Web2Lead form and capture the ID’s needed for our SMS Script.

Navigate to: Customize > Leads > Web-To-Lead

Remove all the initial fields from the box marked ‘Selected Fields’ and then import:

  • PhoneNumber
  • Campaign
  • Question1
  • Question2
  • Question3
  • Question4

You could add first name to this setup but you would need add a name collection to the SMS conversation, while its easy to do. Its not something I will be doing in this setup.

In the end your setup should look something like:

SF Web2Lead

SF Web2Lead

Then click generate. Salesforce will spit you out some code that you could use in a webform but we are going to grab the details of this code and use it in our SMS lead tracker. The code will look something like:


<!– ———————————————————————- –>
<!– NOTE: Please add the following <META> element to your page <HEAD>. –>
<!– If necessary, please modify the charset parameter to specify the –>
<!– character set of your HTML page. –>
<!– ———————————————————————- –>

<META HTTP-EQUIV=”Content-type” CONTENT=”text/html; charset=UTF-8″>

<!– ———————————————————————- –>
<!– NOTE: Please add the following <FORM> element to your page. –>
<!– ———————————————————————- –>

<form action=”https://www.salesforce.com/servlet/servlet.WebToLead?encoding=UTF-8″ method=”POST”>

<input type=hidden name=”oid” value=”ABC123″>
<input type=hidden name=”retURL” value=”http://”>

<!– ———————————————————————- –>
<!– NOTE: These fields are optional debugging elements. Please uncomment –>
<!– these lines if you wish to test in debug mode. –>
<!– <input type=”hidden” name=”debug” value=1> –>
<!– <input type=”hidden” name=”debugEmail” –>
<!– value=”[email protected]”> –>
<!– ———————————————————————- –>

<label for=”phone”>Phone</label><input id=”phone” maxlength=”40″ name=”phone” size=”20″ type=”text” /><br>

<label for=”Campaign_ID”>Campaign</label><select id=”Campaign_ID” name=”Campaign_ID”><option value=””>–None–</option></select><br>

Question1:<input id=”Question1″ maxlength=”174″ name=”Question1″ size=”20″ type=”text” /><br>

Question2:<input id=”Question2″ maxlength=”174″ name=”Question2″ size=”20″ type=”text” /><br>

Question3:<input id=”Question3″ maxlength=”174″ name=”Question3″ size=”20″ type=”text” /><br>

Question4:<input id=”Question4″ maxlength=”174″ name=”Question4″ size=”20″ type=”text” /><br>

<input type=”submit” name=”submit”>

</form>


As you can see its quite comprehensive, what we need from this code snippet; is the form URL, formID and then the ID’s for our phone number, campaign and questions. From the script above we get

  • URL Endpoint: ‘https://www.salesforce.com/servlet/servlet.WebToLead?encoding=UTF-8’
  • FormID: ‘ABC123’
  • Phone Number: ‘phone’
  • Campaign ID : ‘Campaign_ID’
  • Question 1 : ‘Question1’
  • Question 2 : ‘Question2’
  • Question 3 : ‘Question3’
  • Question 4 : ‘Question4’

This is the data we need to plug into our SMS cookie script.

At the end of the Twilio SMS conversation, the script will bundle up the details of the conversation and HTTPS POST to the salesforce URL.

Using Twilio cookies to mange the SMS Conversation

In the last post: http://www.mathewjenkinson.co.uk/twilio-sms-conversations-using-cookies/ I used HTTP Cookies to ask multiple questions to a handset. Now we are going to do the same thing, except at the end of this conversation we are going to post the data to Salesforce. You can find a copy of the script on my Github Twilio 2 SalesforceLeads.

The full script Im going to use is:

<?php
// Load the questions we want:
$question1 = ‘Hello. Welcome to the event! We would like to ask you some questions about your experience.</Message><Message>What did you think of the venue & refreshments? 5 (Exceptional) 0 (Poor)’; // by adding the </Message><Message> you can break up the initial response into a welcome message and then question1.
$question2 = ‘And the content of the Presentations? 5 (Exceptional) 0 (Poor)’;
$question3 = ‘How likely are you to attend future Twilio events from 5 (Definitely would) to 0 (definitely would not)’;
$question4 = ‘Is there anything specific you would like to discuss with Twilio? 5 (Yes, please asks someone to call) 0 (I’ll contact you if I need anything)’;
// After we have all 4 questions we can upload to the DB and thank the user for their input
$endStatement = ‘Thanks for your time. Hope you have a fun day!’;

// If we have no cookies we need to set all the cookies to nil and ask the opening question.
if(!isset($_COOKIE[‘question1’])) {
$TwiMLResponse = $question1;
//setcookie(‘question1’, ‘nil’);
setcookie(‘event’, $_POST[‘Body’]);
setcookie(‘question1’, ‘nil’);
setcookie(‘question2’, ‘nil’);
setcookie(‘question3’, ‘nil’);
setcookie(‘question4’, ‘nil’);
}
// If Question 1 is blank we can pair the answer to question 1
elseif ($_COOKIE[‘question1’] == ‘nil’) {
setcookie(‘question1’, $_POST[‘Body’]);
$TwiMLResponse = $question2;
}
// If Question 1 is not blank we find out if question 2 is blank and move up the ladder
elseif (($_COOKIE[‘question2’] == ‘nil’)) {
setcookie(‘question2’, $_POST[‘Body’]);
$TwiMLResponse = $question3;
}
elseif (($_COOKIE[‘question3’] == ‘nil’)) {
setcookie(‘question3’, $_POST[‘Body’]);
$TwiMLResponse = $question4;
}
// After we get the response for question 4, we can assign it to the question.
// Now we have all 4 questions answered and can pass the thank you note and also make a HTTP POST to our end point
elseif (($_COOKIE[‘question4’] == ‘nil’)) {
// With the last question answered, we can reply with our end statement and POST all the data from the conversation.
$TwiMLResponse = $endStatement;
// So now we have the cookies for the event and questions 1 to 3 and the BODY tag for answer 4. Now we can make a POST request to our form with that data.

// Get cURL resource
$curl = curl_init();
// Set some options – we are passing in a useragent too here
curl_setopt_array($curl, array(
CURLOPT_RETURNTRANSFER => 1,
CURLOPT_URL => ‘https://www.salesforce.com/servlet/servlet.WebToLead?encoding=UTF-8’,
CURLOPT_USERAGENT => ‘TwilioSMS’,
CURLOPT_POST => 1,
// POST fields for salesforce input:
CURLOPT_POSTFIELDS => array(‘oid’ => ‘ABC123’, ‘phone’ => $_POST[‘From’], ‘Campaign_ID’ => $_COOKIE[‘event’], ‘Question1’ => $_COOKIE[‘question1’], ‘Question2’ => $_COOKIE[‘question2’], ‘Question3’ => $_COOKIE[‘question3’], ‘Question4’ => $_POST[‘Body’])

));
// Send the request & save response to $resp
$resp = curl_exec($curl);
// Close request to clear up some resources
curl_close($curl);
}
header(‘content-type: text/xml’);
?>
<Response><Message><?php echo $TwiMLResponse; ?></Message></Response>

As you can see Im only use one script to manage the conversation, updating the cookies and working out where the data needs to be updated to and eventually POSTed too. As we are capturing questions about our SalesForceEU event Im going to need 4 questions:

$question1 = ‘Hello. Welcome to the event! We would like to ask you some questions about your experience.</Message><Message>What did you think of the venue & refreshments? 5 (Exceptional) 0 (Poor)’; // by adding the </Message><Message> you can break up the initial response into a welcome message and then question1.
$question2 = ‘And the content of the Presentations? 5 (Exceptional) 0 (Poor)’;
$question3 = ‘How likely are you to attend future Twilio events from 5 (Definitely would) to 0 (definitely would not)’;
$question4 = ‘Is there anything specific you would like to discuss with Twilio? 5 (Yes, please asks someone to call) 0 (I’ll contact you if I need anything)’;

As the script gets more replies from Twilio it populates the questions cookies until they are all full of data. Then we thank the user for their time, assemble the POST request and send it off to SalesForce.

CURLOPT_RETURNTRANSFER => 1,
CURLOPT_URL => ‘https://www.salesforce.com/servlet/servlet.WebToLead?encoding=UTF-8’,
CURLOPT_USERAGENT => ‘TwilioSMS’,
CURLOPT_POST => 1,
// POST fields for salesforce input:
CURLOPT_POSTFIELDS => array(‘oid’ => ‘ABC123’, ‘phone’ => $_POST[‘From’], ‘Campaign_ID’ => $_COOKIE[‘event’], ‘Question1’ => $_COOKIE[‘question1’], ‘Question2’ => $_COOKIE[‘question2’], ‘Question3’ => $_COOKIE[‘question3’], ‘Question4’ => $_POST[‘Body’])

If we run a test between my phone and Salesforce we get:

Twilio2SalesForceSMS

Twilio2SalesForceSMS


and in SalesForce:

SalesForce Leed Capture from SMS

SalesForce Leed Capture from SMS


As you can see this opens up lots of possibilities of lead capture and accurate number sourcing from events. You can even have a campaign manager back at HQ reaching back out to leads while they are still at the event.


When I talk to people about using Twilio (Twilio.com) SMS to engage with their customers I get a lot of push back on the technical side of how to manage a two way conversation.

If you think back to the old days before iPhones and threaded messages. We had whats now called ‘Nokia’ style messages. This is just a continuous list of messages that arrive into your mailbox, messages between two handsets were not threaded or connected in anyway. Twilio operates in the same fashion, a message out to a handset is not connected to a message in from a handset, there is no ID that links them and no function to make parent child relationships.

Step in Twilio Cookies. In the internet world you can use cookies to track a clients events and navigation throughout your website, you can use it to log if a customer viewed a product or read an article and then clicked on a related one. A visual example :

Cookies Example

Cookies Example (Taken from Twilio.com)

Using Cookies with Twilio we can imitate a conversation with the handset / end user, collecting data along the way and at the end of the conversation we can do something meaningful with the information – such as POST the data to a database or store in a file somewhere.

Why would conversations / cookies be handy to use with Twilio? Well, imagine your hosting an event and you want to get feedback from your guests, you can pass your guests a Twilio powered phone number which when they message will initiate a conversation with them.  At the end of the conversation we will have meaningful answers about the event, not to mention the guests phone number so we can follow up with that all important sales call!


The example Im using here is a single page PHP powered script that when your guests message will ask them favourite colour, meal, drink and if they want to go to the movies next week. We will then take this data and make a HTTP POST request to any server with the data. You can use Google Forms here to capture all your responses by amending the URL and POST ID’s. See: https://www.twilio.com/blog/2012/11/connecting-twilio-sms-to-a-google-spreadsheet.html as an example here.

If you just want the code its hosted at: TwilioSMSConversationCookies/TwilioSMSConversation.php

Below is a break down of the script:

These are the questions we want to ask when the user sends us a message:

// Load the questions we want:
$question1 = ‘Hello. What is your favourite colour’;
$question2 = ‘Thanks! Whats your favourite meal’;
$question3 = ‘Tasty! What about to Drink?’;
$question4 = ‘Delish! Do you want to go to the movies next week?’;

At the end of our conversation we want to thank the user so they know that no more questions are coming, and its polite!

// After we have all 4 questions we can upload to the DB and thank the user for their input
$endStatement = ‘Thanks for your time. Hope you have a fun day!’;

We are going to use cookies to track the conversation, I find that its better to pass all the cookies info we want with nil values and add data to these values as the conversation goes rather than adding them as we go. This way we can logically track the conversation.

if(!isset($_COOKIE[‘question1’])) {
$TwiMLResponse = $question1;
//setcookie(‘question1’, ‘nil’);
setcookie(‘event’, $_POST[‘Body’]);
setcookie(‘question1’, ‘nil’);
setcookie(‘question2’, ‘nil’);
setcookie(‘question3’, ‘nil’);
setcookie(‘question4’, ‘nil’);
}

As this conversation is kicked off by the user and not by us, we set all the question cookies to nil, load the first question into $TwiMLResponse and set the event cookie to be the current data in the original message. So for example if our event was called ‘Mats BBQ’ and I asked all my users to send the opening message as ‘Mats BBQ’ the event cookie would be ‘Mats BBQ’.

Because no question has been asked yet, all our cookie values are blank and we can ask our questions:

// If Question 1 is blank we can pair the answer to question 1
elseif ($_COOKIE[‘question1’] == ‘nil’) {
setcookie(‘question1’, $_POST[‘Body’]);
$TwiMLResponse = $question2;
}
// If Question 1 is not blank we find out if question 2 is blank and move up the ladder
elseif (($_COOKIE[‘question2’] == ‘nil’)) {
setcookie(‘question2’, $_POST[‘Body’]);
$TwiMLResponse = $question3;
}
elseif (($_COOKIE[‘question3’] == ‘nil’)) {
setcookie(‘question3’, $_POST[‘Body’]);
$TwiMLResponse = $question4;
}

Questions 1 to 3 are the same, its a case of moving through the questions, assigning the ‘Body’ value to the last question asked. When we get to the answer for Question 4 we have all our answers, so no need to set any more cookies.

Now we can take all our data, wrap it up into an array and make a HTTP POST request with this data:

// After we get the response for question 4, we can assign it to the question.
// Now we have all 4 questions answered and can pass the thank you note and also make a HTTP POST to our end point
elseif (($_COOKIE[‘question4’] == ‘nil’)) {
// With the last question answered, we can reply with our end statement and POST all the data from the conversation.
$TwiMLResponse = $endStatement;
// So now we have the cookies for the event and questions 1 to 3 and the BODY tag for answer 4. Now we can make a POST request to our form with that data.

// Get cURL resource
$curl = curl_init();
// Set some options – we are passing in a useragent too here
curl_setopt_array($curl, array(
CURLOPT_RETURNTRANSFER => 1,
CURLOPT_URL => ‘HTTP://YOUR.Domain.TLD/POST’,
CURLOPT_USERAGENT => ‘TwilioSMS’,
CURLOPT_POST => 1,
CURLOPT_POSTFIELDS => array(‘From’ => $_POST[‘From’], ‘Event’ => $_COOKIE[‘event’], ‘Question1’ => $_COOKIE[‘question1’], ‘Question2’ => $_COOKIE[‘question2’], ‘Question3’ => $_COOKIE[‘question3’], ‘Question4’ => $_POST[‘Body’])
));
// Send the request & save response to $resp
$resp = curl_exec($curl);
// Close request to clear up some resources
curl_close($curl);
}

I’ve removed my POST URL and ID’s to forms so you can see what question tally’s to what data and it should be easy enough to input your own details.

At then end of the php processing loop we need to pass all the information needed by Twilio:

header(‘content-type: text/xml’);
?>
<Response><Sms><?php echo $TwiMLResponse; ?></Sms></Response>

TwiML needs to pass strict XML  to operate so we set the header as XML file and then use the variable $TwiMLResponse to manage what we actually say back to our users.

I hope this helps your events get more data and keep your customers more engaged with your brand.

So for months of my development I’ve wanted to host and use a GitLab Droplet on Digital Ocean (https://www.digitalocean.com/?refcode=8dc34df963c1). Using the server works great for all my projects bar, ANYTHING xCode! The hours spent screaming at a bit of software “… But the Password is correct you stupid f*$ker, AHHH!!!!”

Up to this point, I had taken to using Xcode to locally manage the git repo for a particular project, which worked well but didn’t allow me to swap machines, pass code to friends or do anything close to what GitLab can to in term of backup and team management.

Eventually I came up with the idea of initialising the Git settings for a project and was going to push all the updated code / changes to GitLab using terminal. Ie, write all the code / project in Xcode, then close Xcode, launch terminal and then push from terminal to GitLab. But then, after I had setup a project directory, added the information needed to connect it to my git: “git init” and then “git remote add origin [email protected]:MyUserName/GitRepo.git” and had done the initial commit and push.

I went into Xcode, created a new project, navigated to the same directory and Xcode proudly told me that a git repo was already in use! See screenshot:

Git Repo Already Exists

Git Repo Already Exists

Clicking ok, and moving on with the rest of the project settings I can now push, commit and update all information FROM Xcode to my GitLab projects.

I hope this helps lots of people who struggle with GitLab / Xcode interrogations, from looking at forums and how-to guides. It seems a lot of people current struggle.

One of the coolest things about having your own phone number with Twilio (Twilio.com). Is that you can do some very nifty things with it.

For example, if you need a conference room setup with a text message you can forward to your friends, you can configure this in a PHP script quite easily, we can even get the script to respond to your request with details about the number to ring and the pin code.

If you haven’t already done so, head over to Twilio (Twilio.com) an sign up at: Try-Twilio This will provision you a Twilio number that you can call into and interact with.

Once we have a number lets build a script that can respond to our SMS message, generate the conference room pin and then respond back with the details of our conference room.

<?php

// Incoming Voice number thats paired with this setup – used for voice Conferences etc.
$voiceNumber = “+1…”;

// Get the Variables from the HTTP POST, We want to know the BODY and the FROM so we can authorise and action the request.

$fromPhoneNumber = $_POST[“From”];
$messageBody = $_POST[“Body”];

// Check the phone number is on our authorised list if so action the SMS request.

// As this grows I want to put the numbers into an authorised DB and make a DB request regarding this.
// As this minute we are just going to look up against authorised number just in the IF field.

if ($fromPhoneNumber == “+1…” or “+44…”) // This is the list of authorised numbers that can make conf rooms.

{

// If the number is authorised then we are going to look at the body for what we need to make / do.

if ($messageBody == “Conference” or “Conf”)
{
// If the body is Conference we want to generate a 4 digit pin number and then generate a SMS message that can be
// forwarded out to the participants.

// The idea is that this script will reply with
// “A Conference has been setup, please call XYZ Number press option X and enter pin abcd”

$confPin = rand(1000, 9999); // Generate a random pin number
$TwiMLResponse = “<Message>Conference Room Details:\r\nPhone Number: ” . $voiceNumber . “\r\nConference Pin: ” . $confPin. “</Message>”;
}
else // Catch all for whats left.
{
$TwiMLResponse = “<Message>Sorry, Me No understand. Try Again.</Message>”;
}
}
else
{
$TwiMLResponse = “<Message>Sorry, Your not authorised for this.</Message>”;
}

header(“content-type: text/xml”);
?>

<Response><?php echo $TwiMLResponse; ?></Response>

This script will check that the inbound number is able make conference room pin numbers and if so will generate a 4 digit pin that will then be distributed back to the user.

Now when we text our number the body “Conference” or “Conf” from an authorised phone it will generate a pin number and respond back with details of the conference room in a SMS message:


Conf Details

Conference Room Details


You can then copy and paste this SMS message into a group SMS or Whatsapp and allow people to call into the conference room.

Now we have the SMS part setup we need to build a script that can welcome the caller, get the pin number and then route them to the correct conference based on that response.

<?php

// Check to see if a Conf Pin has been inputted. If so, make a Conf room with that pin.
$confPin = $_GET[“Digits”];

// If no conf Pin ask the caller to enter a Conf pin or else hangup.
if (isset($confPin)){
$TwiMLResponse = “<Say voice=\”alice\”>Placing You into Conference Now.</Say><Dial><Conference>”. $confPin .”</Conference></Dial>”;
}
else
{
$TwiMLResponse = “<Gather method=\”GET\” timeout=\”25\” numDigits=\”4\”><Say voice=\”alice\”>Hello and welcome to the conference line. Please enter the Conference Pin.</Say></Gather><Say>I’m Sorry I didnt catch that</Say>”;

}

header(“content-type: text/xml”);
?>

<Response><?php echo $TwiMLResponse; ?></Response>


Here in this script we are checking to see if the GET method has been passed with any digits, indicating that the caller has already been greeted and input a conference pin. If we have a conference pin then we can use the digits to put his caller into that conference room.


This is a very simple conference line setup tool, and it will need some further modifying to make it secure. For example right now any 4 digit numbers will create a conference room. You may wish to modify the code so that only generated pin numbers can be used and those numbers cannot be reused – entirely up to you.


So after spending a considerable amount of time using Sakis – the 3G dongle software. I feel I need to write a better post on how to connect your Debian based system / Raspberry Pi to the internet using a 3G connection.

– Be warned, Data on the 3G network is RARELY all you can eat, ensure you have an appropriate data plan before you let your Pi loose.

– 2nd Warning.. 3G dongles consume huge quantities of power, if your running the project off a battery setup, write some code to disconnect the 3G stick when not in use to prevent it from eating all the power just staying connected.

With that being said, to download and install the 3G software:

sudo apt-get -y update

then

sudo apt-get -y upgrade

then

sudo apt-get -y install ppp

Once the updates have taken route and ppp has been installed you will need to download sakis;

wget “http://www.sakis3g.org/versions/latest/armv4t/sakis3g.gz”

then

gunzip sakis3g.gz

then

chmod +x sakis3g

finally

sudo ./sakis3g –interactive

This will take you to the interactive window used by Sakis, you can configure the 3G dongle here and then issue the connect command. The software has been set out to be easy to interact with.

Depending on the Simcard you have in the dongle, it may attempt to download the latest settings automatically and then offer them to you as a connection method.

If you don’t get that luxury you can manually enter your APN, username and password manually in the prompts.

One feature that I LOVE about Sakis is that you can call the connect command from within another program, lets say my Pi gathers some data up and then needs to send it somewhere on the net, you can tell the program to connect to Sakis like this:

./sakis3g connect APN=”CUSTOM_APN” CUSTOM_APN=”giffgaff.com” APN_USER=”giffgaff” APN_PASS=”password”

This string tells Sakis to connect to the Giffgaff network and can be followed by:

sudo ./sakis3g disconnect

How to add a custom APN to the sakis config file:
Using Nano create a file called sakis3g.conf stored in /etc/

sudo nano /etc/sakis3g.conf

Here you can add the APN details like this:

APN=CUSTOM_APN
CUSTOM_APN=”giffgaff.com”
APN_USER=”giffgaff”
APN_PASS=”password”

and then connect the 3G dongle by doing this:

sudo ./sakis3g connect

Super handy if you need to bring some 3G connectivity to your project! 🙂