Recently Twilio released a new product called Studio, which is a graphical drag and drop editor you can use to build workflows, IVR’s and bots – both via voice and SMS channels. Over the last little while, I’ve been using Studio to build some awesome bots.
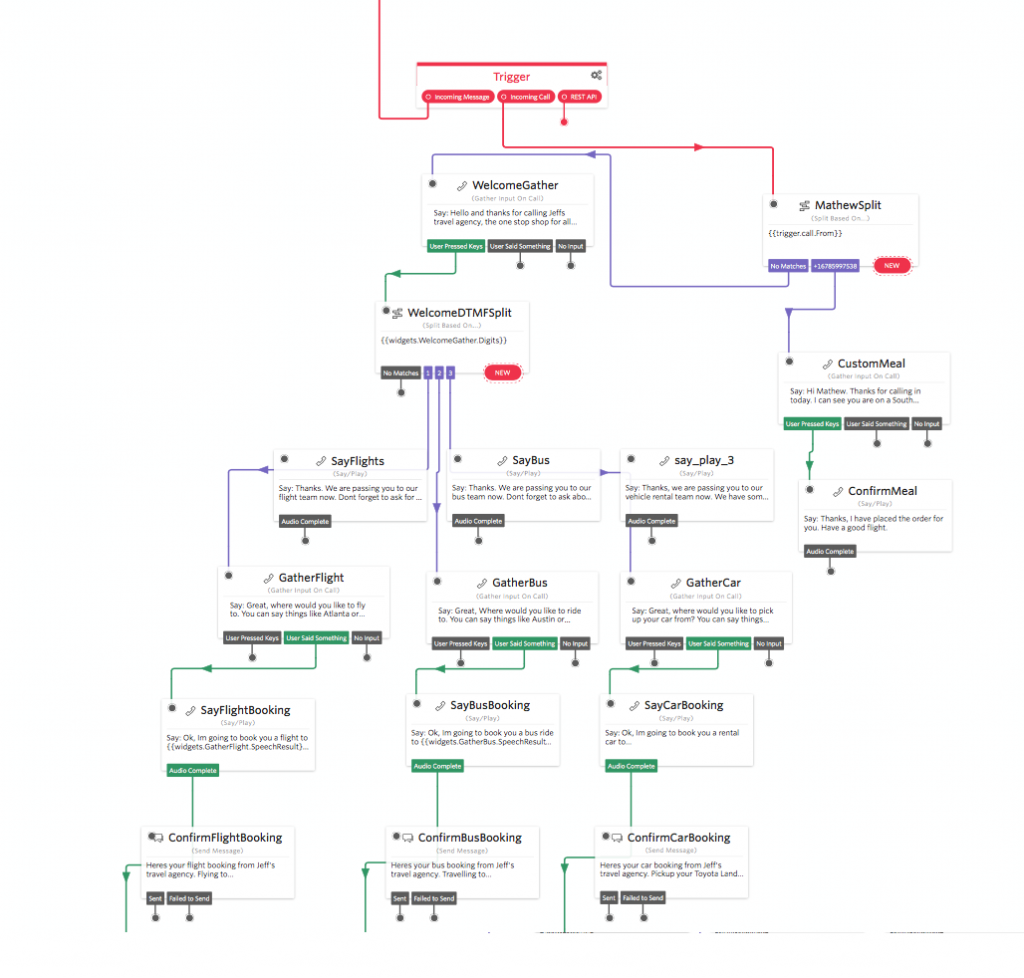
An awesome studio flow

One of the bots that I have built is a blacklisting tool that prevents my apps from spamming and messaging unwanted users, this tool uses another product of Twilio called ‘functions’ which is essentially AWS Lambda but executed within the Twilio ecosystem.

To do this project I found a great service called BanishBot, which dub’s itself as ‘An API designed to help you manage opt-in/out communications and access lists.’ In short, its an API you can use in distributed systems to manage your opt-in and out lists.

In this post, I’m going to use Studio, Functions, and BanishBot to create an auto-updating opt-in/out application. At the end of the build, I’ll have a system where customers/people can automatically opt-in or out of my messages. I’ll then be able to use BanishBot in my application development as the last mile checker to make sure I’m not actually sending out unwanted messages.

You’ll need the following to do this project:
Twilio account (upgraded and with a phone number) – Sign up here
BanishBot account – Sign up here

Once your setup with your accounts, go into Twilio functions and create a new function using the blank template.
Name the function something like ‘BanishNewNumber’, then copy and paste this code into the code field – update the username and APIKey fields with your own credentials.

var banishbot = require(‘banishbot’);
var username = ”; // Put your BanishBot username here
var apiKey = ”; // Put your BanishBot API key here
// This script is responsible for banishing a number to the banishbot platform
// This script is usually initiated from a Studio function
// and is passed the number that no longer wishes to be contacted.
exports.handler = function(context, event, callback) {
var numberToBanish = event.NumberToBanish;
console.log(‘Stand back! Im going to Banish the number ‘+numberToBanish);

banishPayload = {“banished”: true, “type”: “PhoneNumber”, “notes”: “STOP request from Studio Flow SMS StudioBot”}
banishbot.banishNewItem(username, apiKey, numberToBanish, banishPayload).then(function(result) {
// Success Result
console.log(result);
callback(null, ‘OK’);
})
.fail(function (error) {
// Error Something died, here is the response
console.log(error);
callback(null, ‘OK’);
});
//callback(null, ‘OK’);
};

Once you have set this function up click save.
Make the second function, called ‘UnbanishNumber’ then copy and paste this code into the code field – update the username and APIKey fields with your own credentials.

var banishbot = require(‘banishbot’);
var username = ”; // Put your BanishBot username here
var apiKey = ”; // Put your BanishBot API key here
// This script is responsible for unbanishing a number.
// This is usually a request from a Studio flow to return SMS to a user.
// This script updates the BanishBot Table to set the banished state to be false for a number.
exports.handler = function(context, event, callback) {
var numberToUnBanish = event.numberToUnBanish;
console.log(‘Stand back! Im going unbanish ‘+numberToUnBanish);

banishPayload = {
banished: false,
notes: ‘This number was un-banished using The BanishBot Studio Flow’
};
banishbot.updateBanishedItem(username, apiKey, numberToUnBanish, banishPayload).then(function(result) {
// Success Result
console.log(result);
callback(null, ‘OK’);
})
.fail(function (error) {
// Error Something died, here is the response
console.log(error);
callback(null, ‘OK’);
});
//callback(null, ‘OK’);
};

Great! A quick recap of the two functions we just created, one is responsible for banishing a number, and the other is responsible for un-banishing a number.

Now let’s go ahead and create our Studio bot that will handle our inbound stop/start requests.

But why build an opt-out bot?
When engaging with consumers, customers or people via SMS you have to comply with carrier compliance requirements, industry standards, and applicable law.
These often include the keywords HELP and STOP. In the case of shortcodes (five/six-digit numbers), you are also required to manage your own blacklist – something BanishBot is designed to do.

This project is going to conform to the highest of standards, that is we are going to manage the following keywords:
STOP, END, CANCEL, UNSUBSCRIBE, QUIT, HELP, INFO, START, and SUBSCRIBE

I’m choosing to adhere to the highest of standards because it means I can use this project/code in a shortcode application without changing any code – handy!

The keywords are broken down into three areas; Stop, Start and Help.
When a user sends a message containing one of the STOP words (STOP, END, CANCEL, UNSUBSCRIBE, QUIT), we are going to banish this number.
When a user sends a message containing one of the START words (START, and SUBSCRIBE), we are going un-banish the number.
When a user sends a message containing one of the HELP words ( HELP, INFO) we are going to reply to the user with details on how they can get in touch – an email address or website for example.

You can find more details on TCPA compliance and industry regulations here: https://support.twilio.com/hc/en-us/articles/223182208-Industry-standards-for-U-S-short-code-HELP-and-STOP

From your Twilio console navigate to Studio and create a new flow, I’ve called mine ‘MatBot’ but feel I recommend you stick with a naming convention relevant to your project.

Your new empty flow will contain just a red trigger box with three connectors attached, one for inbound messages, one for inbound calls and one for REST API requests.

If you aren’t familiar with Studio have a look at the getting started pages.

Today we will be focusing on the SMS opt-out mechanism.
The first ‘widget’ we are going to drag onto the page is the ‘Spit’ Widget. A split is used to help guide how an application will react given different input parameters – in our case the SMS message body.
Drag a split widget onto the flow and link it up to the inbound SMS trigger. It should look something like this:
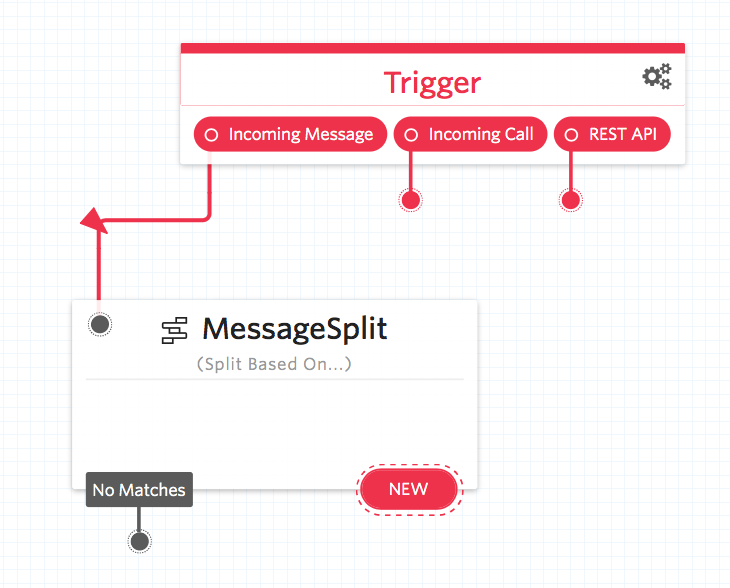
Message Split

Now when someone sends our number a message, we are going to parse that text and perform different responses based on the message body.

Before we can add any connects let’s drag the rest of the components onto the flow and configure them.
Drag a function widget onto the flow and name it ‘BanishThisNumber’, then from the function drop down select the function ‘BanishNewNumber’ and in the parameters section create a new parameter called ‘NumberToBanish’ with a value of ‘{{trigger.message.From}}’. The {{ brackets }} tells studio that this parameter is dynamic and to use the SenderID we received the message from.

Once you have this widget setup save and then repeat the function setup, this time for the unbanish number function. I called mine ‘UnBanishThisNumber’ linking to function ‘UnbanishNumber’ passing a parameter called ‘numberToUnBanish’ with value ‘{{trigger.message.From}}’.

Great! Now let’s add our first split, click the ‘New’ button, select ‘Regex’ from the drop down and in the value box type STOP. Once you have typed STOP a new drop-down will appear. From the drop-down select the function ‘BanishThisNumber’.
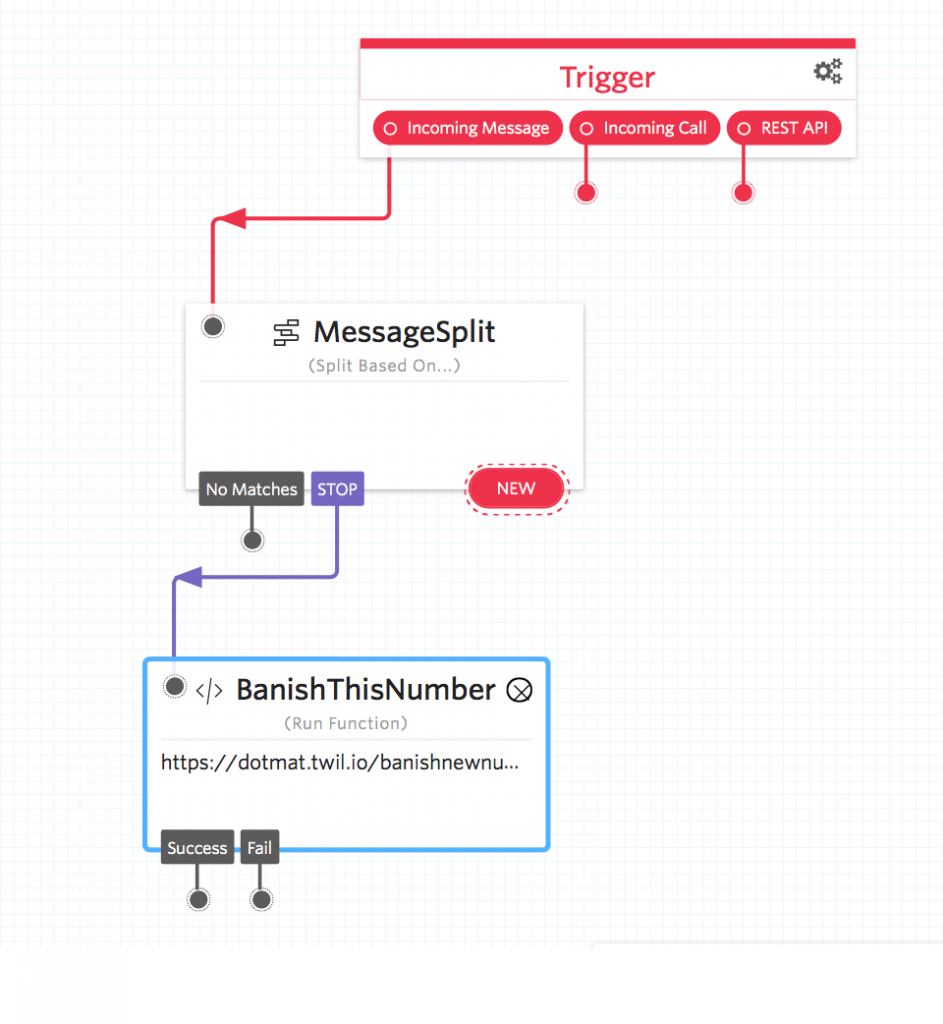
Banish This Number

Now when someone sends the message STOP to your number, the studio flow will route the message to the ‘BanishThisNumber’ function which will update the BanishBot service with this number which will now be banished. Now that you have one link setup lets connect the other opt-out keywords; END, CANCEL, UNSUBSCRIBE and QUIT.

Now, this is great but what if a user wants to opt back into your service. To opt a user back in they need to send one of the following words; START or SUBSCRIBE. You can add these words the same way you added the STOP keywords but link the keywords to the function ‘UnBanishThisNumber’.

Finally, we need to add support for the help/information keywords; HELP, INFO.
For help and information, we can reply to the message with a response that directs the user to our helpdesk or email address.
Drag a ‘Send Message’ Widget onto the flow and insert your response message.

Your Studio flow should look something like this:
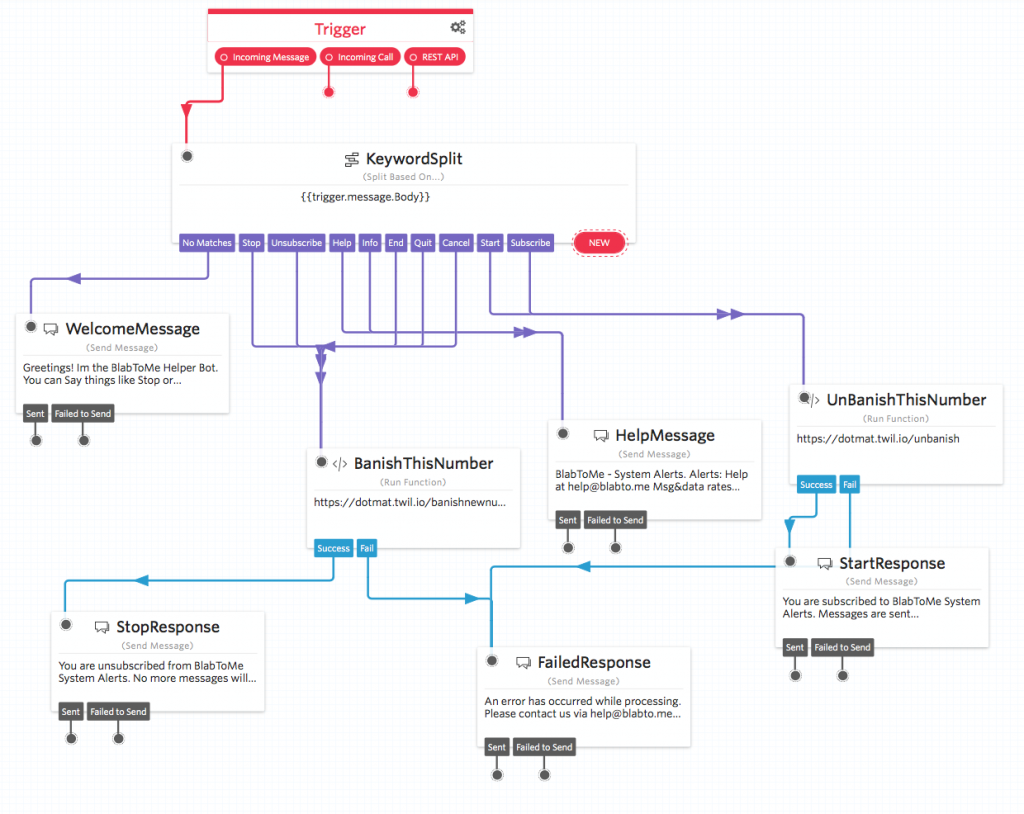
BanishBot Studio Flow

Fantastic! Congratulations on building your opt-out bot!
Now when anyone wants opt-out of your services they will be handled automatically by the studio flow.

For the sending side, you now need to build BanishBot into your sending mechanism, so that each time you want to send someone an SMS message, the sending mechanism first checks the number against BanishBot and rejects the request if the number is indeed banished. – You can find the BanishBot Docs here, https://www.banishbot.com/docs.html
Hope you have fun banishing things 😉

Over the last few months I’ve been speaking to a lot of customers (of Twilio), who need to be able to break down the spend of minutes spread over the countries that they call.

An example here would be:

ISO Country Code Minutes Used Total Price Number Of Calls
US 34 55.23 29


Thinking about how to solve this issue, I thought the best way to do it was to put the power into a script that you can download and run yourself.

You can find the script at: https://github.com/dotmat/TwilioCountryMonthlyReport

You will need to install Twilio helper library by running:

pip install Twilio

Once you have the helper library installed you need to edit the ‘CountryReportGenerator.py’ file to include your AccountSID and AuthKey as well as the dates you want to examine.

  • Keep in mind that the larger date range you select the longer the script will take to run.

From your terminal you can now run:

python3 ./CountryReportGenerator.py

The script will generate three reports for you.

  1. A CSV file showing containing the log of calls made in the date period. The CSV headers are: CallSID, CountryCode, NumberCalled, CallPrice, CallDuration
  2. A CSV file, this CSV file is the outcome of   and outputs: Country, MinutesUsed, TotalPrice, NumberOfCalls
  3. A JSON feed of the data so that you can use this in any server scripts you have running

Please let me know if you have any questions or issues.

TL:DR: Python3 Script that examines a date range to work out what countries have been called and in what frequency.

One of the coolest things about having your own phone number with Twilio (Twilio.com). Is that you can do some very nifty things with it.

For example, if you need a conference room setup with a text message you can forward to your friends, you can configure this in a PHP script quite easily, we can even get the script to respond to your request with details about the number to ring and the pin code.

If you haven’t already done so, head over to Twilio (Twilio.com) an sign up at: Try-Twilio This will provision you a Twilio number that you can call into and interact with.

Once we have a number lets build a script that can respond to our SMS message, generate the conference room pin and then respond back with the details of our conference room.

<?php

// Incoming Voice number thats paired with this setup – used for voice Conferences etc.
$voiceNumber = “+1…”;

// Get the Variables from the HTTP POST, We want to know the BODY and the FROM so we can authorise and action the request.

$fromPhoneNumber = $_POST[“From”];
$messageBody = $_POST[“Body”];

// Check the phone number is on our authorised list if so action the SMS request.

// As this grows I want to put the numbers into an authorised DB and make a DB request regarding this.
// As this minute we are just going to look up against authorised number just in the IF field.

if ($fromPhoneNumber == “+1…” or “+44…”) // This is the list of authorised numbers that can make conf rooms.

{

// If the number is authorised then we are going to look at the body for what we need to make / do.

if ($messageBody == “Conference” or “Conf”)
{
// If the body is Conference we want to generate a 4 digit pin number and then generate a SMS message that can be
// forwarded out to the participants.

// The idea is that this script will reply with
// “A Conference has been setup, please call XYZ Number press option X and enter pin abcd”

$confPin = rand(1000, 9999); // Generate a random pin number
$TwiMLResponse = “<Message>Conference Room Details:\r\nPhone Number: ” . $voiceNumber . “\r\nConference Pin: ” . $confPin. “</Message>”;
}
else // Catch all for whats left.
{
$TwiMLResponse = “<Message>Sorry, Me No understand. Try Again.</Message>”;
}
}
else
{
$TwiMLResponse = “<Message>Sorry, Your not authorised for this.</Message>”;
}

header(“content-type: text/xml”);
?>

<Response><?php echo $TwiMLResponse; ?></Response>

This script will check that the inbound number is able make conference room pin numbers and if so will generate a 4 digit pin that will then be distributed back to the user.

Now when we text our number the body “Conference” or “Conf” from an authorised phone it will generate a pin number and respond back with details of the conference room in a SMS message:


Conf Details

Conference Room Details


You can then copy and paste this SMS message into a group SMS or Whatsapp and allow people to call into the conference room.

Now we have the SMS part setup we need to build a script that can welcome the caller, get the pin number and then route them to the correct conference based on that response.

<?php

// Check to see if a Conf Pin has been inputted. If so, make a Conf room with that pin.
$confPin = $_GET[“Digits”];

// If no conf Pin ask the caller to enter a Conf pin or else hangup.
if (isset($confPin)){
$TwiMLResponse = “<Say voice=\”alice\”>Placing You into Conference Now.</Say><Dial><Conference>”. $confPin .”</Conference></Dial>”;
}
else
{
$TwiMLResponse = “<Gather method=\”GET\” timeout=\”25\” numDigits=\”4\”><Say voice=\”alice\”>Hello and welcome to the conference line. Please enter the Conference Pin.</Say></Gather><Say>I’m Sorry I didnt catch that</Say>”;

}

header(“content-type: text/xml”);
?>

<Response><?php echo $TwiMLResponse; ?></Response>


Here in this script we are checking to see if the GET method has been passed with any digits, indicating that the caller has already been greeted and input a conference pin. If we have a conference pin then we can use the digits to put his caller into that conference room.


This is a very simple conference line setup tool, and it will need some further modifying to make it secure. For example right now any 4 digit numbers will create a conference room. You may wish to modify the code so that only generated pin numbers can be used and those numbers cannot be reused – entirely up to you.


So one of the buzzword’s used in 2012 was ‘Big Data’, representing the interconnection of lots of databases from a variety of sources all communicating together.

Why might you want to engage with big data? Well say your website or app wants to make use of a post code search tool to confirm someones address, or allow your visitors to look up a weather report for a holiday destination you are offering without the user leaving your website or app.

This is achieved through the use of some technology known as ‘web services’ or an ‘Application Programming Interface’ (API).

One of my projects for 2013 involves making use of API’s to load data from a web server so I thought I would share how API’s work through this demo:

Lets say you have a database of recipes containing:

  • Recipe ID
  • Title
  • Thumbnail of the Dish
  • Ingredients & Method
  • Author

Next you would need to define what formats you want your data to be presented back, in this case I am going to use JSON and XML formatting.

On your web server create a new folder or appropriate place to store your API data file. In my case I have chosen: domain.com/api_interface/ and add a new file titled ‘API.php’

Inside API.php we can start to add some code:

<?php

//Checking and Getting the two variables format and number of records
if(isset($_GET[‘format’]) and intval($_GET[‘num’])) {

//Set our variables
$format = strtolower($_GET[‘format’]);
$num = intval($_GET[‘num’]);

In this code we open the PHP tags and check that we are getting two variables from the HTTP request – the format (either XML or JSON) and num (number of rows of data).

After this we need to connect to the database and start to query for data:

//Connect to the Database
$con = mysql_connect(“localhost”,”username”,”password”) or die (‘MySQL Connection Error.’);
mysql_select_db(“database_name”, $con) or die(‘MySQL Table Error.’);

//Run the API query
$result = mysql_query(‘SELECT * FROM table ORDER BY `recipe_id` ASC LIMIT ‘ . $num, $con) or die(‘MySQL Query Error.’);

This query will look-up the table ‘table’ from the database ‘database_name’ and return in ASCENDING order rows of data.

Now we have the data we can build an array and begin to present the data we would like.

//Preapre our output
if($format == ‘json’) {

$recipes = array();
while($recipe = mysql_fetch_array($result, MYSQL_ASSOC)) {
$recipes[] = array(‘post’=>$recipe);
}

$output = json_encode(array(‘posts’ => $recipes));

Fortunately for us PHP includes an encoder for JSON so specifying that we want the data in JSON format we can load the data into an array and then write the data directly into the correct format.

If on the other hand we would like our data in XML format we can use a loop inside php to load the array and then fill in the XML tags to present back the XML format required:

elseif($format == ‘xml’) {

header(‘Content-type: text/xml’);
$output .= “<?xml version=\”1.0\”?>\n”;
$output .= “<recipes>\n”;

for ($i = 0 ; $i < mysql_num_rows($result) ; $i++)
{
$row = mysql_fetch_assoc($result);
$output .= “<recipe> \n”;
$output .= “<recipe_id>” . $row[‘recipe_id’] . “</recipe_id> \n”;
$output .= “<recipe_name>” . $row[‘title’] . “</recipe_name> \n”;
$output .= “<recipe_img_small>” . $row[‘thumbnail_photo_url’] . “</recipe_img_small> \n”;
$output .= “<recipe_link>http://www.domain.com/recipes/recipe_detail.php?=” . $row[‘recipe_id’] . “</recipe_link> \n”;
$output .= “</recipe> \n”;
}

$output .= “</recipes>”;

The else if statement is connected to the IF statement above and relates to the users choice of data they would like (JSON Vs XML). As the If statement is run it loops through the statement filling in the blanks with data from the Array creating a complete XML file.

This is what the files look like in their respective outputs.

JSON:

{“posts”:[{“post”:{“recipe_id”:”1″,”title”:”Quick and Easy Rice”,”large_photo_url”:”tbd”,”thumbnail_photo_url”:”tbd”,”ingredients”:”Rice\r\nBoiling Water\r\nSesame Oil – Optional\r\n”,”method”:”Cook some rice”,”Author”:”Mathew”,”thumbs”:”1″}}]}

XML:

<recipes>
<recipe>
<recipe_id>1</recipe_id>
<recipe_name>Quick and Easy Rice</recipe_name>
<recipe_img_small>tbd</recipe_img_small>
<recipe_link>http://www.domain.com/recipes/recipe_detail.php?=1</recipe_link>
</recipe>
</recipes>

Building an API like this gives developers the most amount of flexibility when it comes to interfacing with your information and data.

Its worth noting that this API has got NO limitations attached to it and that should someone get a hold of your the API they would be able to spam your web server countless times bringing it down. I HIGHLY recommend the use of an API Key system such as mashery.com or  3scale.net/