Recently Twilio released a new product called Studio, which is a graphical drag and drop editor you can use to build workflows, IVR’s and bots – both via voice and SMS channels. Over the last little while, I’ve been using Studio to build some awesome bots.

An awesome studio flow

One of the bots that I have built is a blacklisting tool that prevents my apps from spamming and messaging unwanted users, this tool uses another product of Twilio called ‘functions’ which is essentially AWS Lambda but executed within the Twilio ecosystem.

To do this project I found a great service called BanishBot, which dub’s itself as ‘An API designed to help you manage opt-in/out communications and access lists.’ In short, its an API you can use in distributed systems to manage your opt-in and out lists.

In this post, I’m going to use Studio, Functions, and BanishBot to create an auto-updating opt-in/out application. At the end of the build, I’ll have a system where customers/people can automatically opt-in or out of my messages. I’ll then be able to use BanishBot in my application development as the last mile checker to make sure I’m not actually sending out unwanted messages.

You’ll need the following to do this project:
Twilio account (upgraded and with a phone number) – Sign up here
BanishBot account – Sign up here

Once your setup with your accounts, go into Twilio functions and create a new function using the blank template.
Name the function something like ‘BanishNewNumber’, then copy and paste this code into the code field – update the username and APIKey fields with your own credentials.

var banishbot = require(‘banishbot’);
var username = ”; // Put your BanishBot username here
var apiKey = ”; // Put your BanishBot API key here
// This script is responsible for banishing a number to the banishbot platform
// This script is usually initiated from a Studio function
// and is passed the number that no longer wishes to be contacted.
exports.handler = function(context, event, callback) {
var numberToBanish = event.NumberToBanish;
console.log(‘Stand back! Im going to Banish the number ‘+numberToBanish);

banishPayload = {“banished”: true, “type”: “PhoneNumber”, “notes”: “STOP request from Studio Flow SMS StudioBot”}
banishbot.banishNewItem(username, apiKey, numberToBanish, banishPayload).then(function(result) {
// Success Result
console.log(result);
callback(null, ‘OK’);
})
.fail(function (error) {
// Error Something died, here is the response
console.log(error);
callback(null, ‘OK’);
});
//callback(null, ‘OK’);
};

Once you have set this function up click save.
Make the second function, called ‘UnbanishNumber’ then copy and paste this code into the code field – update the username and APIKey fields with your own credentials.

var banishbot = require(‘banishbot’);
var username = ”; // Put your BanishBot username here
var apiKey = ”; // Put your BanishBot API key here
// This script is responsible for unbanishing a number.
// This is usually a request from a Studio flow to return SMS to a user.
// This script updates the BanishBot Table to set the banished state to be false for a number.
exports.handler = function(context, event, callback) {
var numberToUnBanish = event.numberToUnBanish;
console.log(‘Stand back! Im going unbanish ‘+numberToUnBanish);

banishPayload = {
banished: false,
notes: ‘This number was un-banished using The BanishBot Studio Flow’
};
banishbot.updateBanishedItem(username, apiKey, numberToUnBanish, banishPayload).then(function(result) {
// Success Result
console.log(result);
callback(null, ‘OK’);
})
.fail(function (error) {
// Error Something died, here is the response
console.log(error);
callback(null, ‘OK’);
});
//callback(null, ‘OK’);
};

Great! A quick recap of the two functions we just created, one is responsible for banishing a number, and the other is responsible for un-banishing a number.

Now let’s go ahead and create our Studio bot that will handle our inbound stop/start requests.

But why build an opt-out bot?
When engaging with consumers, customers or people via SMS you have to comply with carrier compliance requirements, industry standards, and applicable law.
These often include the keywords HELP and STOP. In the case of shortcodes (five/six-digit numbers), you are also required to manage your own blacklist – something BanishBot is designed to do.

This project is going to conform to the highest of standards, that is we are going to manage the following keywords:
STOP, END, CANCEL, UNSUBSCRIBE, QUIT, HELP, INFO, START, and SUBSCRIBE

I’m choosing to adhere to the highest of standards because it means I can use this project/code in a shortcode application without changing any code – handy!

The keywords are broken down into three areas; Stop, Start and Help.
When a user sends a message containing one of the STOP words (STOP, END, CANCEL, UNSUBSCRIBE, QUIT), we are going to banish this number.
When a user sends a message containing one of the START words (START, and SUBSCRIBE), we are going un-banish the number.
When a user sends a message containing one of the HELP words ( HELP, INFO) we are going to reply to the user with details on how they can get in touch – an email address or website for example.

You can find more details on TCPA compliance and industry regulations here: https://support.twilio.com/hc/en-us/articles/223182208-Industry-standards-for-U-S-short-code-HELP-and-STOP

From your Twilio console navigate to Studio and create a new flow, I’ve called mine ‘MatBot’ but feel I recommend you stick with a naming convention relevant to your project.

Your new empty flow will contain just a red trigger box with three connectors attached, one for inbound messages, one for inbound calls and one for REST API requests.

If you aren’t familiar with Studio have a look at the getting started pages.

Today we will be focusing on the SMS opt-out mechanism.
The first ‘widget’ we are going to drag onto the page is the ‘Spit’ Widget. A split is used to help guide how an application will react given different input parameters – in our case the SMS message body.
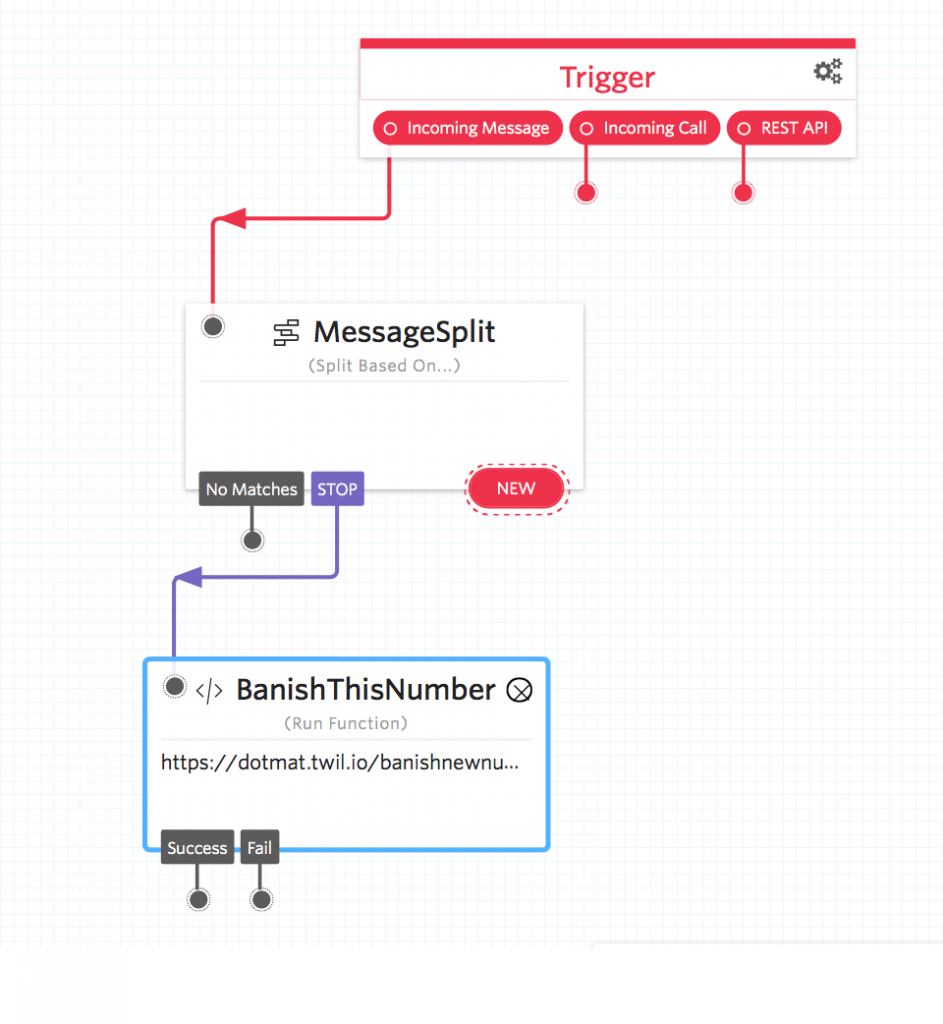
Drag a split widget onto the flow and link it up to the inbound SMS trigger. It should look something like this:

Message Split

Now when someone sends our number a message, we are going to parse that text and perform different responses based on the message body.

Before we can add any connects let’s drag the rest of the components onto the flow and configure them.
Drag a function widget onto the flow and name it ‘BanishThisNumber’, then from the function drop down select the function ‘BanishNewNumber’ and in the parameters section create a new parameter called ‘NumberToBanish’ with a value of ‘{{trigger.message.From}}’. The {{ brackets }} tells studio that this parameter is dynamic and to use the SenderID we received the message from.

Once you have this widget setup save and then repeat the function setup, this time for the unbanish number function. I called mine ‘UnBanishThisNumber’ linking to function ‘UnbanishNumber’ passing a parameter called ‘numberToUnBanish’ with value ‘{{trigger.message.From}}’.

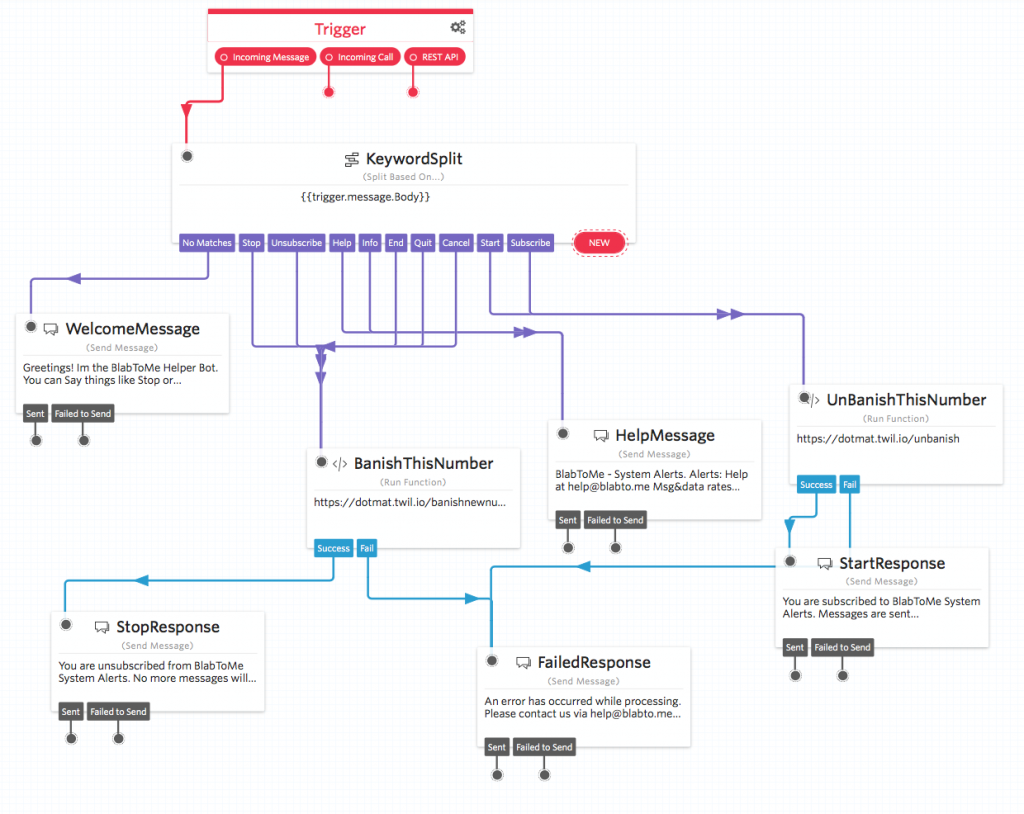
Great! Now let’s add our first split, click the ‘New’ button, select ‘Regex’ from the drop down and in the value box type STOP. Once you have typed STOP a new drop-down will appear. From the drop-down select the function ‘BanishThisNumber’.

Banish This Number

Now when someone sends the message STOP to your number, the studio flow will route the message to the ‘BanishThisNumber’ function which will update the BanishBot service with this number which will now be banished. Now that you have one link setup lets connect the other opt-out keywords; END, CANCEL, UNSUBSCRIBE and QUIT.

Now, this is great but what if a user wants to opt back into your service. To opt a user back in they need to send one of the following words; START or SUBSCRIBE. You can add these words the same way you added the STOP keywords but link the keywords to the function ‘UnBanishThisNumber’.

Finally, we need to add support for the help/information keywords; HELP, INFO.
For help and information, we can reply to the message with a response that directs the user to our helpdesk or email address.
Drag a ‘Send Message’ Widget onto the flow and insert your response message.

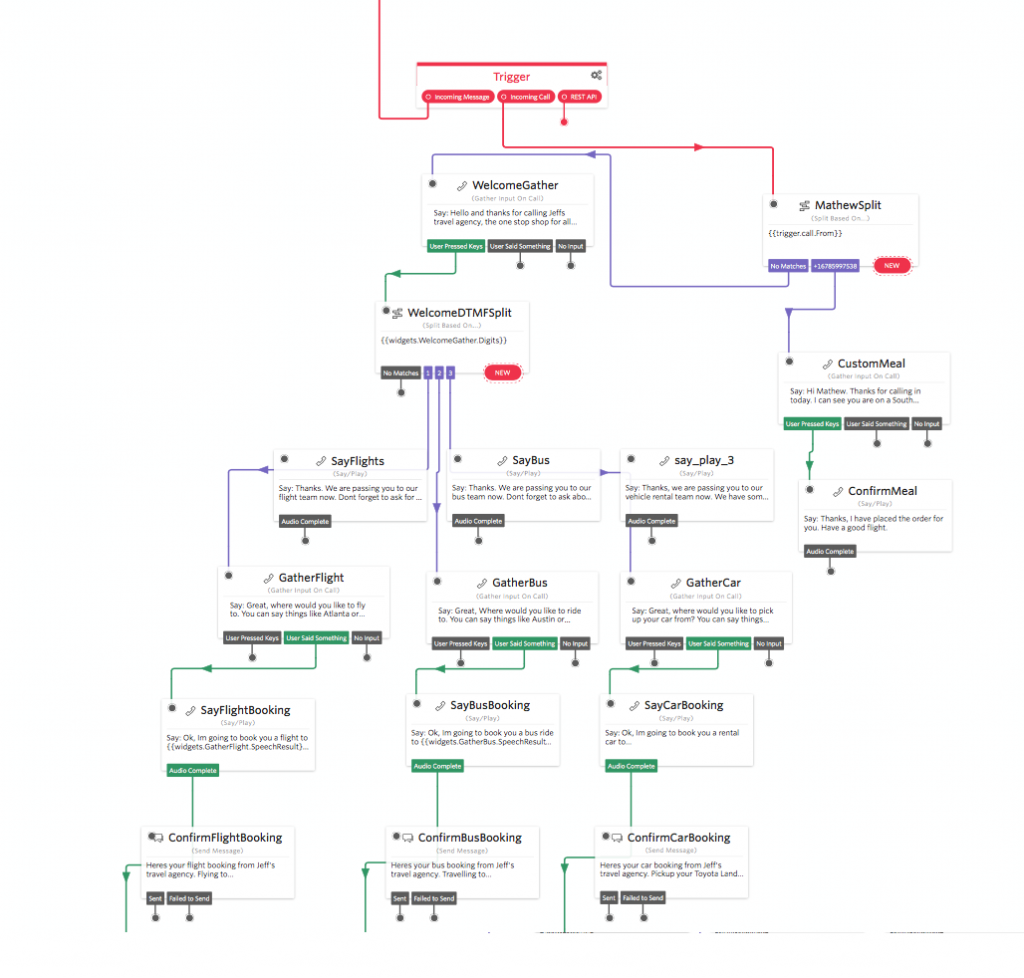
Your Studio flow should look something like this:

BanishBot Studio Flow

Fantastic! Congratulations on building your opt-out bot!
Now when anyone wants opt-out of your services they will be handled automatically by the studio flow.

For the sending side, you now need to build BanishBot into your sending mechanism, so that each time you want to send someone an SMS message, the sending mechanism first checks the number against BanishBot and rejects the request if the number is indeed banished. – You can find the BanishBot Docs here, https://www.banishbot.com/docs.html
Hope you have fun banishing things 😉

An ever increasing problem in the digital age is the continual use and unwanted exposure of rude words and profanity. Thinking about this from a business perspective its never great when your customer service agents are exposed to an angry customer who does nothing but swear in a real time live chat.

Lets take for example a (Twilio) SMS powered customer support channel.

The standard work flow would be

Raw Inbound Request

Here the message comes into your support application, the raw content is added to a ticket or messaging system and is presented to your customer agent.

If this inbound contains profanity or other rude words your agents are immediately exposed to this.


Fortunately I’ve found a service that scans text bodies for rude words and replaces them – WebSanitize.

Using WebSanitize you can implement a profanity filter at the server or application layer.

This lets you build a workflow into your inbound messages process.

In layman’s terms we can add a method to scan inbound messages for profanity and replace the words.

This gives you the option of adding a layer between the rude inbound messages and our / your customer service agents.


Getting started with WebSanitize

The core of WebSanitize is fast API, to get started you need to sign up for an account with them. Once you have an API Key the request is fairly straight forward:

To make a request you need to pass the following details:


URL https://api.websanitize.com/message
API Key Your API Key
Content-type application/json
filter ‘word’ or ‘character’
message The message you want inspected


An example API request would be:

curl -XPOST -H ‘x-api-key: This1sN0tS3cure’ \
-H “Content-type: application/json” \
-d ‘{“filter”:”word”, “message”:”What the fuck man!”}’ \
‘https://api.websanitize.com/message’

Here the message that needs to be inspected is: “What the fuck man!” and the API is going to perform a word swap if it finds any profanity.

The response to the above request is:

{
“JobID”:”u4C9JTNPB3a8ykplhAi8YJyzXodGoF”,
“MessageAlert”:true,
“OriginalMessage”:”What the fuck man!”,
“CleanerMessage”:”what the duck man!”
}

The return response contains

JobID A unique ID for this request
MessageAlert true/false if a banned word was found
OriginalMessage The original unfiltered message
CleanerMessage The cleaned message


The first thing to notice is that ‘MessageAlert‘ flag has been set to true. You can use this as a first step to see if you need to replace the original text is to check this status. e.g.:

if(MessageAlert == true){
// Replace the original text using the returned variable CleanerMessage
} else {
// The original message did not contain any profanity
}


With this ‘Sanitized’ message replacing the original one we can present this to our customer support agent.

Why use WebSanitize or any kind of screening service?
It’s often said that a companies best asset is the people.
If you think about the abuse and language thats occasionally used by irate people when they speak to customer service agents, any barrier or in this case a ‘Sanitizer’ that can shield an employee from those harsh words is always a good thing.
Using a service like WebSanitize gives your customer service agents confidence that you or your organisation  are proactively taking steps to keep them safe and shielded from those undesirable words.

At Amazon AWS ReInvent 2016 one of the cool new features that was released was Polly, an amazingly slick synthetic voice engine. At time of writing, Polly supports a total of 47 male & female voices spread across 24 languages.


From the moment I saw the demo I knew I could use this to generate on the fly audio for use on Twilio.

Using AWS Polly with Twilio will allow you to make use of multiple languages, dialects and pronunciation of words. For example the word “live” in the phrases “I live in Seattle” and “Live from New York.” Polly knows that this pair of homographs are spelled the same but are pronounced quite differently. (sic) .

In this example I’m going to be using AWS Polly, Twilio TwiML (the Twilio XML based markup language) and NodeJS to produce an app that will allow you to generate on demand MP3 files which can then be nested in TwiML <Play> verbs.

Phase One: Get started by setting up the credentials needed by Polly

  1. Login to your AWS account
  2. Navigate to “Identity and Access Management”
  3. Create a new use that has programatic access (this will generate keys and a key secret).
  4. Attach the user to “AmazonPollyFullAccess” policy and finish the account creation steps.

Phase Two: Create a new NodeJS project

  1. In terminal navigate to where you keep your projects and create a new directory
    mkdir nodeJSPollyTwiML && cd nodeJSPollyTwiML
  2. Inside the directory initialise node using
    npm init
  3. The initialise script will ask you some basic questions about the application; name, keywords etc. I will leave this up to you.

Once the initialise script has finished we can install the required modules needed by NodeJS to run our application.

npm install --save aws-config aws-sdk body-parser express forms

This will install the required modules needed to build and run this app.
Now we can begin to build out this application.
Call up your favourite text editor – mine currently is Atom, which is made by the GitHub team.

Atom Screenshot

Atom allows you to keep a project directory on the left for easy navigation as well as colour coding all the files based on their git state.

The structure of the app is going to be:

├── server.js
|   ├── config.js
├── audioFiles
  • server.js will be responsible for all the application processing
  • config.js will be where the system configuration files will be stored
  • audioFiles will house the saved audio records.

Before we can write any server code we need somewhere to store our AWS credentials. Create a new file called config.js, add to this file:

var config = {
production: {
serverAddress: "https://production.domain.com",
port: 3005,
awsConfig: {
region: 'us-east-1',
maxRetries: 3,
accessKeyId: 'this is top secret',
secretAccessKey: 'this is bottom secret',
timeout: 15000
}
},
default: {
serverAddress: "https://test.domain.com",
port: 3000,
awsConfig: {
region: 'us-east-1',
maxRetries: 3,
accessKeyId: 'this is top secret test',
secretAccessKey: 'this is bottom secret test',
timeout: 15000
}
}
}

exports.get = function get(env) {
return config[env] || config.default;
}

In the configuration page we have broken out the settings into two parts; one for production systems and one for test systems (default in this case). As we are still building this app I will be working from the test environment.

Using Module exports we can now call the config file into server.js and load the credentials when we need them!

Open server.js file and load the modules needed, this should be the same as what was in package.json after npm install had completed.

To server.js we are going to add:

"use strict";

var express = require('express');
var AWS = require('aws-sdk');
var awsConfig = require('aws-config');
var path = require('path');
var bodyParser = require('body-parser');
var fs = require('fs');

// Load the config files
var config = require('./config.js').get(process.env.NODE_ENV);
AWS.config = awsConfig({
region: config.awsConfig.region,
maxRetries: config.awsConfig.maxRetries,
accessKeyId: config.awsConfig.accessKeyId,
secretAccessKey: config.awsConfig.secretAccessKey,
timeout: config.awsConfig.timeout
});

// Create a new AWS Polly object
var polly = new AWS.Polly();

var express = require('express')
var app = express()

Here we have defined that the app is to use ‘strict mode‘ when processing.

Then the script loaded all the modules and imported the configuration file.

To make use of AWS Polly a polly object is created you will see this referenced later.

Lastly an express object is created, this object will be used to handle the HTTP requests to the app.


Application Logic

While this application doesn’t have a lot of moving parts its important to understand whats going on.

When a HTTP Request comes in, express will route the task to a function that will engage with Polly, transmit the text and desired voice.

When Polly completes the task it will return the audio file as a data stream which is saved to disk.

Once the file has been saved to disk it can then be sent as part of the HTTP Response.

The diagram illustrates the lifecycle.

For the inbound HTTP request URL, Im going to define the structure as

/play/Carla/Hi%20Mathew.%20this%20is%20Carla%20from%20Amazon%20Web%20services.

Breaking this down, the path is comprised of ‘play‘ this refers to the Twilio Verb Play, if the application were to be built out further you could use other verbs or commands to define other paths, e.g. /host/ could generate the audio file but return the URL path of the audio file, letting the application host the file.

Next ‘Carla‘ refers to the Polly voice we want to use, as mentioned before AWS polly has a total of 47 male & female voices. Each of these voices has a name so its easy to reference which voice you want to use by calling that name.

The last part: ‘Hi%20Mathew.%20this%20is%20Carla%20from%20Amazon%20Web%20services.‘ Is the message that needs to be converted into speech. To ensure that the message is transmitted correctly you will need to URL encode the string, this converts spaces into %20, you can find more details on URL encoding here.

Add the following to server.js

// Generate an Audiofile and serve stright back to the user for use as a file stright away
app.get('/play/:voiceId/:textToConvert', function (req, res) {
var pollyCallback = function (err, data) {
if (err) console.log(err, err.stack); // an error occurred
else console.log(data); // successful response

// Generate a unique name for this audio file, the file name is: PollyVoiceTimeStamp.mp3
var filename = req.params.voiceId + (new Date).getTime() + ".mp3";
fs.writeFile('./audioFiles/'+filename, data.AudioStream, function (err) {
if (err) {
console.log('An error occurred while writing the file.');
console.log(err);
}
console.log('Finished writing the file to the filesystem ' + '/audioFiles/'+filename)

// Send the audio file
res.setHeader('content-type', 'audio/mpeg');
res.download('audioFiles/'+filename);
});
};

var pollyParameters = {
OutputFormat: 'mp3',
Text: unescape(req.params.textToConvert),
VoiceId: req.params.voiceId
};

// Make a request to AWS Polly with the text and voice needed, when the request is completed push callback to pollyCallback
polly.synthesizeSpeech(pollyParameters, pollyCallback);
})

Lets break down what this function does.

First

app.get('/play/:voiceId/:textToConvert', function (req, res) {

When a HTTP GET requests comes in that starts /play/ this function will be called. Next voiceID is the variable for the the Polly voice requested, and textToConvert the URL encoded text that needs to be converted.

To make the request to AWS Polly, the pollyParameters object needs to be populated, this consists of the chosen voice and the text to convert. MP3 has been fixed in this example.

Now the application is ready to call Polly,

polly.synthesizeSpeech(pollyParameters, pollyCallback);

here the app passes the parameters as well as a callback that will be invoked when the job is finished.

Once Polly has finished generating the audio file it will run the callback and (if successful) pass back the audio file.

The callback pollyCallback is now responsible for a two things; saving the file to disk and passing the file back to the users request.

var filename = req.params.voiceId + (new Date).getTime() + ".mp3";
fs.writeFile('./audioFiles/'+filename, data.AudioStream, function (err) {

To make sure we dont overwrite another audio file I’m using epoc timestamps to define a unique file name combined with the Polly voice used.

At the end of the callback, it will pass back to the user the audio file and a MP3 header

res.setHeader('content-type', 'audio/mpeg');
res.download('audioFiles/'+filename);

Awesome! Now we have an API that can generate synthesised speech using AWS Polly from text provided inbound.
If you build and run the application, putting in

/play/Carla/Hello%20reader.%20Thank%20you%20for%20taking%20the%20time%20to%20read%20this%20blog%20post%20and%20build%20the%20tutorial.%20I%20Hope%20it%20has%20been%20helpful%20for%20you.

You will get a MP3 file passed back in your browser!


Phase Three: Twilio Play

Now we have a HTTP addressable endpoint we can integrate our audio files into Twilio’s TwiML,  when Twilio makes a request to your Twilio application for TwiML you can now integrate this application into <Play> verbs. An example is:

<Response><Play>http://your.app.domain/play/Joanna/Wow.%20I%20have%20integrated%20Amazon%20Polly%20into%20my%20Twilio%20application.%20Now%20I%20can%20generate%20natural%20voices%20with%20custom%20text%20exactly%20when%20needed.%20This%20is%20amazing.</Play></Response>

When you compile your TwiML you will need to make sure that the text to speak has been url-encoded, otherwise Twilio will fail the TwiML for not being compliant.
GitHubhttps://github.com/dotmat/nodeJSPollyTwiML

Conclusion:

Integrating AWS Polly into your Twilio apps is now fast and easy. With a HTTP request you can request a desired voice convert text into an audio file which can be used with Twilio to play back to a caller / customer.

Betterments:

  1. At present time, the application is unsecured, anyone with access to your app / domain could quickly start using polly to increase your AWS spend. While Polly is very cheap ($0.000004 per character, or about $0.004 per minute of generated audio) its still something that should be addressed. I would recommend implementing some kind of auth that can check against known users database (Basic Auth for example)
  2. For common messages that you might use over and over its pointless to keep generating this for one time use, if you had a prebuilt database of common messages that your application uses, you could reference these from the API. In the GitHub repo I expanded the code to allow you to pull audio files by calling the MP3 file name.
  3. The app currently does no house keeping of audio files, each time you make a request to Polly it will generate an audio file. A good tool next would be something that deletes audio files over than a X days or weeks.

I hope this tutorial has been helpful, please reach out if you have any issues or questions!

Over the last few months I’ve been speaking to a lot of customers (of Twilio), who need to be able to break down the spend of minutes spread over the countries that they call.

An example here would be:

ISO Country Code Minutes Used Total Price Number Of Calls
US 34 55.23 29


Thinking about how to solve this issue, I thought the best way to do it was to put the power into a script that you can download and run yourself.

You can find the script at: https://github.com/dotmat/TwilioCountryMonthlyReport

You will need to install Twilio helper library by running:

pip install Twilio

Once you have the helper library installed you need to edit the ‘CountryReportGenerator.py’ file to include your AccountSID and AuthKey as well as the dates you want to examine.

  • Keep in mind that the larger date range you select the longer the script will take to run.

From your terminal you can now run:

python3 ./CountryReportGenerator.py

The script will generate three reports for you.

  1. A CSV file showing containing the log of calls made in the date period. The CSV headers are: CallSID, CountryCode, NumberCalled, CallPrice, CallDuration
  2. A CSV file, this CSV file is the outcome of   and outputs: Country, MinutesUsed, TotalPrice, NumberOfCalls
  3. A JSON feed of the data so that you can use this in any server scripts you have running

Please let me know if you have any questions or issues.

TL:DR: Python3 Script that examines a date range to work out what countries have been called and in what frequency.

In my last post: http://www.mathewjenkinson.co.uk/twilio-sms-conversations-using-cookies/ I used HTTP Cookies to ask multiple questions to a handset. This got me thinking, what if I could use that conversation to generate a lead in Salesforce.

For example, your at an event, ‘CloudForce’ for example 😉 and you want to ask your guests about the experience they are having as well as capture the guests phone number in a lead campaign in Salesforce ready to pick up with the lead after the event. This gives you instant feedback on how people are enjoying the event, an incoming lead stream and verified phone numbers from potential customers.

In this post, Im going to build on using Twilio cookies to populate a lead campaign in Salesforce. To initiate this setup, I want to get the interested lead to message a keyword “CloudForceEU” for example. Once the initial message comes in, I want to ask 4 questions to the lead and then pass the captured data to our Salesforce instance.

To replicate this setup you will need:

  • An account with Twilio (https://www.twilio.com/try-twilio)
  • A SMS capable number within your Account Portal.
  • A Salesforce instance where you can add custom lead fields and use Web2Lead Form generator
  • A PHP based server to host the script found on my Github.  – If your savy you can make your own in another language such as Ruby or Python 🙂

Setting up Salesforce

To begin we need to add 4 custom fields to our salesforce lead’s panel. As I am choosing to ask 4 questions to our potential lead I want to capture this information so I can get an overall feel for the event as well as capturing info about our potential lead.

To add a custom field in Salesforce go to : salesforce.com/p/setup/layout/LayoutFieldList?type=Lead&setupid=LeadFields

or:  Setup > Leads > Fields and scroll to the bottom for ‘Custom Fields’ It should look something like:

Leads Generation SalesForce

Leads Generation SalesForce

Here we want the button marked ‘New’. Following the steps, we want a new text box of no more than 150 (This is WAY more than we need as we are only gathering simple responses). Fill in the details for the new field and then continue along. I tend to add the details of the question in the description so that I know what Question1 relates to. Continue this until you have all your question fields added.

Now we are going to build our Web2Lead form and capture the ID’s needed for our SMS Script.

Navigate to: Customize > Leads > Web-To-Lead

Remove all the initial fields from the box marked ‘Selected Fields’ and then import:

  • PhoneNumber
  • Campaign
  • Question1
  • Question2
  • Question3
  • Question4

You could add first name to this setup but you would need add a name collection to the SMS conversation, while its easy to do. Its not something I will be doing in this setup.

In the end your setup should look something like:

SF Web2Lead

SF Web2Lead

Then click generate. Salesforce will spit you out some code that you could use in a webform but we are going to grab the details of this code and use it in our SMS lead tracker. The code will look something like:


<!– ———————————————————————- –>
<!– NOTE: Please add the following <META> element to your page <HEAD>. –>
<!– If necessary, please modify the charset parameter to specify the –>
<!– character set of your HTML page. –>
<!– ———————————————————————- –>

<META HTTP-EQUIV=”Content-type” CONTENT=”text/html; charset=UTF-8″>

<!– ———————————————————————- –>
<!– NOTE: Please add the following <FORM> element to your page. –>
<!– ———————————————————————- –>

<form action=”https://www.salesforce.com/servlet/servlet.WebToLead?encoding=UTF-8″ method=”POST”>

<input type=hidden name=”oid” value=”ABC123″>
<input type=hidden name=”retURL” value=”http://”>

<!– ———————————————————————- –>
<!– NOTE: These fields are optional debugging elements. Please uncomment –>
<!– these lines if you wish to test in debug mode. –>
<!– <input type=”hidden” name=”debug” value=1> –>
<!– <input type=”hidden” name=”debugEmail” –>
<!– value=”[email protected]”> –>
<!– ———————————————————————- –>

<label for=”phone”>Phone</label><input id=”phone” maxlength=”40″ name=”phone” size=”20″ type=”text” /><br>

<label for=”Campaign_ID”>Campaign</label><select id=”Campaign_ID” name=”Campaign_ID”><option value=””>–None–</option></select><br>

Question1:<input id=”Question1″ maxlength=”174″ name=”Question1″ size=”20″ type=”text” /><br>

Question2:<input id=”Question2″ maxlength=”174″ name=”Question2″ size=”20″ type=”text” /><br>

Question3:<input id=”Question3″ maxlength=”174″ name=”Question3″ size=”20″ type=”text” /><br>

Question4:<input id=”Question4″ maxlength=”174″ name=”Question4″ size=”20″ type=”text” /><br>

<input type=”submit” name=”submit”>

</form>


As you can see its quite comprehensive, what we need from this code snippet; is the form URL, formID and then the ID’s for our phone number, campaign and questions. From the script above we get

  • URL Endpoint: ‘https://www.salesforce.com/servlet/servlet.WebToLead?encoding=UTF-8’
  • FormID: ‘ABC123’
  • Phone Number: ‘phone’
  • Campaign ID : ‘Campaign_ID’
  • Question 1 : ‘Question1’
  • Question 2 : ‘Question2’
  • Question 3 : ‘Question3’
  • Question 4 : ‘Question4’

This is the data we need to plug into our SMS cookie script.

At the end of the Twilio SMS conversation, the script will bundle up the details of the conversation and HTTPS POST to the salesforce URL.

Using Twilio cookies to mange the SMS Conversation

In the last post: http://www.mathewjenkinson.co.uk/twilio-sms-conversations-using-cookies/ I used HTTP Cookies to ask multiple questions to a handset. Now we are going to do the same thing, except at the end of this conversation we are going to post the data to Salesforce. You can find a copy of the script on my Github Twilio 2 SalesforceLeads.

The full script Im going to use is:

<?php
// Load the questions we want:
$question1 = ‘Hello. Welcome to the event! We would like to ask you some questions about your experience.</Message><Message>What did you think of the venue & refreshments? 5 (Exceptional) 0 (Poor)’; // by adding the </Message><Message> you can break up the initial response into a welcome message and then question1.
$question2 = ‘And the content of the Presentations? 5 (Exceptional) 0 (Poor)’;
$question3 = ‘How likely are you to attend future Twilio events from 5 (Definitely would) to 0 (definitely would not)’;
$question4 = ‘Is there anything specific you would like to discuss with Twilio? 5 (Yes, please asks someone to call) 0 (I’ll contact you if I need anything)’;
// After we have all 4 questions we can upload to the DB and thank the user for their input
$endStatement = ‘Thanks for your time. Hope you have a fun day!’;

// If we have no cookies we need to set all the cookies to nil and ask the opening question.
if(!isset($_COOKIE[‘question1’])) {
$TwiMLResponse = $question1;
//setcookie(‘question1’, ‘nil’);
setcookie(‘event’, $_POST[‘Body’]);
setcookie(‘question1’, ‘nil’);
setcookie(‘question2’, ‘nil’);
setcookie(‘question3’, ‘nil’);
setcookie(‘question4’, ‘nil’);
}
// If Question 1 is blank we can pair the answer to question 1
elseif ($_COOKIE[‘question1’] == ‘nil’) {
setcookie(‘question1’, $_POST[‘Body’]);
$TwiMLResponse = $question2;
}
// If Question 1 is not blank we find out if question 2 is blank and move up the ladder
elseif (($_COOKIE[‘question2’] == ‘nil’)) {
setcookie(‘question2’, $_POST[‘Body’]);
$TwiMLResponse = $question3;
}
elseif (($_COOKIE[‘question3’] == ‘nil’)) {
setcookie(‘question3’, $_POST[‘Body’]);
$TwiMLResponse = $question4;
}
// After we get the response for question 4, we can assign it to the question.
// Now we have all 4 questions answered and can pass the thank you note and also make a HTTP POST to our end point
elseif (($_COOKIE[‘question4’] == ‘nil’)) {
// With the last question answered, we can reply with our end statement and POST all the data from the conversation.
$TwiMLResponse = $endStatement;
// So now we have the cookies for the event and questions 1 to 3 and the BODY tag for answer 4. Now we can make a POST request to our form with that data.

// Get cURL resource
$curl = curl_init();
// Set some options – we are passing in a useragent too here
curl_setopt_array($curl, array(
CURLOPT_RETURNTRANSFER => 1,
CURLOPT_URL => ‘https://www.salesforce.com/servlet/servlet.WebToLead?encoding=UTF-8’,
CURLOPT_USERAGENT => ‘TwilioSMS’,
CURLOPT_POST => 1,
// POST fields for salesforce input:
CURLOPT_POSTFIELDS => array(‘oid’ => ‘ABC123’, ‘phone’ => $_POST[‘From’], ‘Campaign_ID’ => $_COOKIE[‘event’], ‘Question1’ => $_COOKIE[‘question1’], ‘Question2’ => $_COOKIE[‘question2’], ‘Question3’ => $_COOKIE[‘question3’], ‘Question4’ => $_POST[‘Body’])

));
// Send the request & save response to $resp
$resp = curl_exec($curl);
// Close request to clear up some resources
curl_close($curl);
}
header(‘content-type: text/xml’);
?>
<Response><Message><?php echo $TwiMLResponse; ?></Message></Response>

As you can see Im only use one script to manage the conversation, updating the cookies and working out where the data needs to be updated to and eventually POSTed too. As we are capturing questions about our SalesForceEU event Im going to need 4 questions:

$question1 = ‘Hello. Welcome to the event! We would like to ask you some questions about your experience.</Message><Message>What did you think of the venue & refreshments? 5 (Exceptional) 0 (Poor)’; // by adding the </Message><Message> you can break up the initial response into a welcome message and then question1.
$question2 = ‘And the content of the Presentations? 5 (Exceptional) 0 (Poor)’;
$question3 = ‘How likely are you to attend future Twilio events from 5 (Definitely would) to 0 (definitely would not)’;
$question4 = ‘Is there anything specific you would like to discuss with Twilio? 5 (Yes, please asks someone to call) 0 (I’ll contact you if I need anything)’;

As the script gets more replies from Twilio it populates the questions cookies until they are all full of data. Then we thank the user for their time, assemble the POST request and send it off to SalesForce.

CURLOPT_RETURNTRANSFER => 1,
CURLOPT_URL => ‘https://www.salesforce.com/servlet/servlet.WebToLead?encoding=UTF-8’,
CURLOPT_USERAGENT => ‘TwilioSMS’,
CURLOPT_POST => 1,
// POST fields for salesforce input:
CURLOPT_POSTFIELDS => array(‘oid’ => ‘ABC123’, ‘phone’ => $_POST[‘From’], ‘Campaign_ID’ => $_COOKIE[‘event’], ‘Question1’ => $_COOKIE[‘question1’], ‘Question2’ => $_COOKIE[‘question2’], ‘Question3’ => $_COOKIE[‘question3’], ‘Question4’ => $_POST[‘Body’])

If we run a test between my phone and Salesforce we get:

Twilio2SalesForceSMS

Twilio2SalesForceSMS


and in SalesForce:

SalesForce Leed Capture from SMS

SalesForce Leed Capture from SMS


As you can see this opens up lots of possibilities of lead capture and accurate number sourcing from events. You can even have a campaign manager back at HQ reaching back out to leads while they are still at the event.


When I talk to people about using Twilio (Twilio.com) SMS to engage with their customers I get a lot of push back on the technical side of how to manage a two way conversation.

If you think back to the old days before iPhones and threaded messages. We had whats now called ‘Nokia’ style messages. This is just a continuous list of messages that arrive into your mailbox, messages between two handsets were not threaded or connected in anyway. Twilio operates in the same fashion, a message out to a handset is not connected to a message in from a handset, there is no ID that links them and no function to make parent child relationships.

Step in Twilio Cookies. In the internet world you can use cookies to track a clients events and navigation throughout your website, you can use it to log if a customer viewed a product or read an article and then clicked on a related one. A visual example :

Cookies Example

Cookies Example (Taken from Twilio.com)

Using Cookies with Twilio we can imitate a conversation with the handset / end user, collecting data along the way and at the end of the conversation we can do something meaningful with the information – such as POST the data to a database or store in a file somewhere.

Why would conversations / cookies be handy to use with Twilio? Well, imagine your hosting an event and you want to get feedback from your guests, you can pass your guests a Twilio powered phone number which when they message will initiate a conversation with them.  At the end of the conversation we will have meaningful answers about the event, not to mention the guests phone number so we can follow up with that all important sales call!


The example Im using here is a single page PHP powered script that when your guests message will ask them favourite colour, meal, drink and if they want to go to the movies next week. We will then take this data and make a HTTP POST request to any server with the data. You can use Google Forms here to capture all your responses by amending the URL and POST ID’s. See: https://www.twilio.com/blog/2012/11/connecting-twilio-sms-to-a-google-spreadsheet.html as an example here.

If you just want the code its hosted at: TwilioSMSConversationCookies/TwilioSMSConversation.php

Below is a break down of the script:

These are the questions we want to ask when the user sends us a message:

// Load the questions we want:
$question1 = ‘Hello. What is your favourite colour’;
$question2 = ‘Thanks! Whats your favourite meal’;
$question3 = ‘Tasty! What about to Drink?’;
$question4 = ‘Delish! Do you want to go to the movies next week?’;

At the end of our conversation we want to thank the user so they know that no more questions are coming, and its polite!

// After we have all 4 questions we can upload to the DB and thank the user for their input
$endStatement = ‘Thanks for your time. Hope you have a fun day!’;

We are going to use cookies to track the conversation, I find that its better to pass all the cookies info we want with nil values and add data to these values as the conversation goes rather than adding them as we go. This way we can logically track the conversation.

if(!isset($_COOKIE[‘question1’])) {
$TwiMLResponse = $question1;
//setcookie(‘question1’, ‘nil’);
setcookie(‘event’, $_POST[‘Body’]);
setcookie(‘question1’, ‘nil’);
setcookie(‘question2’, ‘nil’);
setcookie(‘question3’, ‘nil’);
setcookie(‘question4’, ‘nil’);
}

As this conversation is kicked off by the user and not by us, we set all the question cookies to nil, load the first question into $TwiMLResponse and set the event cookie to be the current data in the original message. So for example if our event was called ‘Mats BBQ’ and I asked all my users to send the opening message as ‘Mats BBQ’ the event cookie would be ‘Mats BBQ’.

Because no question has been asked yet, all our cookie values are blank and we can ask our questions:

// If Question 1 is blank we can pair the answer to question 1
elseif ($_COOKIE[‘question1’] == ‘nil’) {
setcookie(‘question1’, $_POST[‘Body’]);
$TwiMLResponse = $question2;
}
// If Question 1 is not blank we find out if question 2 is blank and move up the ladder
elseif (($_COOKIE[‘question2’] == ‘nil’)) {
setcookie(‘question2’, $_POST[‘Body’]);
$TwiMLResponse = $question3;
}
elseif (($_COOKIE[‘question3’] == ‘nil’)) {
setcookie(‘question3’, $_POST[‘Body’]);
$TwiMLResponse = $question4;
}

Questions 1 to 3 are the same, its a case of moving through the questions, assigning the ‘Body’ value to the last question asked. When we get to the answer for Question 4 we have all our answers, so no need to set any more cookies.

Now we can take all our data, wrap it up into an array and make a HTTP POST request with this data:

// After we get the response for question 4, we can assign it to the question.
// Now we have all 4 questions answered and can pass the thank you note and also make a HTTP POST to our end point
elseif (($_COOKIE[‘question4’] == ‘nil’)) {
// With the last question answered, we can reply with our end statement and POST all the data from the conversation.
$TwiMLResponse = $endStatement;
// So now we have the cookies for the event and questions 1 to 3 and the BODY tag for answer 4. Now we can make a POST request to our form with that data.

// Get cURL resource
$curl = curl_init();
// Set some options – we are passing in a useragent too here
curl_setopt_array($curl, array(
CURLOPT_RETURNTRANSFER => 1,
CURLOPT_URL => ‘HTTP://YOUR.Domain.TLD/POST’,
CURLOPT_USERAGENT => ‘TwilioSMS’,
CURLOPT_POST => 1,
CURLOPT_POSTFIELDS => array(‘From’ => $_POST[‘From’], ‘Event’ => $_COOKIE[‘event’], ‘Question1’ => $_COOKIE[‘question1’], ‘Question2’ => $_COOKIE[‘question2’], ‘Question3’ => $_COOKIE[‘question3’], ‘Question4’ => $_POST[‘Body’])
));
// Send the request & save response to $resp
$resp = curl_exec($curl);
// Close request to clear up some resources
curl_close($curl);
}

I’ve removed my POST URL and ID’s to forms so you can see what question tally’s to what data and it should be easy enough to input your own details.

At then end of the php processing loop we need to pass all the information needed by Twilio:

header(‘content-type: text/xml’);
?>
<Response><Sms><?php echo $TwiMLResponse; ?></Sms></Response>

TwiML needs to pass strict XML  to operate so we set the header as XML file and then use the variable $TwiMLResponse to manage what we actually say back to our users.

I hope this helps your events get more data and keep your customers more engaged with your brand.

One of the coolest things about having your own phone number with Twilio (Twilio.com). Is that you can do some very nifty things with it.

For example, if you need a conference room setup with a text message you can forward to your friends, you can configure this in a PHP script quite easily, we can even get the script to respond to your request with details about the number to ring and the pin code.

If you haven’t already done so, head over to Twilio (Twilio.com) an sign up at: Try-Twilio This will provision you a Twilio number that you can call into and interact with.

Once we have a number lets build a script that can respond to our SMS message, generate the conference room pin and then respond back with the details of our conference room.

<?php

// Incoming Voice number thats paired with this setup – used for voice Conferences etc.
$voiceNumber = “+1…”;

// Get the Variables from the HTTP POST, We want to know the BODY and the FROM so we can authorise and action the request.

$fromPhoneNumber = $_POST[“From”];
$messageBody = $_POST[“Body”];

// Check the phone number is on our authorised list if so action the SMS request.

// As this grows I want to put the numbers into an authorised DB and make a DB request regarding this.
// As this minute we are just going to look up against authorised number just in the IF field.

if ($fromPhoneNumber == “+1…” or “+44…”) // This is the list of authorised numbers that can make conf rooms.

{

// If the number is authorised then we are going to look at the body for what we need to make / do.

if ($messageBody == “Conference” or “Conf”)
{
// If the body is Conference we want to generate a 4 digit pin number and then generate a SMS message that can be
// forwarded out to the participants.

// The idea is that this script will reply with
// “A Conference has been setup, please call XYZ Number press option X and enter pin abcd”

$confPin = rand(1000, 9999); // Generate a random pin number
$TwiMLResponse = “<Message>Conference Room Details:\r\nPhone Number: ” . $voiceNumber . “\r\nConference Pin: ” . $confPin. “</Message>”;
}
else // Catch all for whats left.
{
$TwiMLResponse = “<Message>Sorry, Me No understand. Try Again.</Message>”;
}
}
else
{
$TwiMLResponse = “<Message>Sorry, Your not authorised for this.</Message>”;
}

header(“content-type: text/xml”);
?>

<Response><?php echo $TwiMLResponse; ?></Response>

This script will check that the inbound number is able make conference room pin numbers and if so will generate a 4 digit pin that will then be distributed back to the user.

Now when we text our number the body “Conference” or “Conf” from an authorised phone it will generate a pin number and respond back with details of the conference room in a SMS message:


Conf Details

Conference Room Details


You can then copy and paste this SMS message into a group SMS or Whatsapp and allow people to call into the conference room.

Now we have the SMS part setup we need to build a script that can welcome the caller, get the pin number and then route them to the correct conference based on that response.

<?php

// Check to see if a Conf Pin has been inputted. If so, make a Conf room with that pin.
$confPin = $_GET[“Digits”];

// If no conf Pin ask the caller to enter a Conf pin or else hangup.
if (isset($confPin)){
$TwiMLResponse = “<Say voice=\”alice\”>Placing You into Conference Now.</Say><Dial><Conference>”. $confPin .”</Conference></Dial>”;
}
else
{
$TwiMLResponse = “<Gather method=\”GET\” timeout=\”25\” numDigits=\”4\”><Say voice=\”alice\”>Hello and welcome to the conference line. Please enter the Conference Pin.</Say></Gather><Say>I’m Sorry I didnt catch that</Say>”;

}

header(“content-type: text/xml”);
?>

<Response><?php echo $TwiMLResponse; ?></Response>


Here in this script we are checking to see if the GET method has been passed with any digits, indicating that the caller has already been greeted and input a conference pin. If we have a conference pin then we can use the digits to put his caller into that conference room.


This is a very simple conference line setup tool, and it will need some further modifying to make it secure. For example right now any 4 digit numbers will create a conference room. You may wish to modify the code so that only generated pin numbers can be used and those numbers cannot be reused – entirely up to you.


Following on my expansion into telephony posts (See a previous one, on making FreePBX work with Twilio). A lot of people have been asking me to provide more information on how to make your phone say things or play and MP3 file.  In particular while in a conference room…

Lets break this down into two parts; Making ‘Say or Play Bots’ and then adding our ‘Say or Play Bot’ to a conference and doing something.

Making a ‘Say or Play Bot’

Using Twilio there are lots of ways to make an automated voice say something to a caller / listener;

Twimlet Message (https://www.twilio.com/labs/twimlets/message) Static Message or MP3 file
TwimelBin (http://twimlbin.com) Static Message
Static XML hosted on your webserver Static Message
Dynamic web script that generates custom Say XML hosted on your webserver Dynamic Message
Dynamic web script that plays a custom message pending some criteria Dynamic Message

Twimlet Message:

In this example we are going to use a Twimlet message to say “Hi, This is you’re 9 AM Meeting Reminder, The current time is 8.55 AM. You have a meeting with Bob in 5 minutes.”

The message could be anything, in this case I’ve choose to use a meeting reminder message. If you follow the URL: https://www.twilio.com/labs/twimlets/message You can input your message into the Twimlet generator and it will spit out the URL you need to use with Twilio to get your message spoken:

http://twimlets.com/message?Message%5B0%5D=Hi%2C%20This%20is%20you’re%209%20AM%20Meeting%20Reminder%2C%20The%20current%20time%20is%208.55%20AM.%20You%20have%20a%20meeting%20with%20Bob%20in%205%20minutes.&

As you can see our message has now been encoded into a URL form, the spaces between words have been filled in with %20 if we were to buy a phone number now and use this in the Voice URL we would hear this message.

Twimelbin:

Twimelbin is an external tool that you can use to test writing your TwiML (XML) writing skills.  It will validate your TwiML and ensure that the syntax is correct, you can then use the URL link provided to reference this TwiML in your Twilio account.  In this example I’m going to copy and paste my TwiML here so you can see what the structure looks like:

<?xml version=”1.0″ encoding=”UTF-8″?>
<Response>
<Say>Hi Caller.</Say>
<Say>I’m just in the shower at the moment</Say>
<Say>Please let me wash my hair in peace and I will call you back later today</Say>
<Say>Thanks!</Say>
</Response>

Here you can see I have linked lots of ‘Say’ commands together in one response. We could if we wanted to be annoying (if!) get each command to be spoken in a different voice or even language (https://www.twilio.com/docs/api/twiml/say) but ill skip that for now.

When your finished composing your Twimelbin entry you take the URL at the top of the page and use this to look up your TwiML in your phone number URL.

Static XML hosted on your own machine:

Static XML and a Twimelbin response are exactly the same, the only difference that one is hosted on your platform and one is hosted by Twimelbin. There are benefits to both; I won’t go into the merits of self hosting vs a 3rd party for any kind of HTTP activity here.

Dynamically generated TwiML response: 

This is where is gets fun! With a dynamic script we can make our message be customised to the caller, the time of day, the weather or any other factor we want! Lets say for example that we have two callers; Mathew and Steve. Mathew’s number is +44123456 and Steve’s is: +44987654 as we are generating this response on demand we can input these names into the <Say> response and give the caller a more personal response.

In this example I’m using PHP, but you could easily use another web language.

<?php

$people = array(
“+44123456″=>”Mathew”,”+44987654″=>”Steve”);

// if the caller is known, then greet them by name
if(!$name = $people[$_REQUEST[‘From’]]) $name = “Caller”;

// now greet the caller
header(“content-type: text/xml”);
echo “<?xml version=\”1.0\” encoding=\”UTF-8\”?>\n”;
?>
<Response>
<Say>Hello <?php echo $name ?>.</Say>
</Response>

In this example, I made an array of data – mine and Steve’s number and then used the array to look up the name, if either Steve or I called the Twilio number from those numbers it would say Hi ‘Steve / Mathew’ if none of the numbers were recognised the caller would be just greater as just a ‘Hello Caller’

You can use the same kind of dynamic scripting language to play specific files, this could be to either specific times of the day, caller ID’s or special events.

I won’t go into the code here but the basic set up is:

IF event is true

Do this

Else (if not true)

Do this

So for example:

If time = before 12

Play the morning MP3 file

Else (If not true)

Play the Afternoon MP3 file

an example of this in PHP would be:

<?php

if (date(‘H’) < 12) {
$mp3_file=”http://domain.com/morning_mp3.mp3″;
}
else
{
$mp3_file =”http://domain.com/afternoon_mp3.mp3″;
}

// Play the AM / PM file to the caller
header(“content-type: text/xml”);
echo “<?xml version=\”1.0\” encoding=\”UTF-8\”?>\n”;
?>
<Response>
<Play><?php echo $mp3_file; ?></Play>
</Response>

When this script is called it will check the time, if the clock is before 12 it will fetch the morning MP3 file and if its in the afternoon  it will fetch the afternoon mp3 file. You could go one step further and make an evening file. But for this setup lets assume an morning and afternoon setup 🙂

So whats a bot?

In simple terms a bot is a program / application that just does one thing. In the use case here you could have a phone bot that people could ring and it would recite company open hours.

Example:

http://twimlets.com/message?Message%5B0%5D=Hello%20and%20welcome%20to%20Mathew’s%20super%20store.%20Our%20open%20hours%20are%208%20AM%20to%207%20PM%20Monday%20to%20Friday.%20&Message%5B1%5D=We%20are%20open%20Saturdays%2C%20from%2010%20AM%20to%203%20PM.%20We%20are%20not%20open%20Sundays&Message%5B2%5D=Have%20a%20nice%20day.&


This Twimlet just informs the callers of the times, Mathew’s superstore will be open.


In recent years, the need for physical internet security has grown, with websites being comprised constantly, we need a way to identify the real you from the internet you..

Enter the world of Two Factor Authentication. This pairs something you have, and something you know.. in our case, a mobile phone and a password.

Imagine signing into a website, after you put your username and password in the website sends you a SMS message or a quick voice call to actually make sure its you.

Using Twilio as the SMS / voice gateway this is possible and really easy to implement, particularly into a PHP server.

You will need:

  1. A Twilio Account – with Twilio Phone number
  2. A PHP webserver
  3. A copy of the TwoFactor Auth script found at: https://github.com/dotmat/TwilioTwoFactorAuth

If you haven’t already, please sign up for a trial account at Twilio : https://www.twilio.com/try-twilio

Once you have signed up you will need to edit the file: TwoFactorAuthProcessor.php placing your AccountSID, Auth Key and Twilio phone number in the top part of the file.

I have included in the git a quick index page that you can fill in, the page will make a HTTP POST to the processor and generate a two-factor passcode which it will either call or SMS to your phone.

Using Two-Factor authentication on your website will make your service more secure and provide peace of mind to your customers / users that even with a security breach, your users remain safe and malicious users are not able to gain access to your platform as they do not have the end users phone – something needed to pickup the two factor key.


So more recently I have been playing around with cloud technologies, namely building a cloud based hosting platform to replace an ageing home-based server solution. Don’t get me wrong my little Mac Mini server has been phenomenal, but the more recent releases of Mac OS X Server have left me wanting a bit more control and a bit less hardware.

Enter Digital Ocean (shameless referral plug: https://www.digitalocean.com/?refcode=8dc34df963c1 ) who allow you to build a very quick virtual machine capable of handling mail, HTTP and other web service based systems (that I have now retired and / or moved to the cloud).

One of the more recent projects I have wanted to build is a private branch exchange (PBX (Phone network)) so that I can adopt a singular 1 number per country approach, i.e. have a US based number that people can call and SMS, a UK based number that people can call and SMS, etc. This would save giving people a whole lot of different numbers – when Im in the UK ring a local uk number when I’m in the US ring a local us number..

Following lots of sniffing around for how to install PBX software onto a hosted platform I stumbled across this document: https://www.digitalocean.com/community/articles/how-to-install-freepbx-on-centos-6-4

I’m not going to copy and paste the guide word for word as its fairly self explanatory. If you have any problems following the guide, check out the comments at the bottom of the page as they helped.

From here we need to configure three things; Trunks (Calling in and Out), Extensions (Phones to answer the calls) and Routing (What calls go where based on logic).

First lets get extensions setup, its the quickest way to test your PBX is working correctly.

Navigate to your server and login to the FreePBX login it should be something like: YOURDOMAIN.com/admin/config.php

From here you want ‘Applications’ drop down menu and then ‘Extensions’

We are going to add 2 SIP based devices so select the option for ‘Generic SIP Device’ and then click submit.

As this is a private PBX I don’t foresee needing a lot of numbers, however a good organisational setup is still good idea. – Don’t go charging ahead into making your first extension ‘1’ and your second extension ‘2’.

I use the two hundred block for all my extensions, IE the first extension is 201 and the second extension is 202. As I need to add more extensions to the PBX they will become 203, 204, 205, etc.

The three main values we need to set here, are the user extension, Display Name and secret (password).  If you follow my convention you should setup ‘201’, ‘Mathew’ and ‘mysupersecretpassword’. Once you have setup your first user, do the same again so you have a second user (appending the next extension, username and password).  – Now we can test our PBX. If you have an iPhone – I recommend downloading any of the open VOIP Clients, my fav is ‘LinPhone‘. Its simple, easy to use and you can turn on the debugger if you need to.

If you have more than 1 phone you can download Linphone to that as well (Or another VOIP client) and try to ring each other. Or if you have 1 phone and your computer look at downloading x-lite (X-Lite)

To ring another IP phone on your PBX just punch in the extension number, 202 to ring the second phone from the first and 201 to ring the first phone from the second.

Once you have established that your phones are working we can begin to get calls into the PBX from the outside world.

Inbound Calling

First we need to organise inbound calling from Twilio.

Head over to Twilio.com and sign up for a trial account, you will need an email address and a mobile / cell phone to validate yourself against. Once you signed up you will need to provision a telephone number, you can do this in your account at: https://www.twilio.com/user/account/phone-numbers/available/local

Next we need to configure what we want to happen with that number when someone calls it, as Twilio uses TWiML (an extremely well documented type of XML) we can set Twillio to make a sip call to our PBX and connect the call over. On a hosted platform place a new xml document. Something like: www.yourdomain.com/twilio.xml

Our XML needs to look like this:

<?xml version=”1.0″ encoding=”UTF-8″?>
<Response>
<Dial>
<Sip>sip:[email protected]</Sip>
</Dial>
</Response>

We can also use a Twimlet to perform the same thing (except it doesn’t look as nice as the above XML:

http://twimlets.com/echo?Twiml=%3C%3Fxml%20version%3D%221.0%22%20encoding%3D%22UTF-8%22%3F%3E%3CResponse%3E%3CDial%3E%3CSip%3Esip%3A201%40YourDomain.com%3C%2FSip%3E%3C%2FDial%3E%3C%2FResponse%3E&

As you can see, the XML very easy to read, should anyone now dial our newly provisioned number, Twilio will transfer the call to our 201 extension on the PBX. (Almost – we have a bit more setup to do first!).

Login to your PBX via a root terminal and navigate to /etc/asterisk/ by typing

cd /etc/asterisk/

Here we need to edit the sip.conf by typing:

nano -w sip.conf

Here we are going to add all the known IP addresses of Twilio so that when one of the gateways makes a request to our PBX the PBX will answer the call and route it accordingly.

The SIP document held at: https://www.twilio.com/docs/sip contains the list of IP addresses used by Twilio for connections via SIP. To add them to sip.conf we need to add the following to the document:

[twiliocaller](!)
context = fromtwilio
type = peer
qualify=no
allowguest=yes

[twilioip-1](twiliocaller)
host=107.21.222.153

[twilioip-2](twiliocaller)
host=107.21.211.20

[twilioip-3](twiliocaller)
host=107.21.231.147

[twilioip-4](twiliocaller)
host=54.236.81.101

[twilioip-5](twiliocaller)
host=54.236.96.128

[twilioip-6](twiliocaller)
host=54.236.97.29

[twilioip-7](twiliocaller)
host=54.236.97.135

[twilioip-8](twiliocaller)
host=54.232.85.81

[twilioip-9](twiliocaller)
host=54.232.85.82

[twilioip-10](twiliocaller)
host=54.232.85.84

[twilioip-11](twiliocaller)
host=54.232.85.85

[twilioip-12](twiliocaller)
host=54.228.219.168

[twilioip-13](twiliocaller)
host=54.228.233.229

[twilioip-14](twiliocaller)
host=176.34.236.224

[twilioip-15](twiliocaller)
host=176.34.236.247

[twilioip-16](twiliocaller)
host=46.137.219.1

[twilioip-17](twiliocaller)
host=46.137.219.3

[twilioip-18](twiliocaller)
host=46.137.219.35

[twilioip-19](twiliocaller)
host=46.137.219.135

[twilioip-20](twiliocaller)
host=54.249.244.21

[twilioip-21](twiliocaller)
host=54.249.244.24

[twilioip-22](twiliocaller)
host=54.249.244.27

[twilioip-23](twiliocaller)
host=54.249.244.28


Save the file and now either reboot asterisk or the server. As the server takes seconds to reboot I tend to follow the save command with just

Sudo reboot

which reboots the whole thing, as this server is for my own use; I’m less worried about the number of users who I will be kicking off when I do this.

Once your back up and working again, if you navigate to: FreePBX system status, it should tell you that 20+ gateways are online. With your backup phone or laptop logged in as your SIP extension we set the look up (201 in the above case) you should be able to call your number and your VOIP phone should ring! (Take 5 mins to strut around the room looking proud and ring yourself a few times!)

Outbound Calling: 

Outbound calling allows you to make call from your VOIP client via your PBX to the real world using Twilio as the gateway. In short we are going to get Twilio to connect the VOIP client to the rest of the world using the callerID we already provisioned.

There is a lot of reference material regarding SIP on the SIP Twilio Page (https://www.twilio.com/docs/sip/sending-sip-how-it-works)

The basics of it include, we need to make a SIP endpoint on Twilio, then when your SIP route references this endpoint, Twilio will make a URL request back to your server to get TwiML to decide what to do with the call.

Head over to: https://www.twilio.com/user/account/sip/domains and click the button ‘Create SIP Domain’

We need to create a Twilio SIP domain, pick something nice and unique such as mypbxservername  – Twilio will append .sip.twilio.com onto this so you will end up with a complete string that looks like this: mypbxservername.sip.twilio.com

Next we need to give it a friendly name, this is just so you can remember what it’s called.

In voice URL, please fill in:

http://twimlets.com/message?Message%5B0%5D=Congratulations!%20You%20just%20made%20your%20first%20call%20with%20Twilio%20SIP.

This will give us a nice uncomplicated message, indicating our success from going from FreePBX to Twilio.

Next we need to generate a way to protect our SIP endpoint.  As Im using a static IP server I can add this to a white list. Click ‘CreateIP Access Control List’ and a new drop down will appear. Here we want to add the IP address of our server and then give it a friendly name.

Save all the changes and then save the domain to Twilio.

Move over to your FreePBX server and add a trunk in the usual fashion: Connectivity > Trunks. 

Here we need to make a new SIP Trunk; so click ‘Add SIP Trunk’

Call the Trunk something like ‘Twilio’ and then move down to the next trunk name (again, Twilio). In Peer details we need to add the three points:

type=peer
host=mypbxservername.sip.twilio.com
qualify=no

Then click submit changes – Ignore an errors you get.

Then we need to add in outbound route, setting it so that when we dial a number on our extensions, FreePBX knows to route the call to our Twilio Trunk.

So, lets add a outbound route; Connectivity > Outbound Routes.

Here, I have set the route name to be ‘Twilio’, now scroll down to ‘Dial Patterns that will use this Route’. We need to configure the PBX so that when we dial a certain prefix, FreePBX will pick up this prefix, remove the prefix and then hand the call over to Twilio to be dialled and connected.

The window is broken up into three boxes, ‘Prepend’, ‘Prefix’ and ‘Match Pattern’. We do not need to worry about ‘Prepend’ so the next bit we need to add a dial prefix so that the PBX knows we want to use this route. I have chosen the prefix of 71, so if I wanted to dial a phone number of 1 415123 1234 I would dial 7114151231234. Here FreePBX will pick up the 71, remove those digits from the string and then hand the 14151231234 to Twilio for dialling. The last part ‘match pattern’ is used to match we have the right numbers dialled. For example in the US, a long distance number would be 1-415-123-1234 so the match pattern would be 1XXXXXXXXXX as we only want +1 numbers to be routed this way. You could also narrow this down do only a certain area code could be called by doing this: 1901XXXXXXX – where 901 is the area code only accepted.

To dial the UK on this dial pattern you would need to setup: 44XXXXXXXXXX, again if you wanted to setup only landlines you could do: 441XXXXXXXXX and 442XXXXXXXXX which would limit numbers to only 441 and 442 (as in 44 1895 and 44 208).

You should now be able to dial a real number from your PBX extensions and you should hear ‘Congratulations, You just Made your first call with Twilio SIP’. PERFECT! This means that your FreePBX box was able to hand over a call to Twilio, and Twilio was able to execute the message we predefined earlier!

Now we need to modify our Twilio URL so that it points to a file we can use to dial our actual end point. On an internet facing server create a new file called asterisk.PHP

to which we need to add:

<?xml version=”1.0″ encoding=”UTF-8″?>
<Response>
<Dial callerId=”+YOURCALLERID”>
<Number><?php preg_match(‘/:([0-9]+)@/’, $_POST[‘To’], $matches); echo $matches[1]; ?></Number>
</Dial>
</Response>

You need to append YOURCALLERID with a caller ID from your account, either a verified number or one of your Twilio numbers. This will be the caller ID used when your PBX dials out via Twilio.

Now take the internet facing location of this file. I’m going to assume: http://domain.com/asterisk.php  – Just update the URL location that was Twimlets message of congratulations with your URL. This should now setup your PBX so that when it makes a request to Twilio, Twilio looks up the URL and injects the TO number into the TwiML, followed up by dialling that number.

Tada!! That should be it! You should now be able to dial your PSTN number and have it call your PBX extensions and you should now be able to dial out from your PBX to PSTN lines using Twilio!