This guide focus is on installing open-vm-tools on Ubuntu based OS’s.
During the downtime of Christmas 2020, I wanted take some time to focus on some new and exciting changes in the virtual hosting world.
Namely the adoption of VMWare’s ESXI port onto the ARM architecture and the now ability to install VMWare ESXI 7.0 onto a RaspberryPi!
I won’t go into all the details on this port, but the crucks of it are around power and flexibility. With the port to ARM based processors, you can run ESXI on some beast processors such as ‘Ampere Altra Q80-33 80-core Arm CPU‘ but also on a home lab using a RaspberryPi4 with 8GB of Ram.
There are a number of guides to help you get setup with ESXI on your RaspberryPi, my favorite being this YouTube video by NetworkChuck.
Once you have a working VM one of the next jobs to do is to install the VMware Tools that link the virtual machine to the ESXI Host.
Normally you would just run command
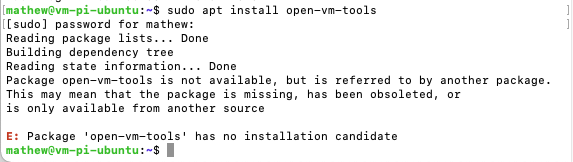
sudo apt-get install open-vm-tools
However if you have stumbled upon this page, it likely means you have ended up seeing error:
Reading package lists... Done

Building dependency tree

Reading state information... Done

Package open-vm-tools is not available, but is referred to by another package.

This may mean that the package is missing, has been obsoleted, or

is only available from another source
Which looks like this in a terminal window:
Wamp Wamp. After a long peruse of the worlds favorite search engine:
Google History
I found nothing that would help.
But! I did find the git repo to VM’s tools. GitHub VM Repo.
So here is the Jan 4th 2021 Guide to installing VMware Tools onto Ubuntu ARM OS’s that are hosted on a RaspberryPi ESXI Host.
- ssh into your virtual machine, if your setup is anything like mine it will be:
ssh [email protected]Once you provide a password and are at the terminal, issue the following command
sudo apt install -y git automake make gobjc++ libtool pkg-config libmspack-dev libglib2.0-dev libpam0g-dev libssl-dev libxml2-dev libxmlsec1-dev libx11-dev libxext-dev libxinerama-dev libxi-dev libxrender-dev libxrandr-dev libxtst-dev libgdk-pixbuf2.0-dev libgtk-3-dev libgtkmm-3.0-dev
This will install any needed toolchains and compilers.
Then if you aren’t already at your /home directory, run command
cd ~
This will take you home and give us a location to clone the VM tools directory to.
Now, lets grab the VM Tools from the above repo.
git clone https://github.com/vmware/open-vm-tools.git
Once downloaded, lets jump into the main directory and start to set things up.
cd open-vm-tools/open-vm-tools/
First thing we need to do is run the config on the dir, then issue the make and make install commands.
Its important to run these as either root or sudo, you can do this by either running command sudo su or adding sudo to each line.
sudo su
autoreconf -i
./configure --disable-dependency-tracking
make
make install
ldconfig
Next we need to make a vmtoolsd.service file, using your favorite text editor (Go Nano!) create a file called vmtoolsd.service in directory: /etc/systemd/system/
you will need to run this as a sudo or admin user: sudo nano /etc/systemd/system/vmtoolsd.service
In the file, copy and paste the following:
[Unit]
Description=Service for virtual machines hosted on VMware
Documentation=http://github.com/vmware/open-vm-tools
After=network-online.target[Service]
ExecStart=/usr/local/bin/vmtoolsd
Restart=always
TimeoutStopSec=5[Install]
WantedBy=multi-user.target
Save and exit the file and then issue the following commands:
sudo systemctl enable vmtoolsd.service
sudo systemctl start vmtoolsd.service
Boom! You can now verify that your VM has the tools installed by doing a quick command:
sudo systemctl status vmtoolsd.service
But you can now also go to the VM UI window and the ESXI host will tell you if the service is working and has connected successfully.
For those that just want a super fast and efficient copy and paste into your CLI, the following is what you need:
sudo apt install -y git automake make gobjc++ libtool pkg-config libmspack-dev libglib2.0-dev libpam0g-dev libssl-dev libxml2-dev libxmlsec1-dev libx11-dev libxext-dev libxinerama-dev libxi-dev libxrender-dev libxrandr-dev libxtst-dev libgdk-pixbuf2.0-dev libgtk-3-dev libgtkmm-3.0-dev && cd ~ && sudo git clone https://github.com/vmware/open-vm-tools.git && cd open-vm-tools/open-vm-tools/ && sudo autoreconf -i && sudo ./configure --disable-dependency-tracking && sudo make && sudo make install && sudo ldconfigthen:
sudo nano /etc/systemd/system/vmtoolsd.servicecopy and paste:
[Unit]
Description=Service for virtual machines hosted on VMware
Documentation=http://github.com/vmware/open-vm-tools
After=network-online.target[Service]
ExecStart=/usr/local/bin/vmtoolsd
Restart=always
TimeoutStopSec=5[Install]
WantedBy=multi-user.target
then:
sudo systemctl enable vmtoolsd.service && sudo systemctl start vmtoolsd.service